How to Fix Custom Resolution Utility Not Working? [Problems & Their Solutions]
Learning how to fix Custom Resolution Utility (CRU) not working, can save you time and improve your performance by 10x. There are many common concerns among users facing different problems with this tool that should be handled technically.
When using CRU to optimize display settings, several issues may arise related to GPU performance, such as memory clock speeds, vertical blanking, monitors going blank after increasing resolution, monitor speakers not working with increased resolution, or some monitors having trouble setting the new resolution.
Let’s find solutions for these common issues users face while using this tool. By applying these troubleshooting steps, you can customize the resolution without any glitches.
Fix the Black Screen Issue After Applying Settings in CRU
If your display goes completely black after applying a custom resolution or refresh rate in Custom Resolution Utility (CRU), it means the monitor cannot accept the signal. You can resolve this issue using one of the methods below.
Method 1: Immediate Recovery via F8 Key
If you recently ran restart.exe or restart64.exe inside CRU and the screen went black:
- Immediately press the F8 key.
- This triggers CRU’s built-in recovery mode, which temporarily unloads all EDID overrides without deleting your saved configurations.
- Your screen display should return shortly.
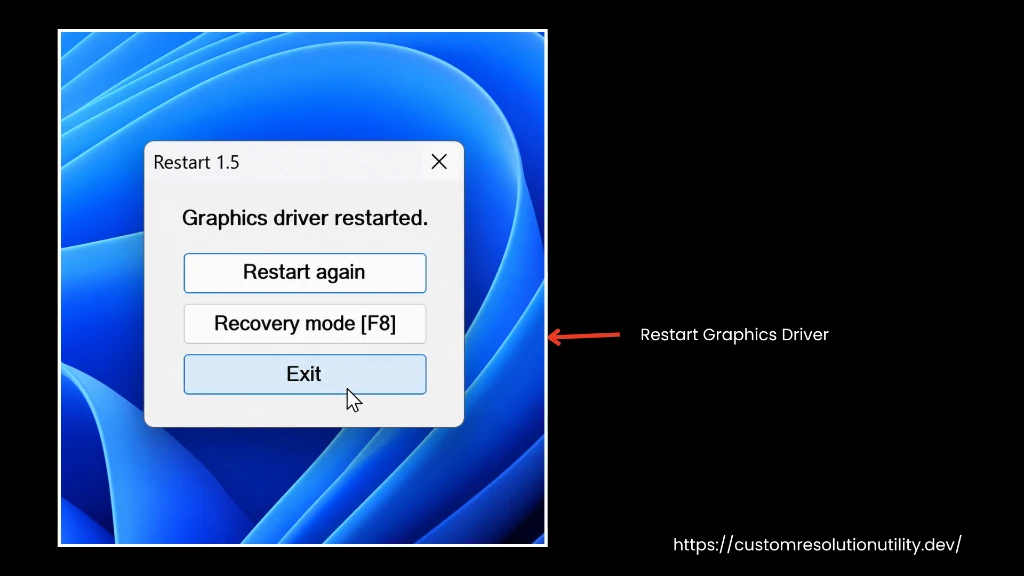
Method 2: Restart Graphics Driver
Try using Windows' native graphics driver reset shortcut:
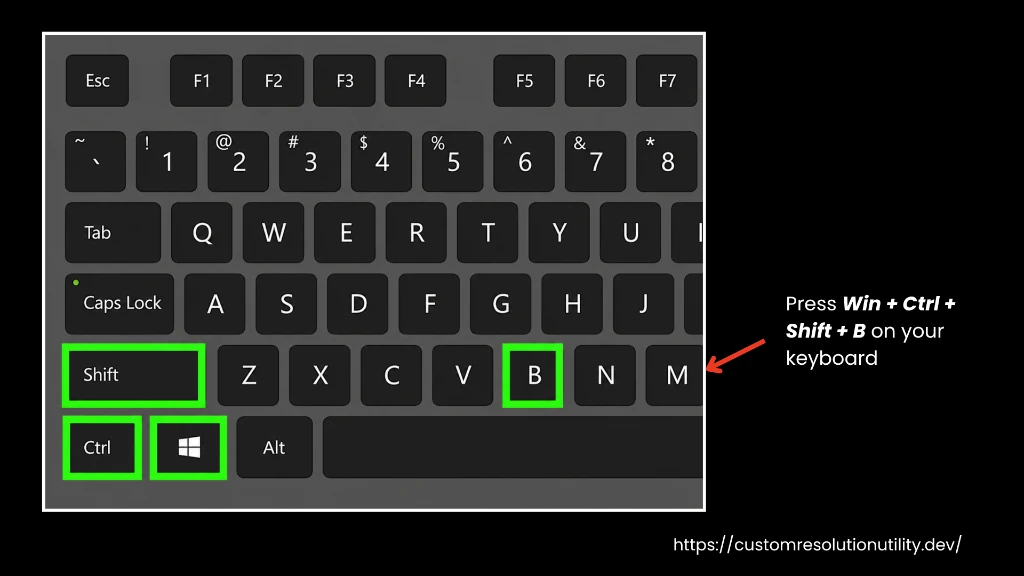
- Press Win + Ctrl + Shift + B on your keyboard.
- The screen will flicker, and you should hear a short beep indicating the display driver has restarted.
Method 3: Boot into Safe Mode & Run reset-all.exe
If the display remains black after rebooting, boot Windows into Safe Mode to reset CRU settings:
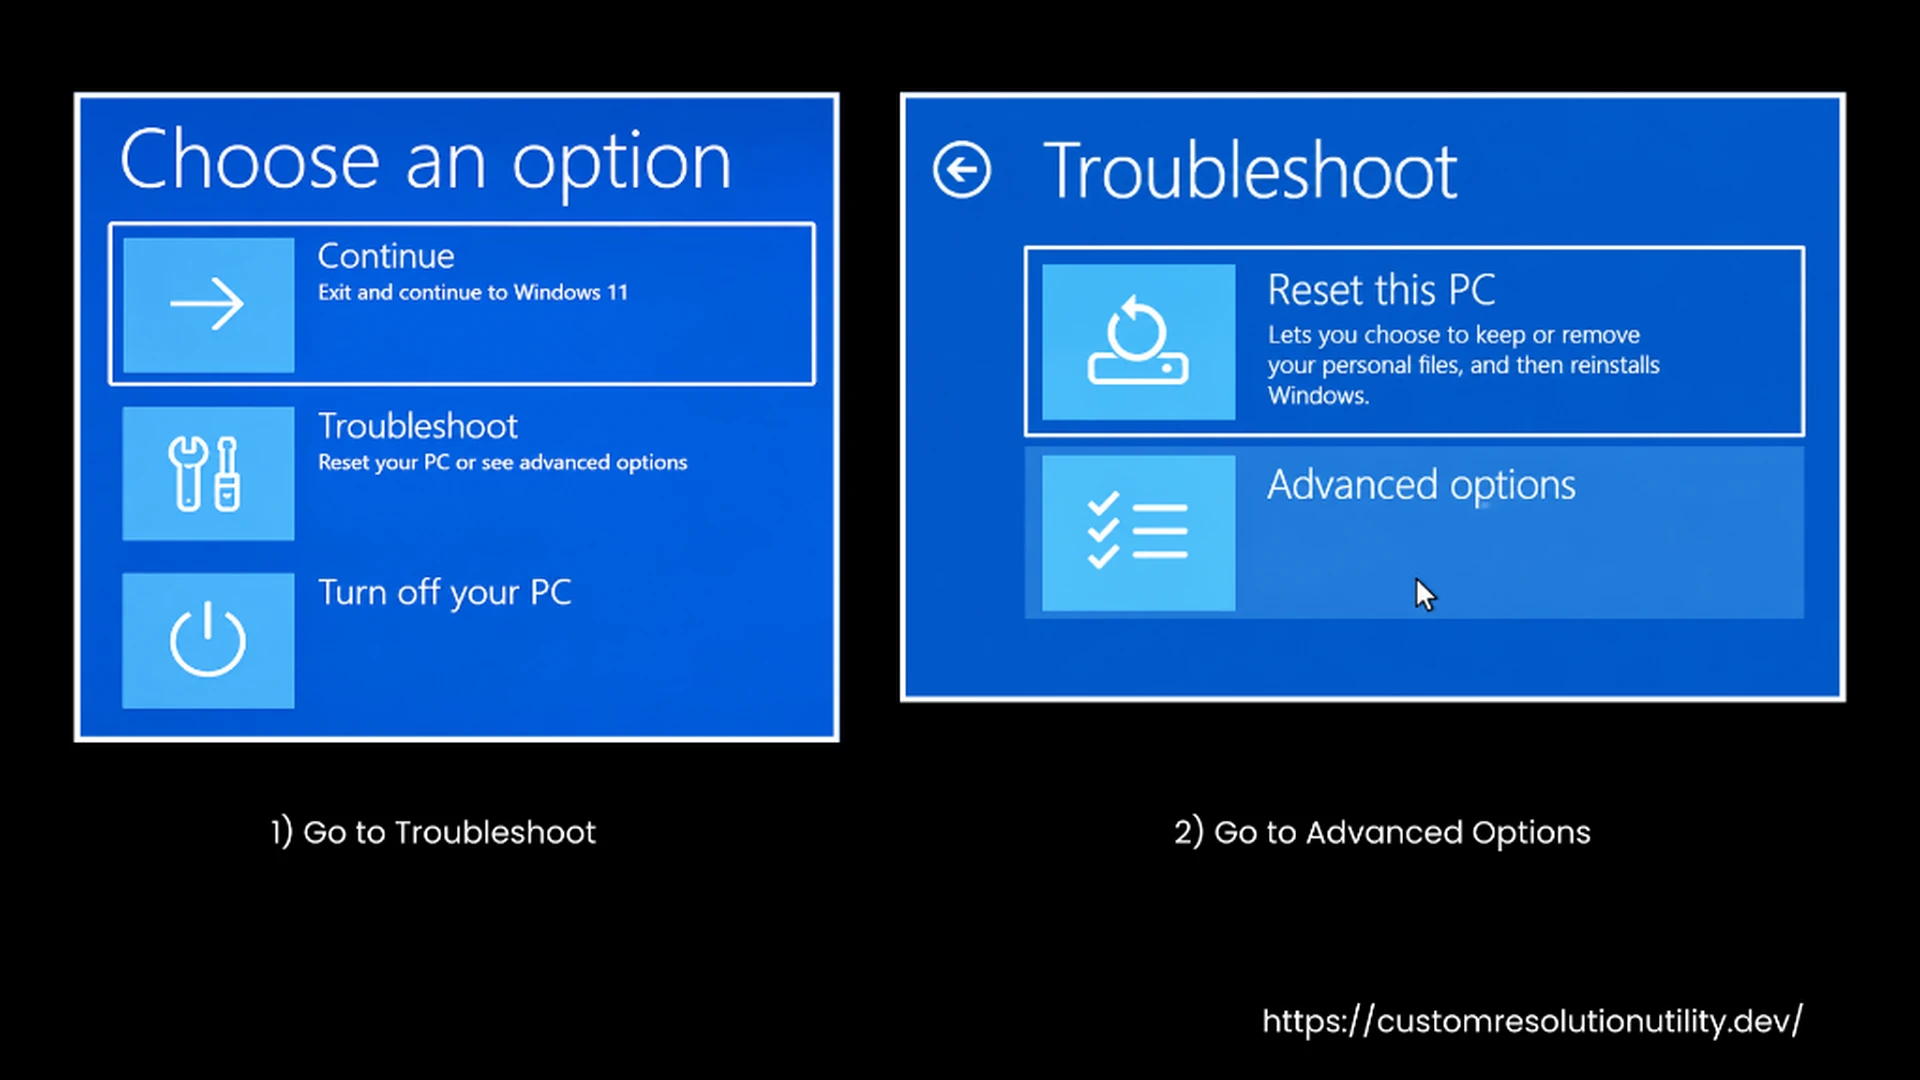
Enter Windows Recovery Environment (WinRE):
- Turn on your PC. As soon as the Windows logo appears, press and hold the power button for 5–10 seconds to force a shutdown.
- Repeat this process twice. On the third boot, Windows should launch Automatic Repair and take you to Advanced Options.
Boot into Safe Mode:
- Go to Troubleshoot > Advanced options > Startup Settings > Restart.
- After the PC reboots, press 4 or F4 to select Enable Safe Mode.
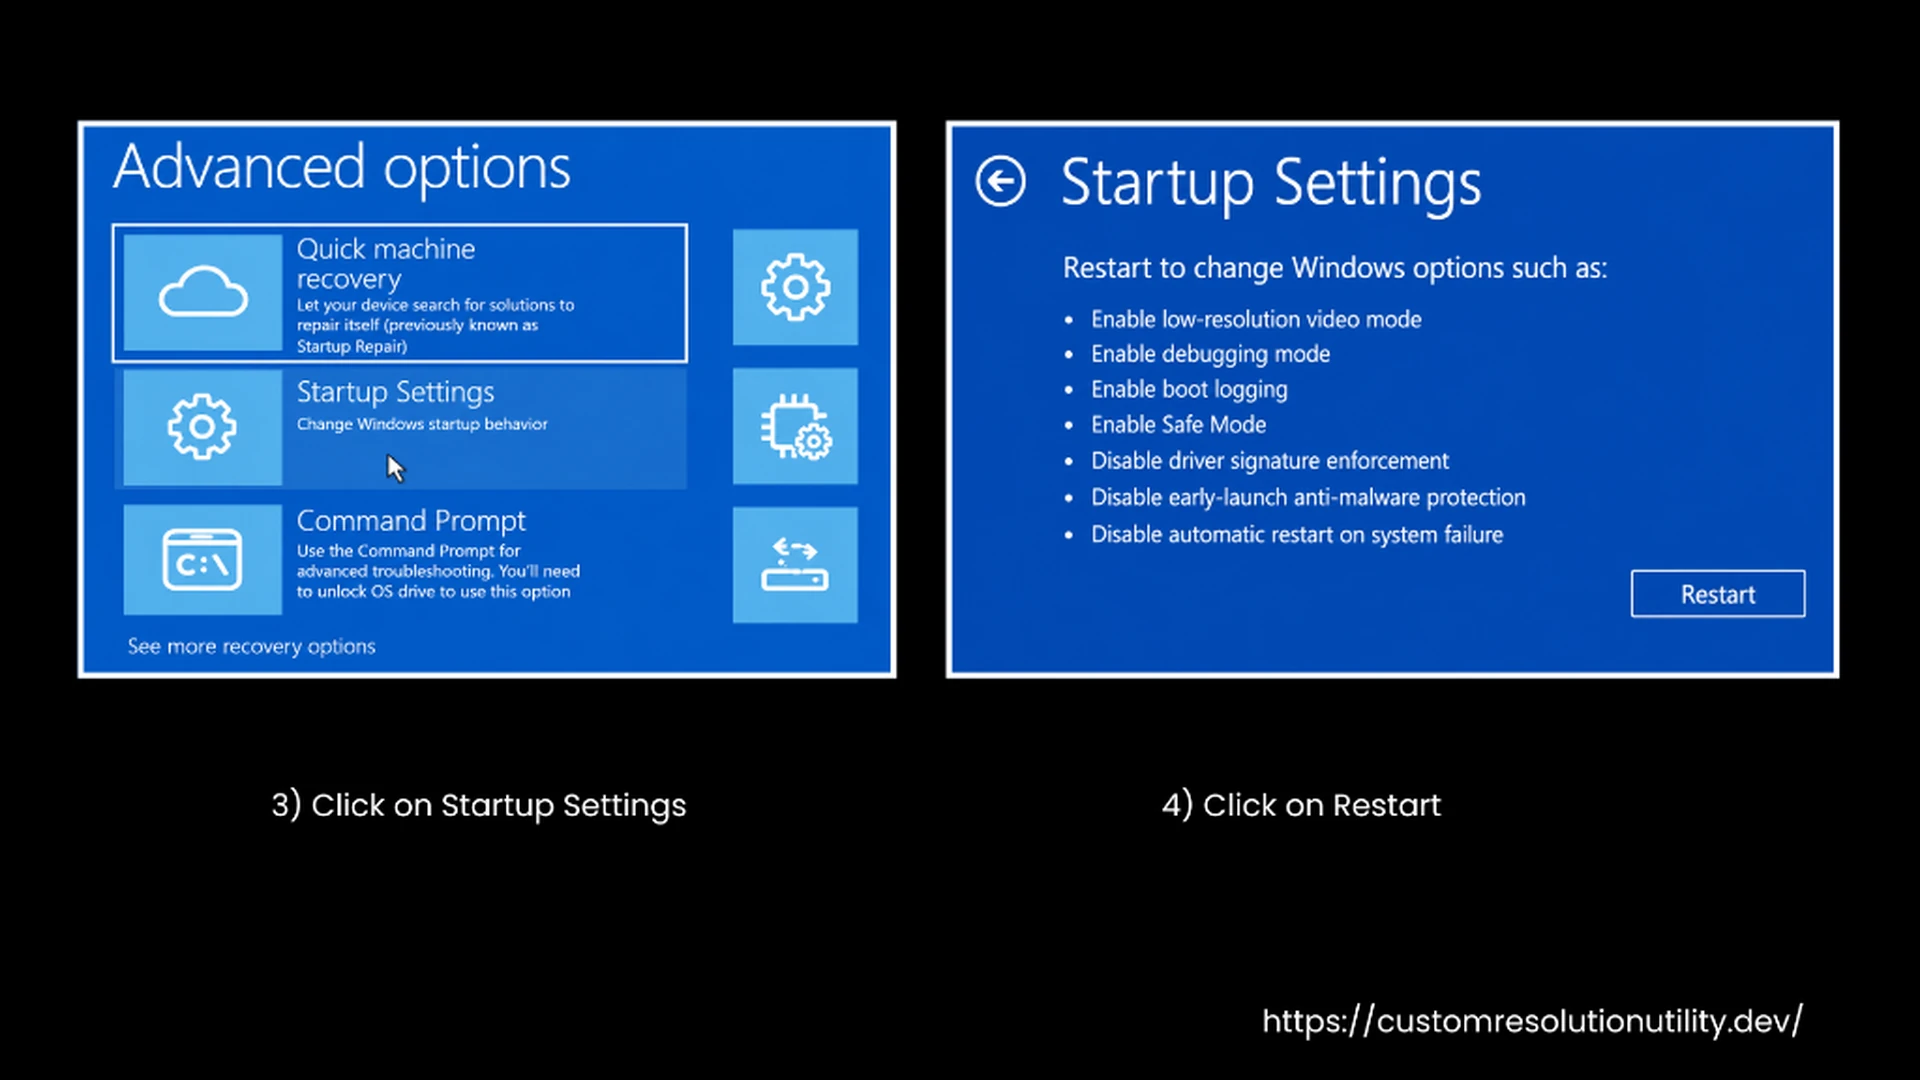
Reset CRU Configurations:
- Open the folder where CRU was extracted.
- Run reset-all.exe as Administrator to clear all display overrides from the Windows Registry.
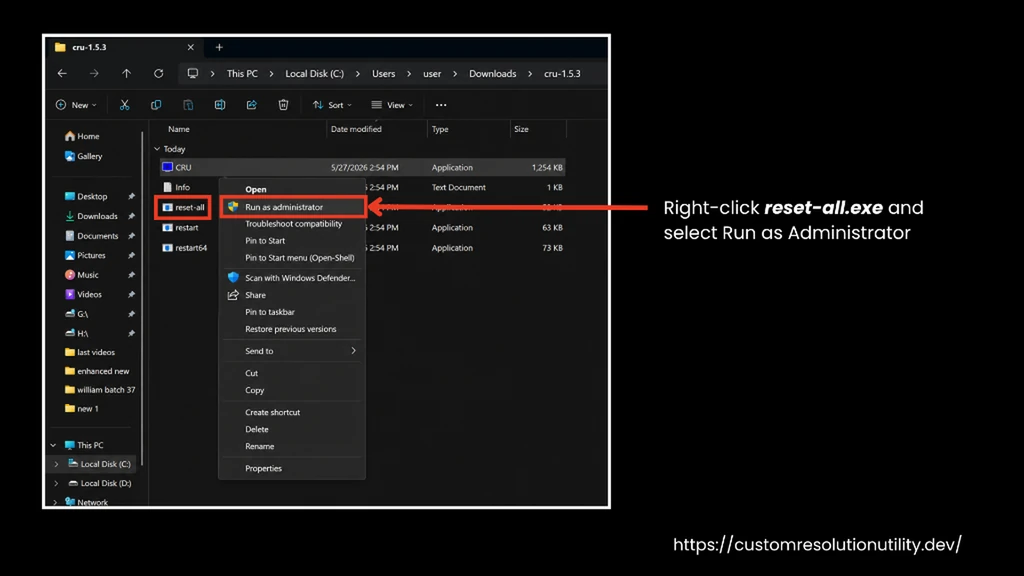
- Run restart64.exe (or restart your PC normally).
Be cautious while rebooting your system; follow the official guide before you start the process.
Method 4: Use a Second Display or External Monitor
If using a laptop or a multi-port desktop GPU:
- Connect an external monitor or TV via HDMI or DisplayPort.
- Press Win + P and select Duplicate or Second screen only to project your desktop onto the working screen.
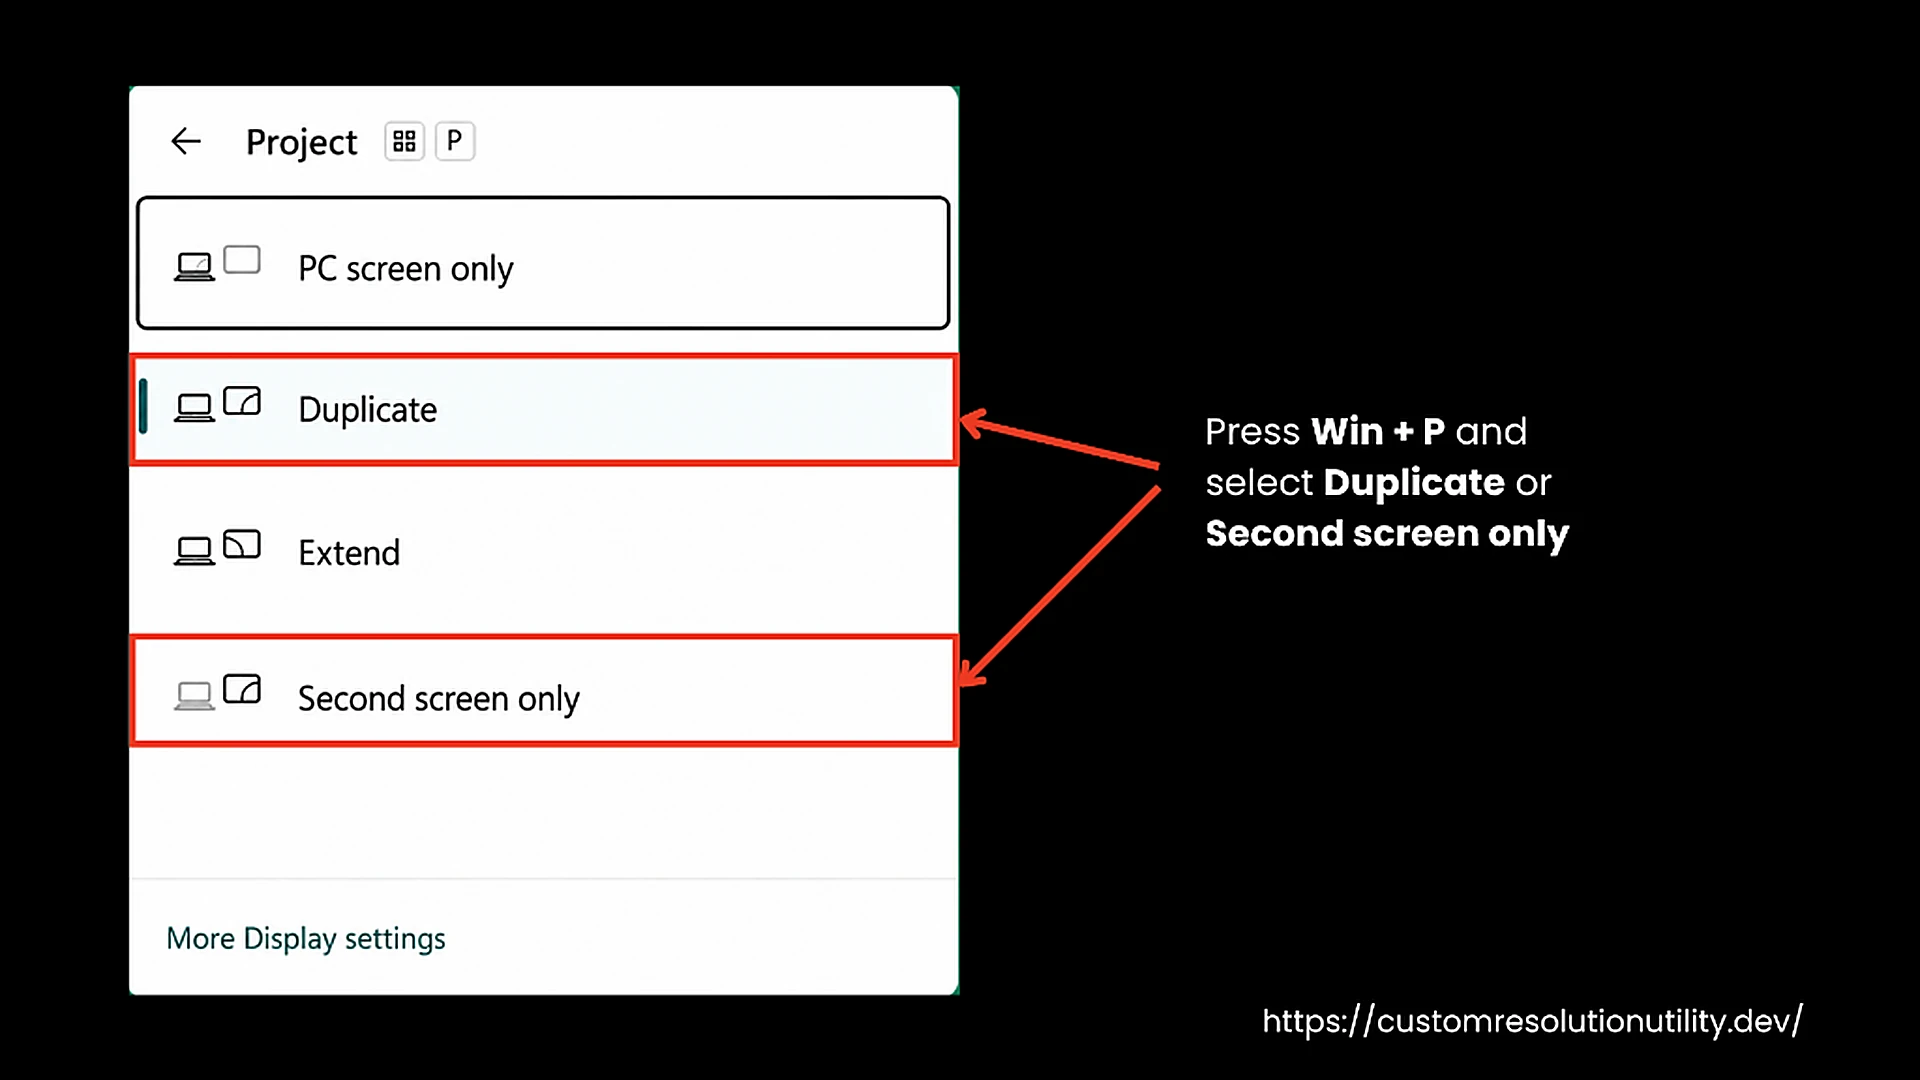
- Open the CRU directory and run reset-all.exe, then run restart64.exe.
Custom Resolution or Refresh Rate Not Showing Up in Windows
Sometimes old settings or custom resolutions are not fully deleted, and when you load new ones, they conflict with each other, resulting in no display in Windows. If you are unable to see custom resolutions or refresh rates in your Windows display settings, here are three methods to fix custom resolutions or refresh rates missing in Windows settings:
Method 1: Force the Mode in Windows Advanced Display Properties
Sometimes Windows hides supported display modes in the main settings menu.
- Right-click on your desktop and select Display settings.
- Scroll down and click Advanced display or Advanced display settings in Windows 10.
- Click Display adapter properties for Display 1 or your specific monitor.
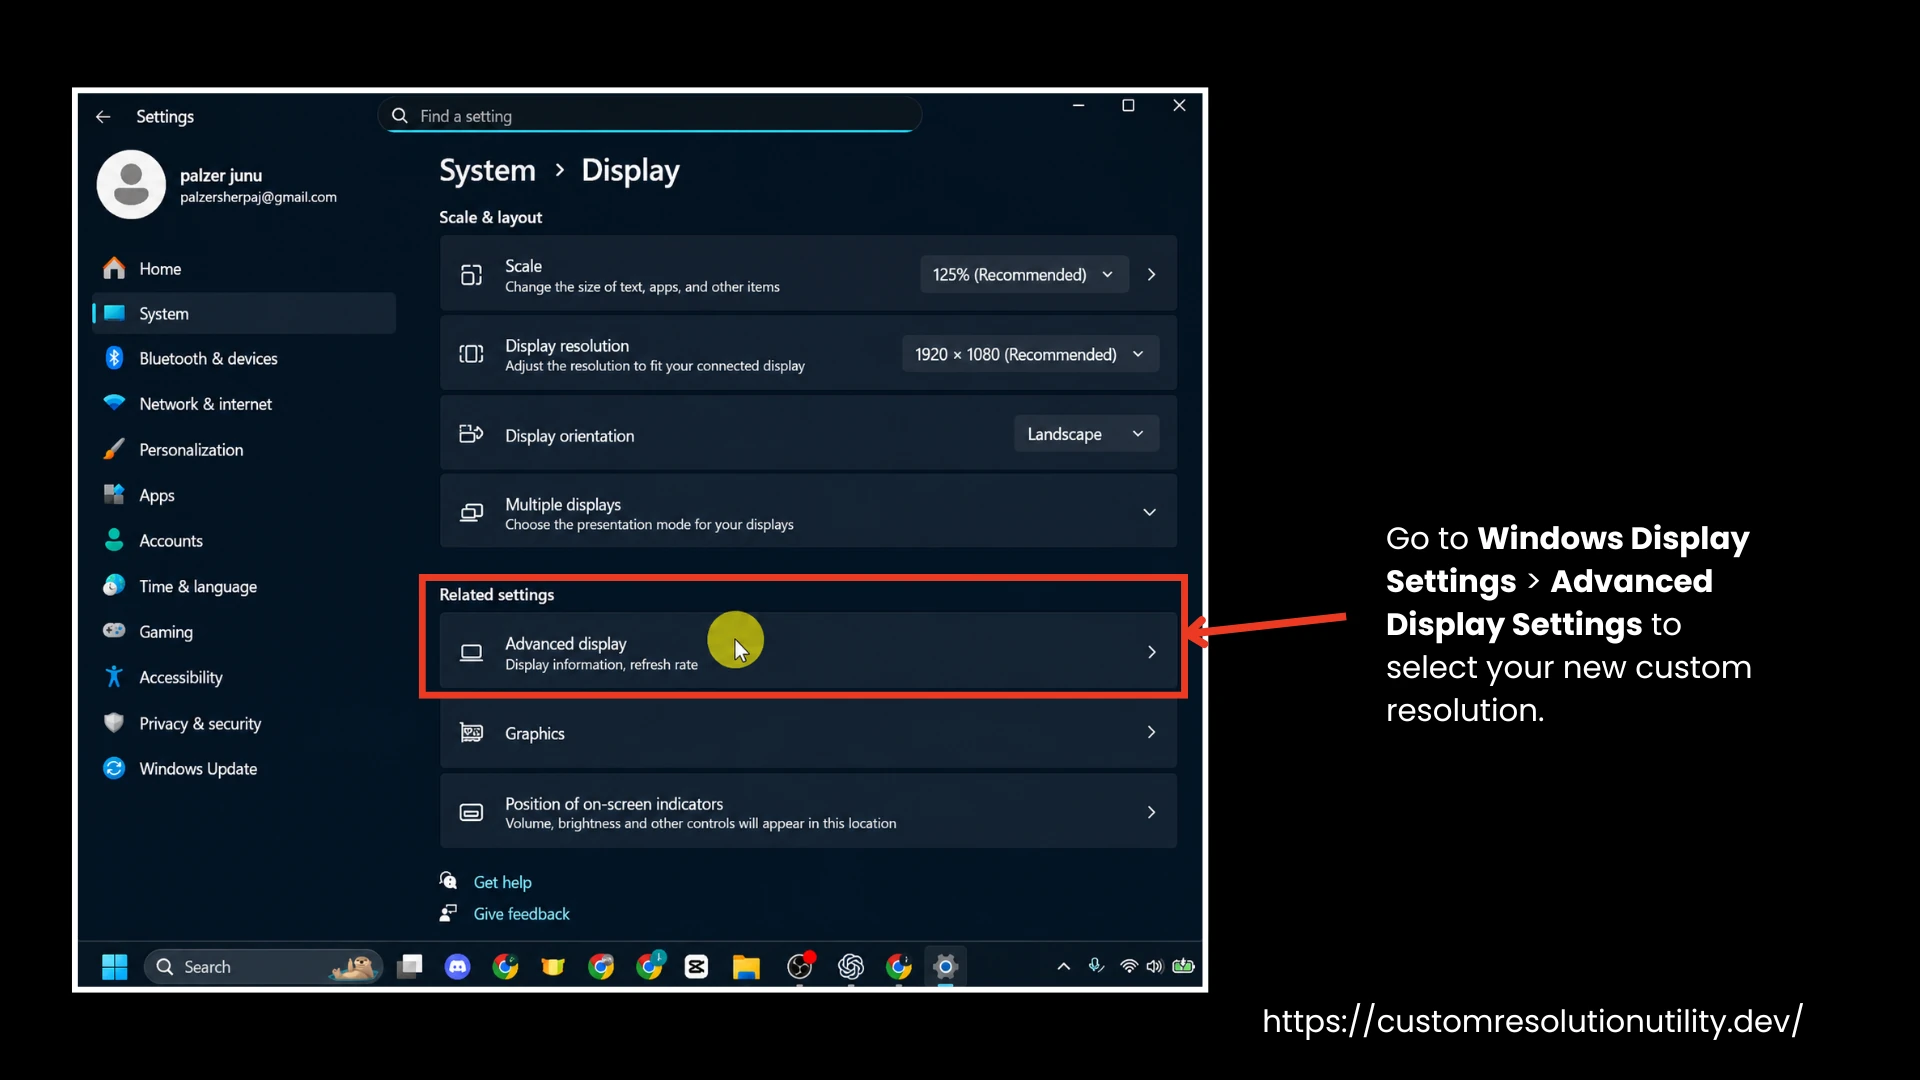
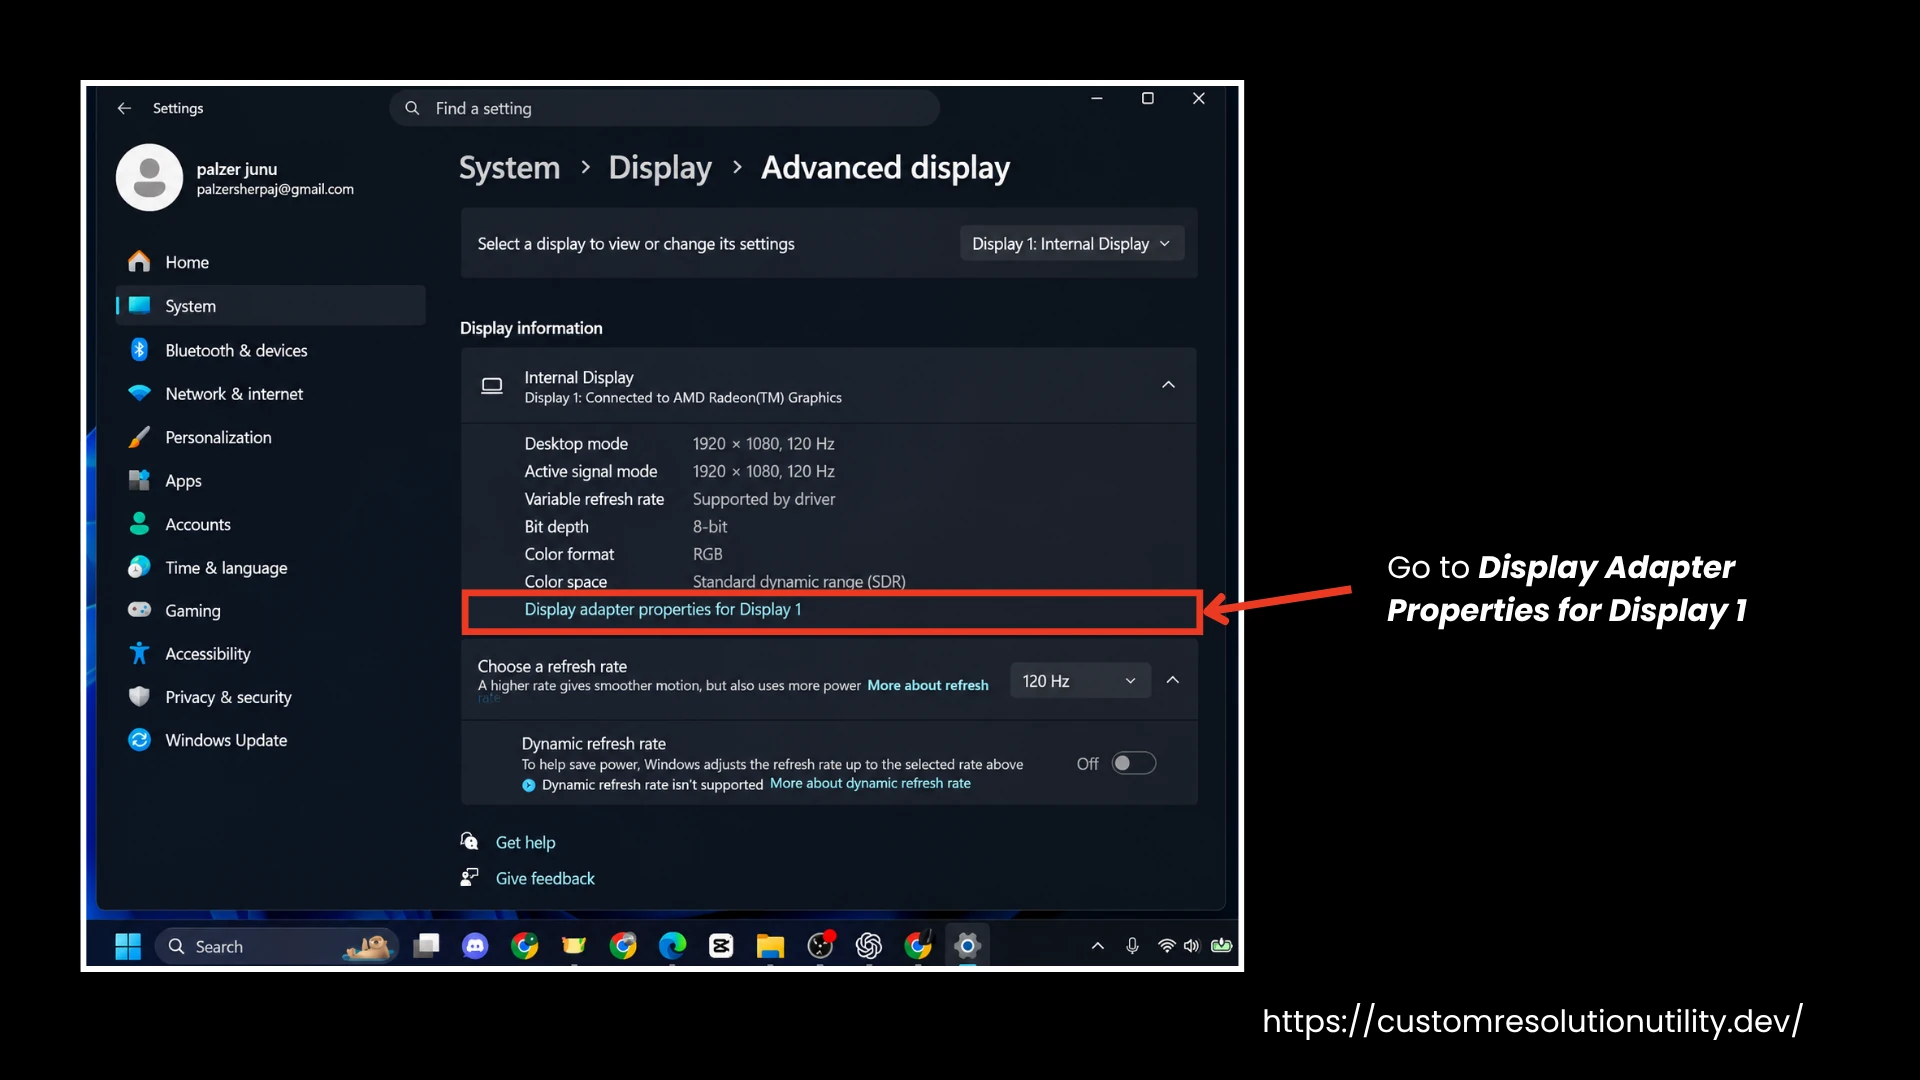
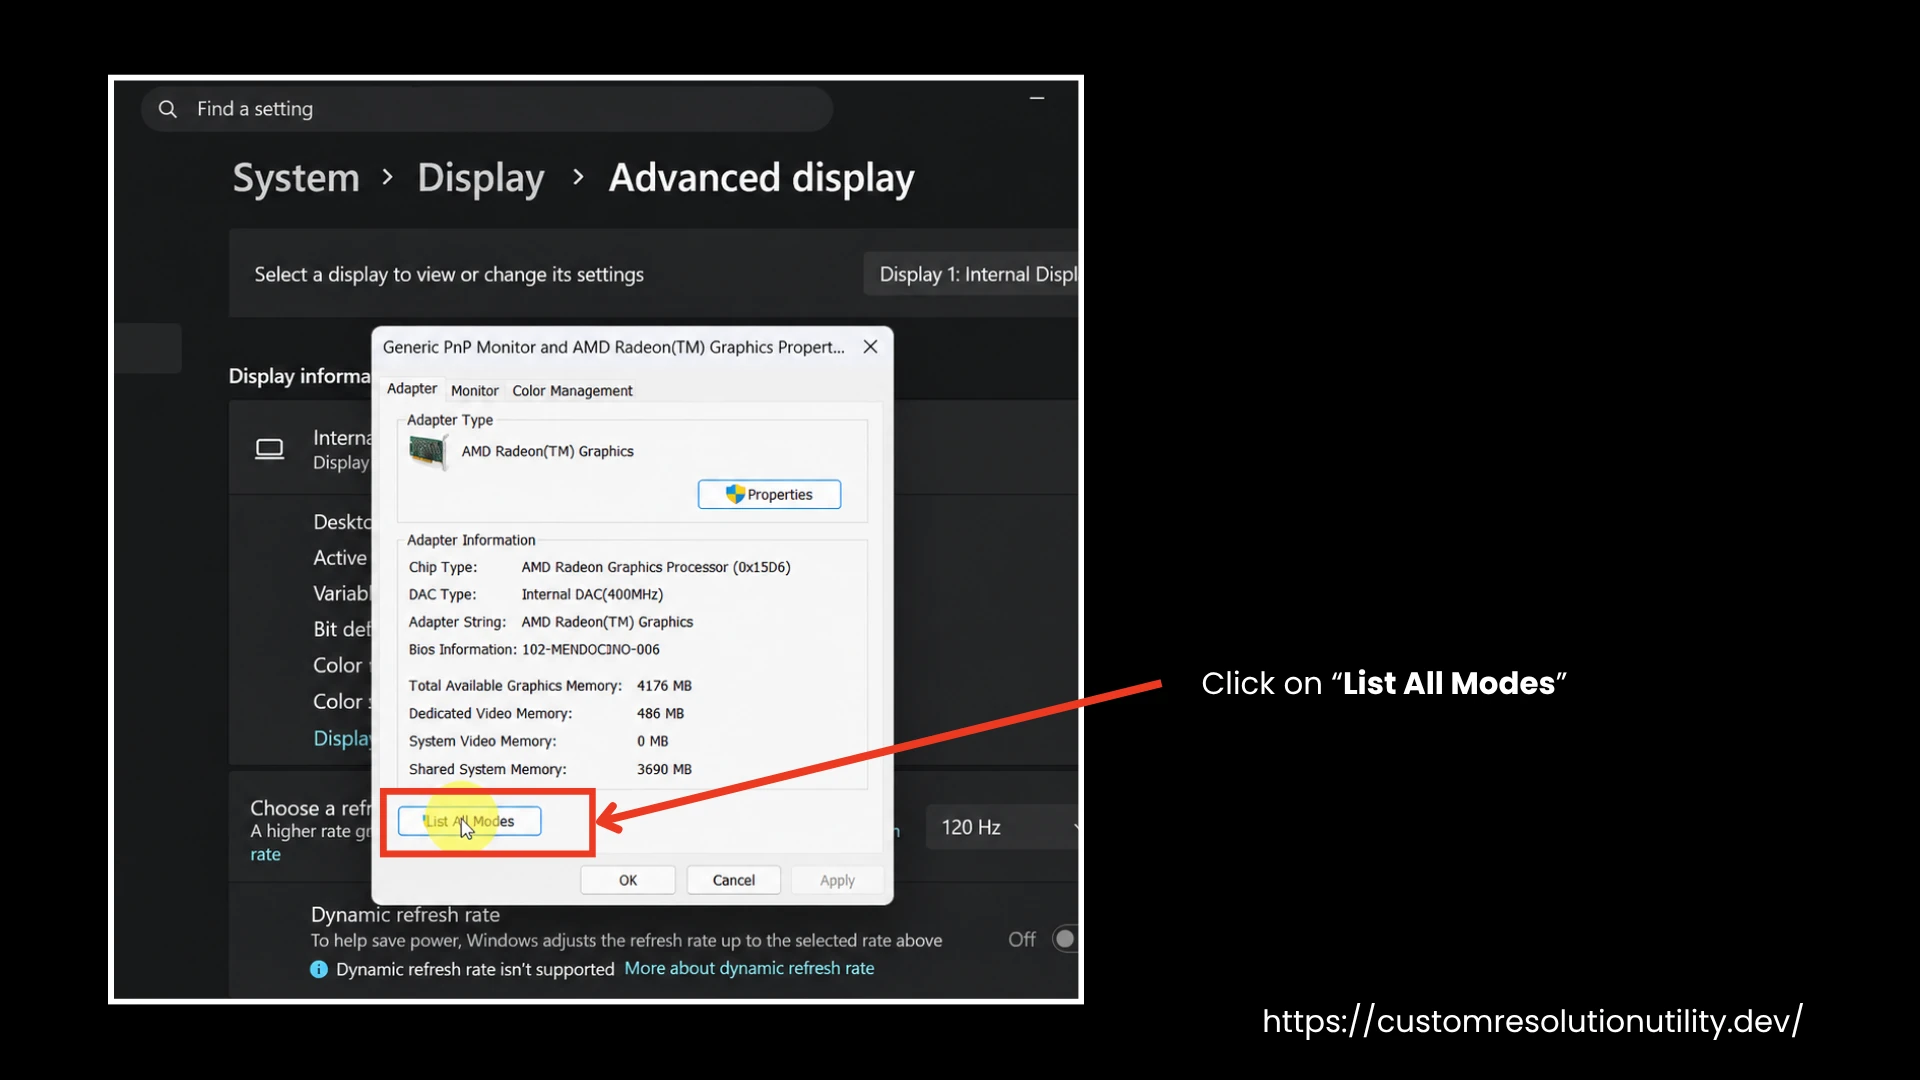
- In the pop-up window, under the Adapter tab, click List All Modes.
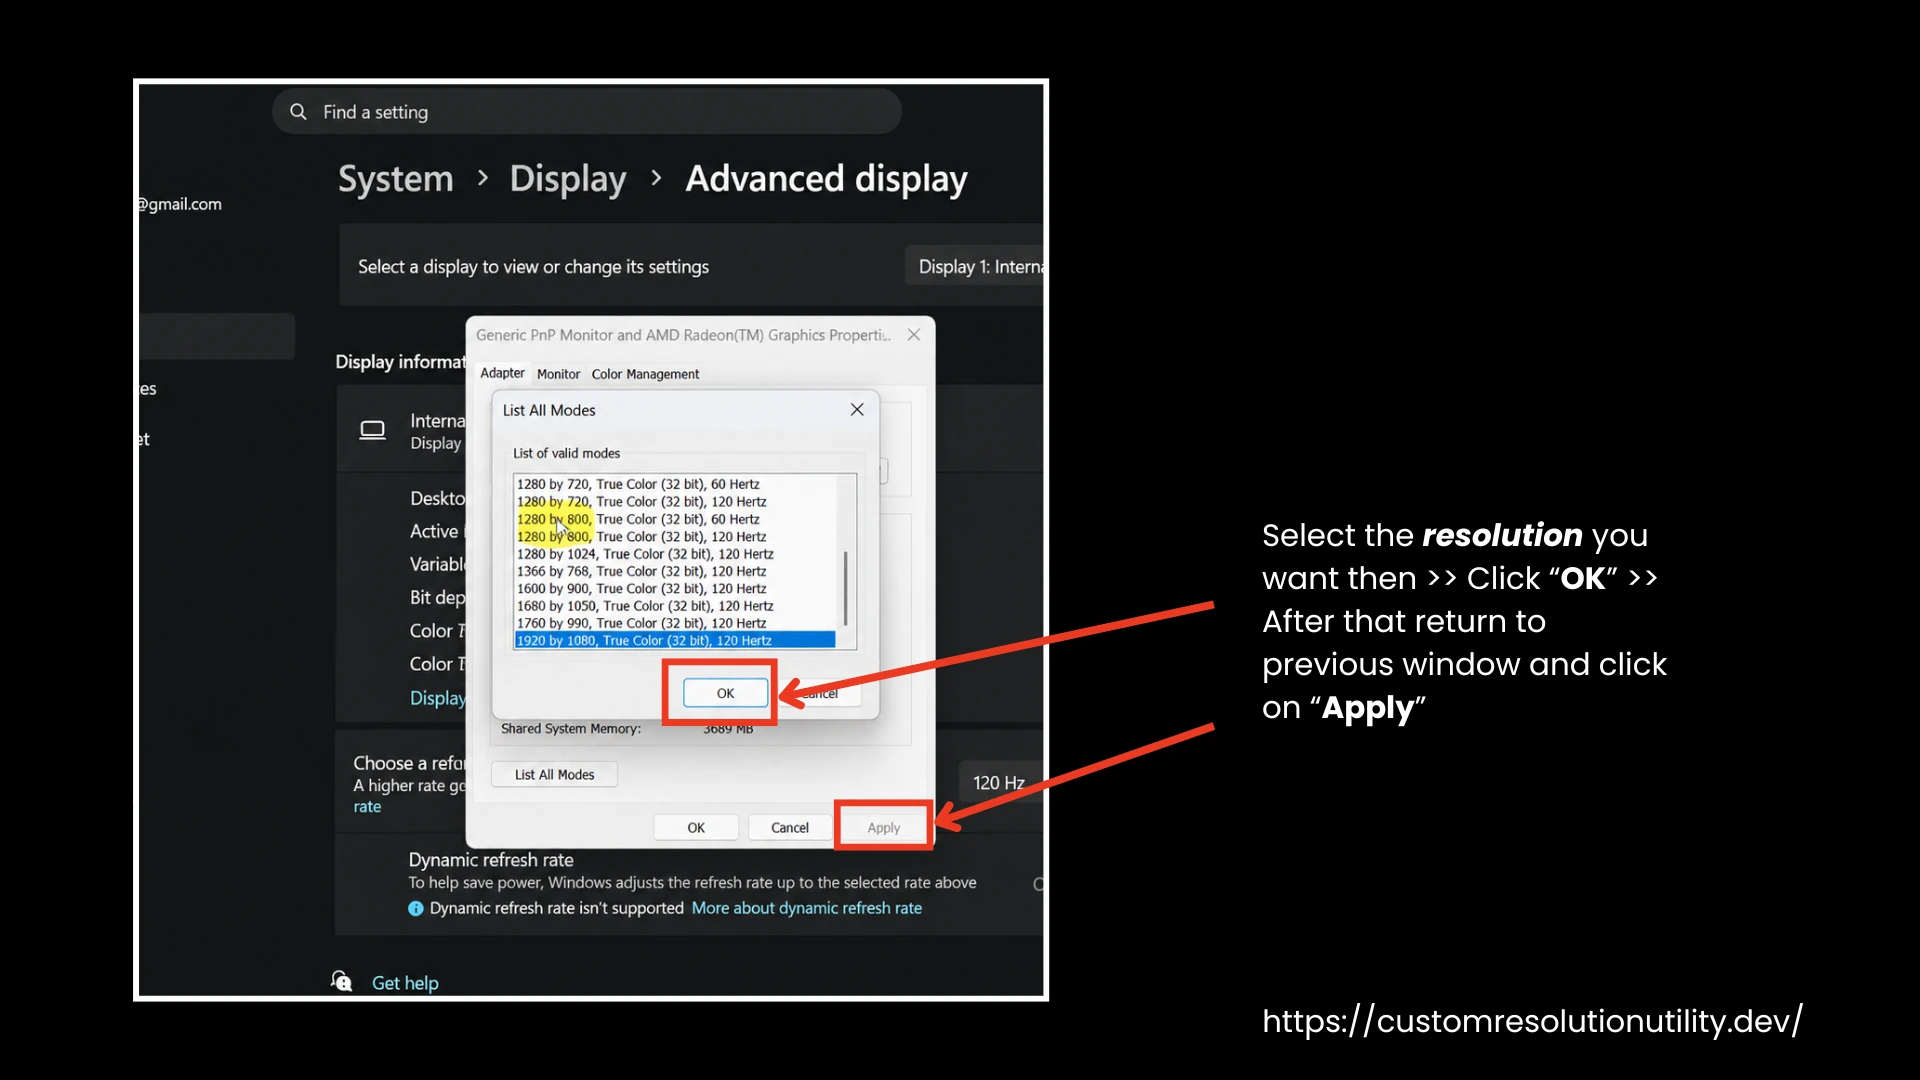
- Scroll through the list to locate your target resolution and refresh rate combination, select it, and click OK > Apply.
Method 2: Add the Custom Resolution via Your GPU Software
If the mode isn't listed, force-add it using your GPU's control panel.
For NVIDIA GPUs:
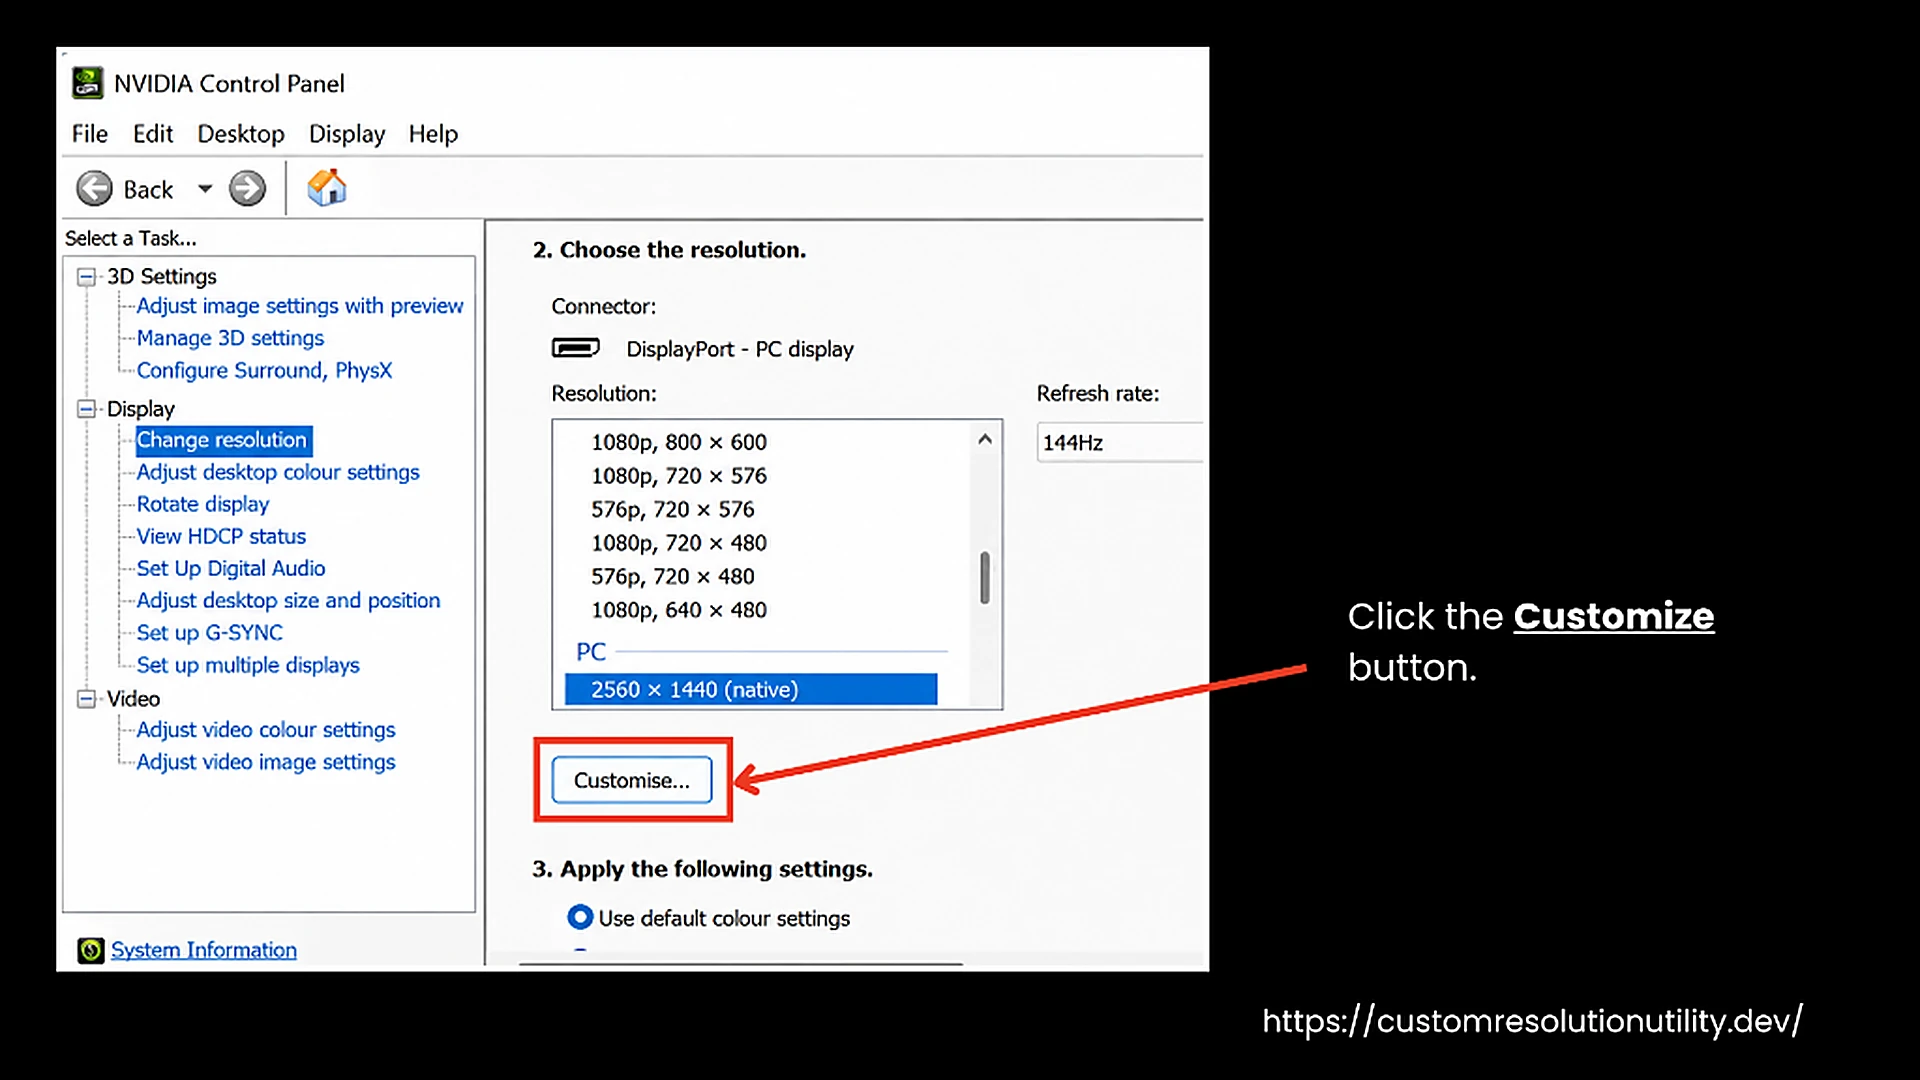
- Right-click the desktop and open the NVIDIA Control Panel.
- Under Display, click Change resolution.
- Click the Customize button below the resolution list.
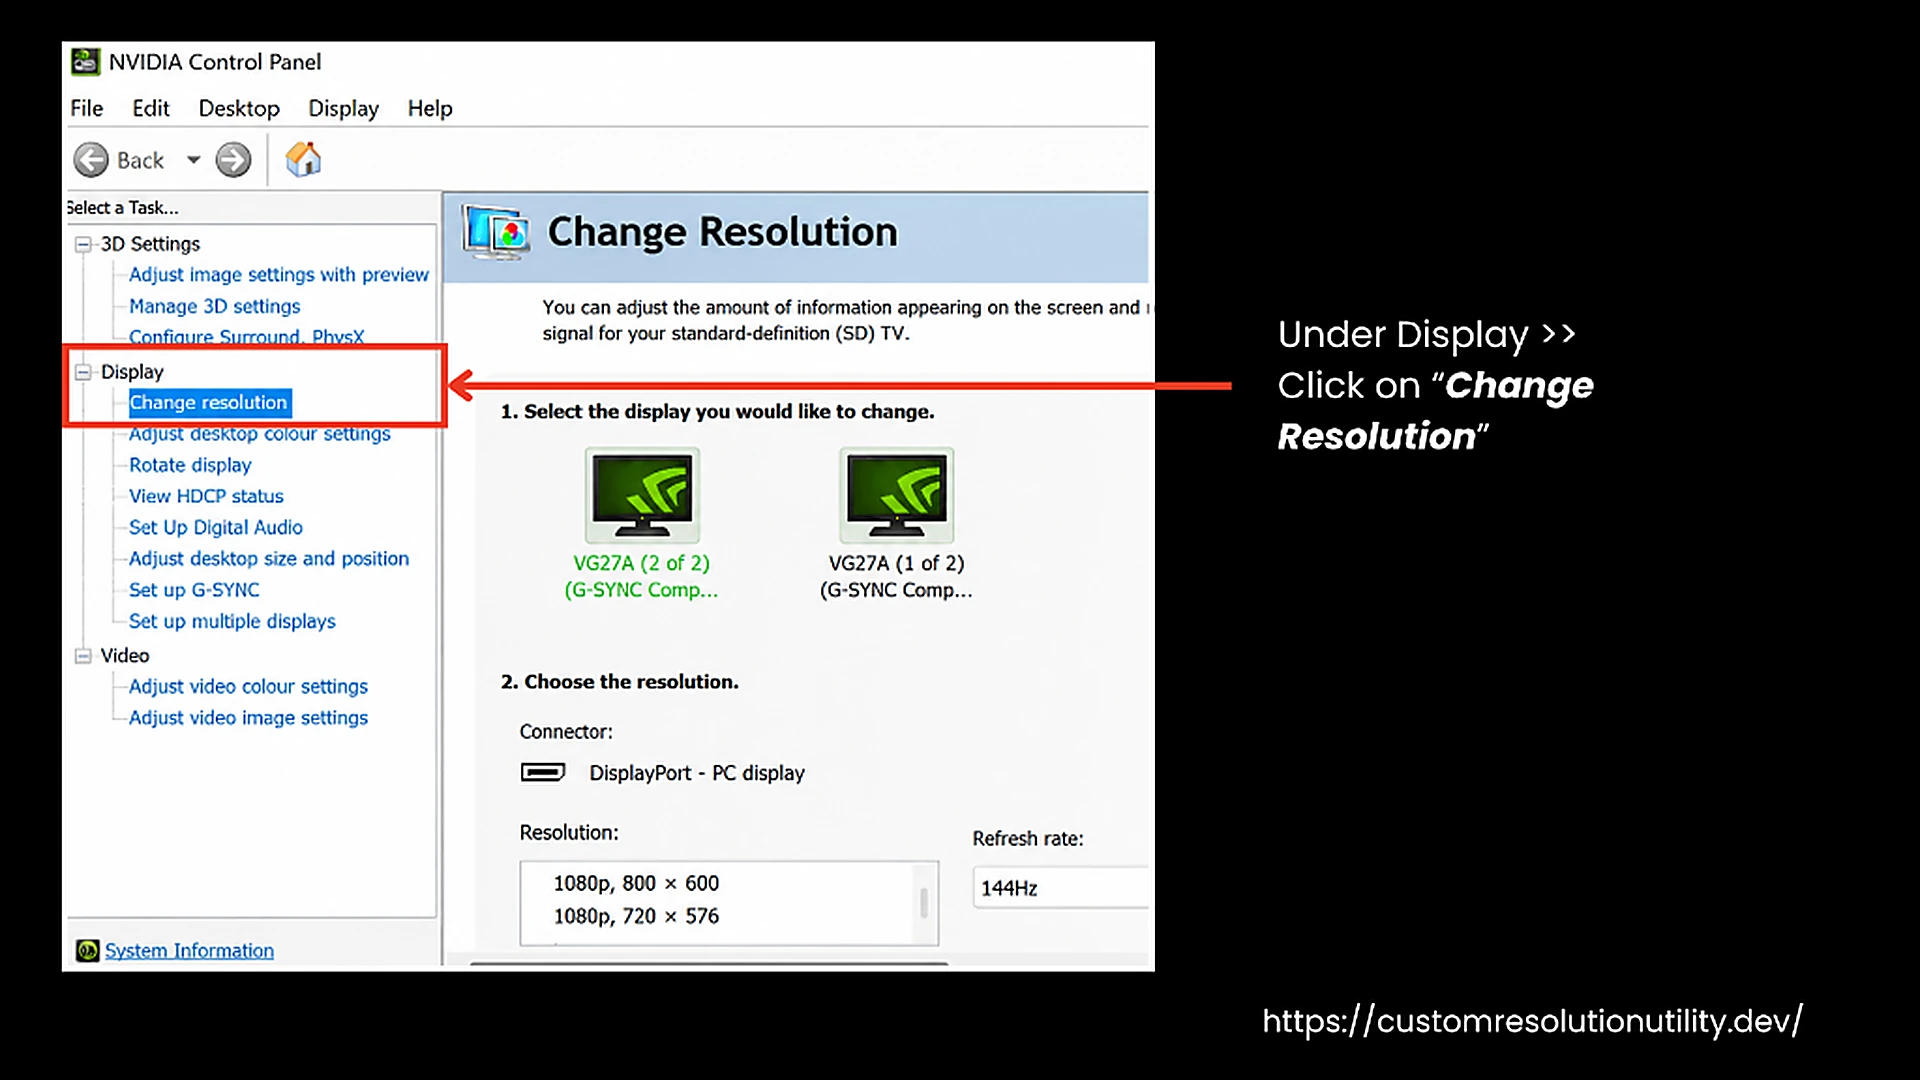
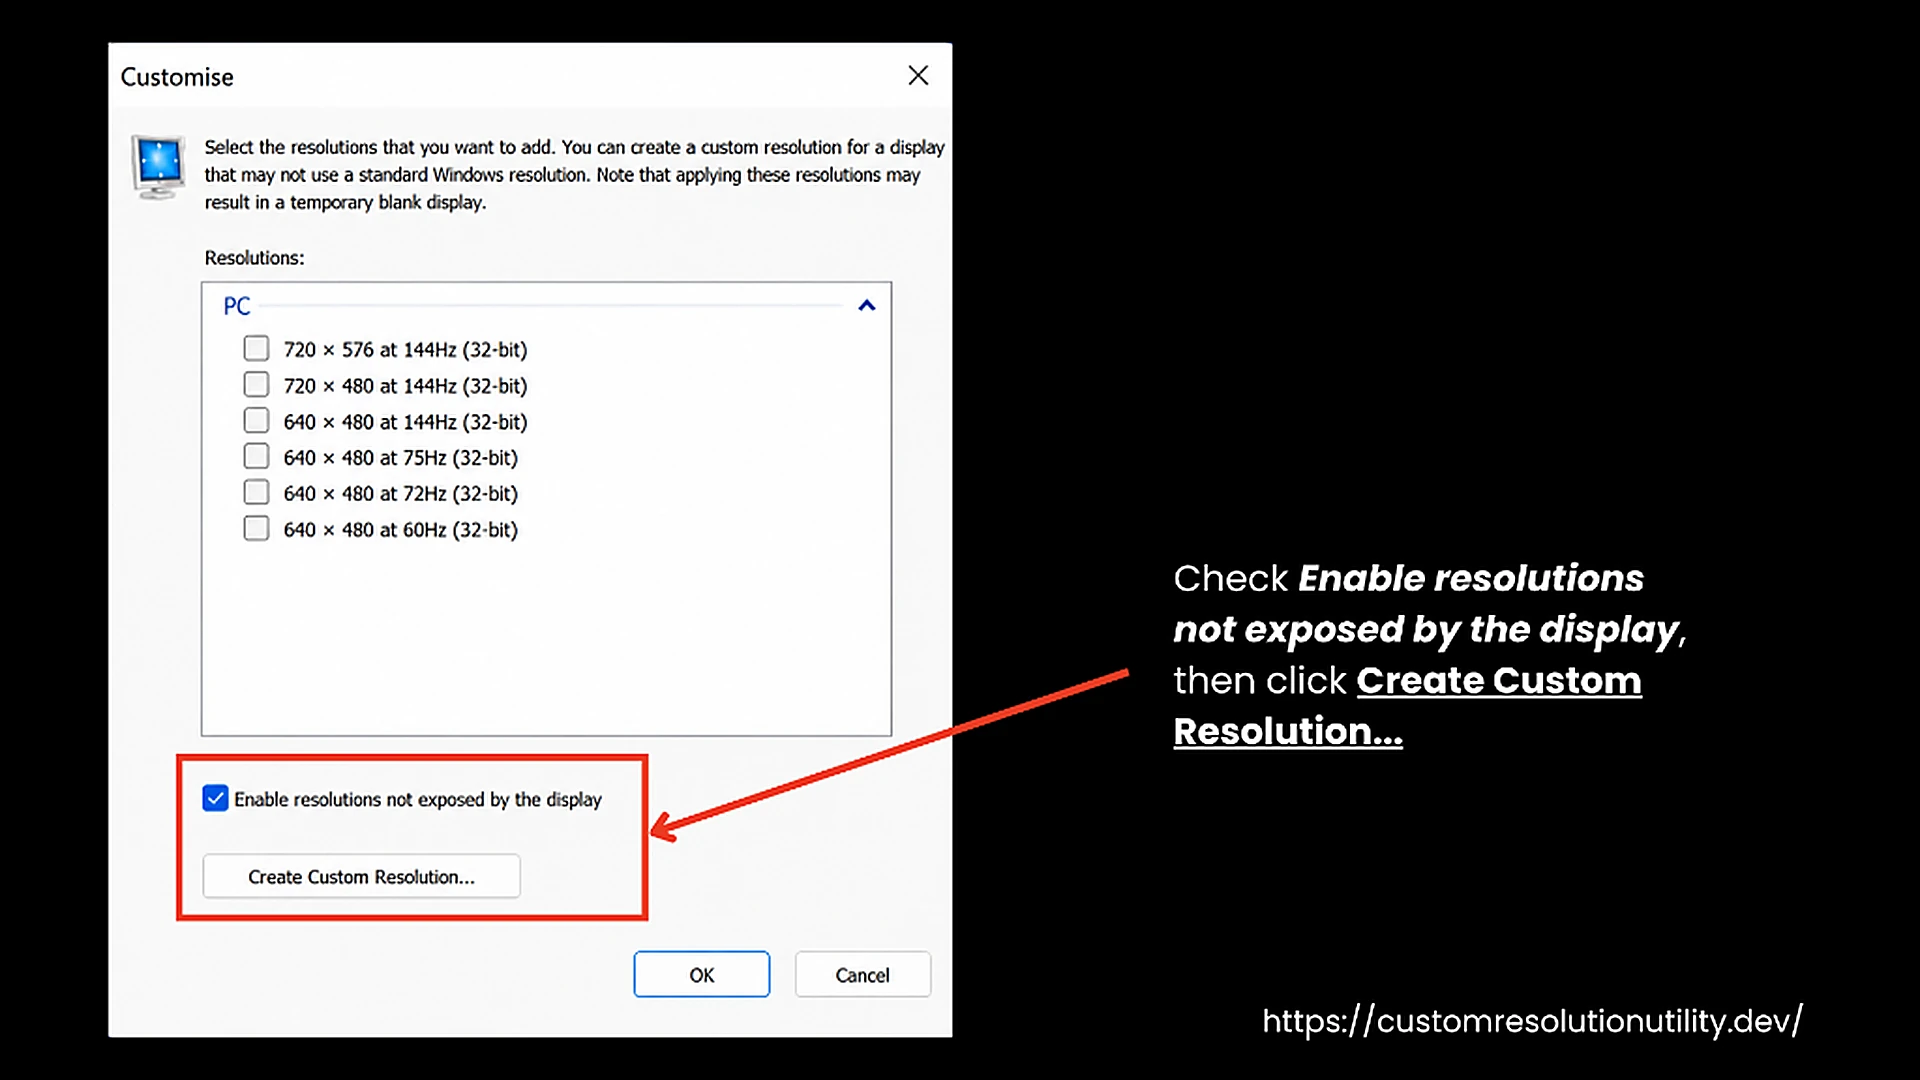
- Check Enable resolutions not exposed by the display, then click Create Custom Resolution...
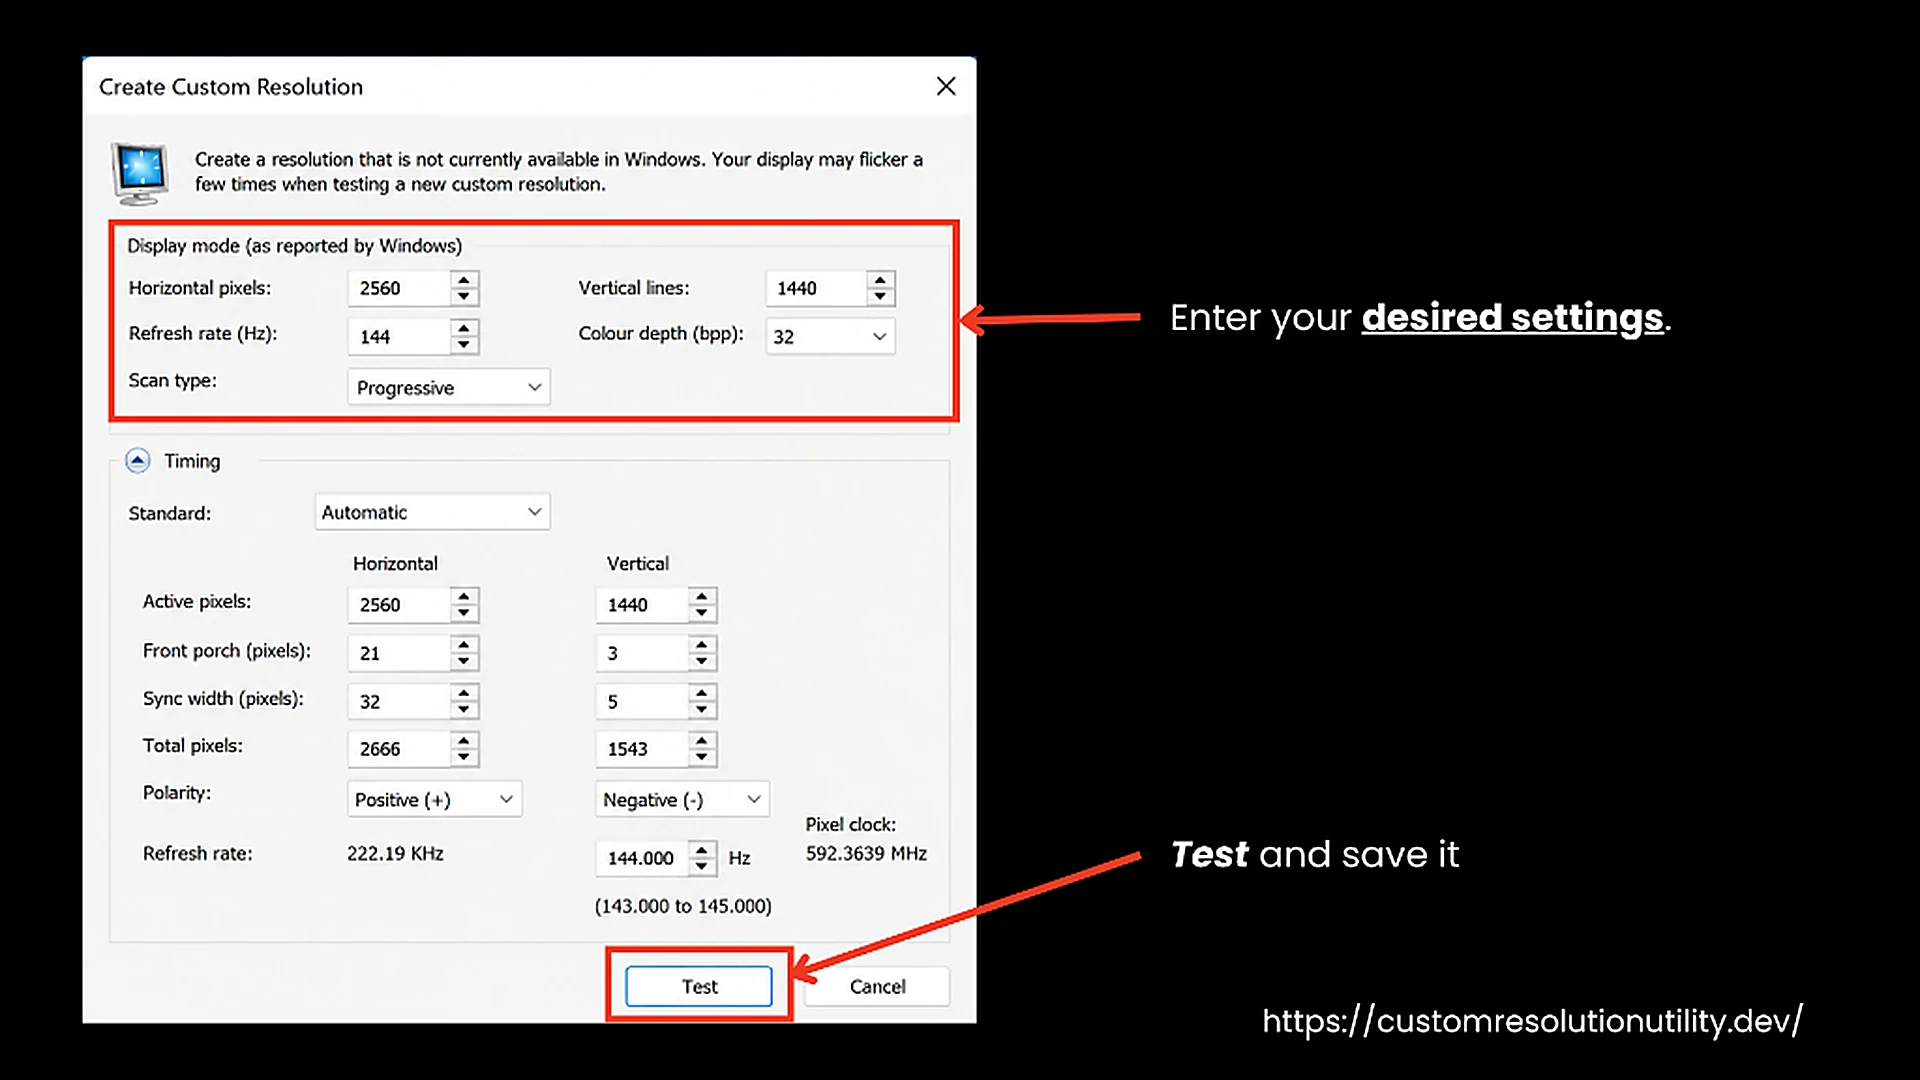
- Enter your desired horizontal pixels, vertical lines, and refresh rate, then test and save it.
For AMD GPUs:
- Right-click the desktop and open AMD Software: Adrenalin Edition.
- Go to Gaming > Display.
- Under the Custom Resolutions section on the right, click Create New.
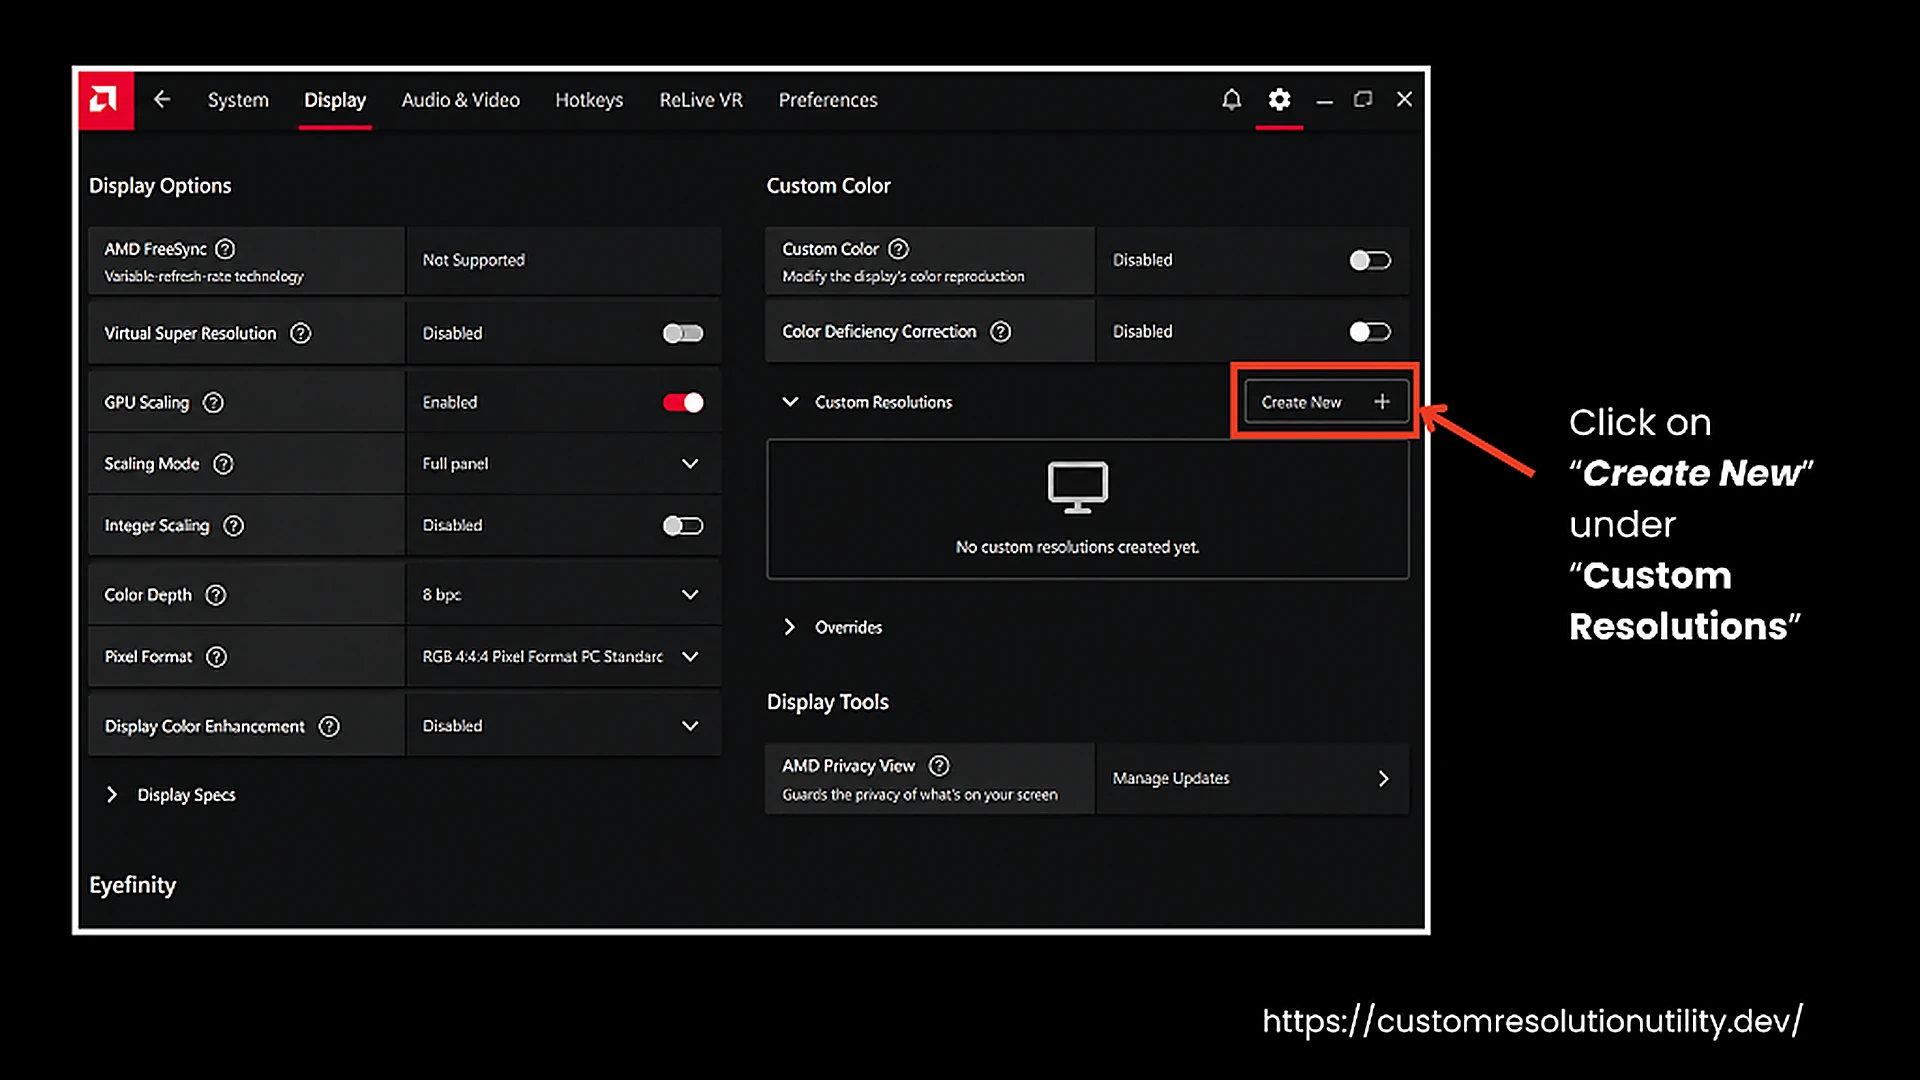
- Set your resolution and refresh rate values, then click Save.
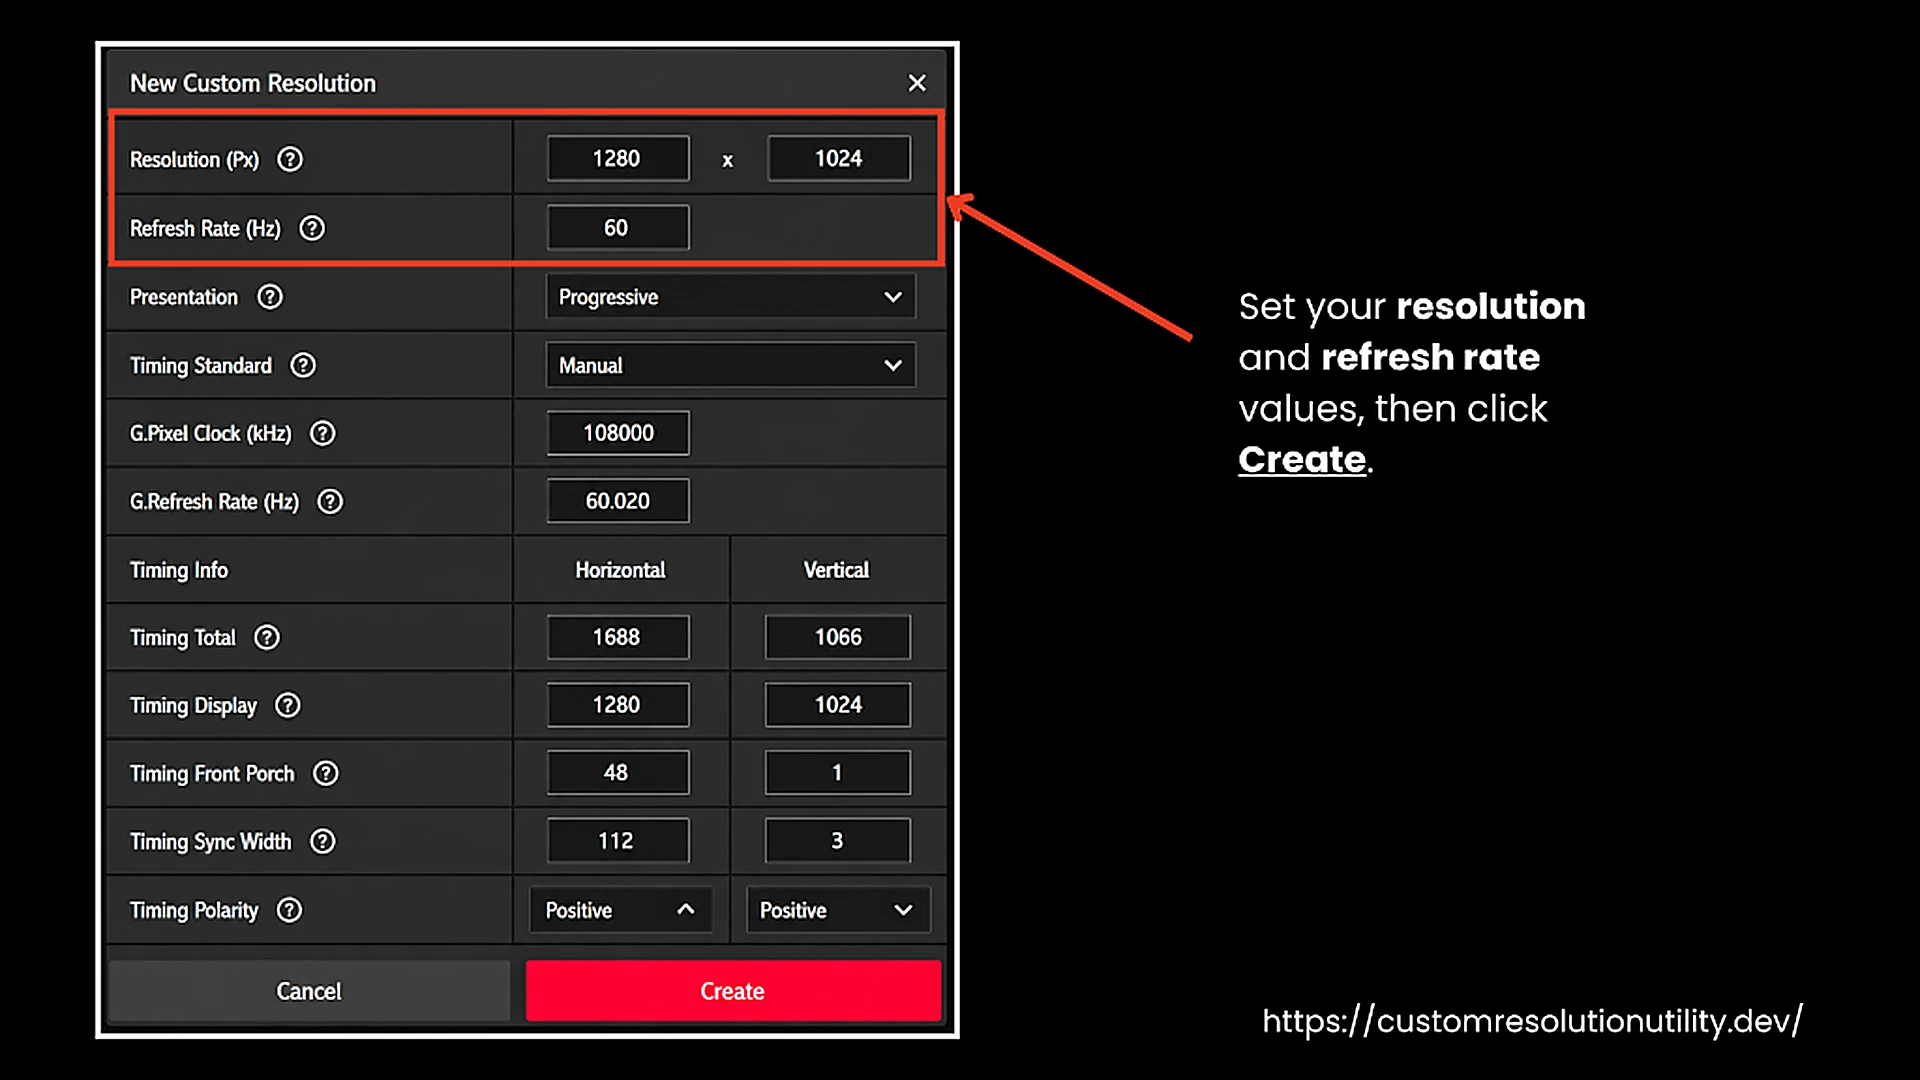
- If it fails, try toggling GPU Scaling off in the main Display settings first.
For Intel Integrated Graphics:
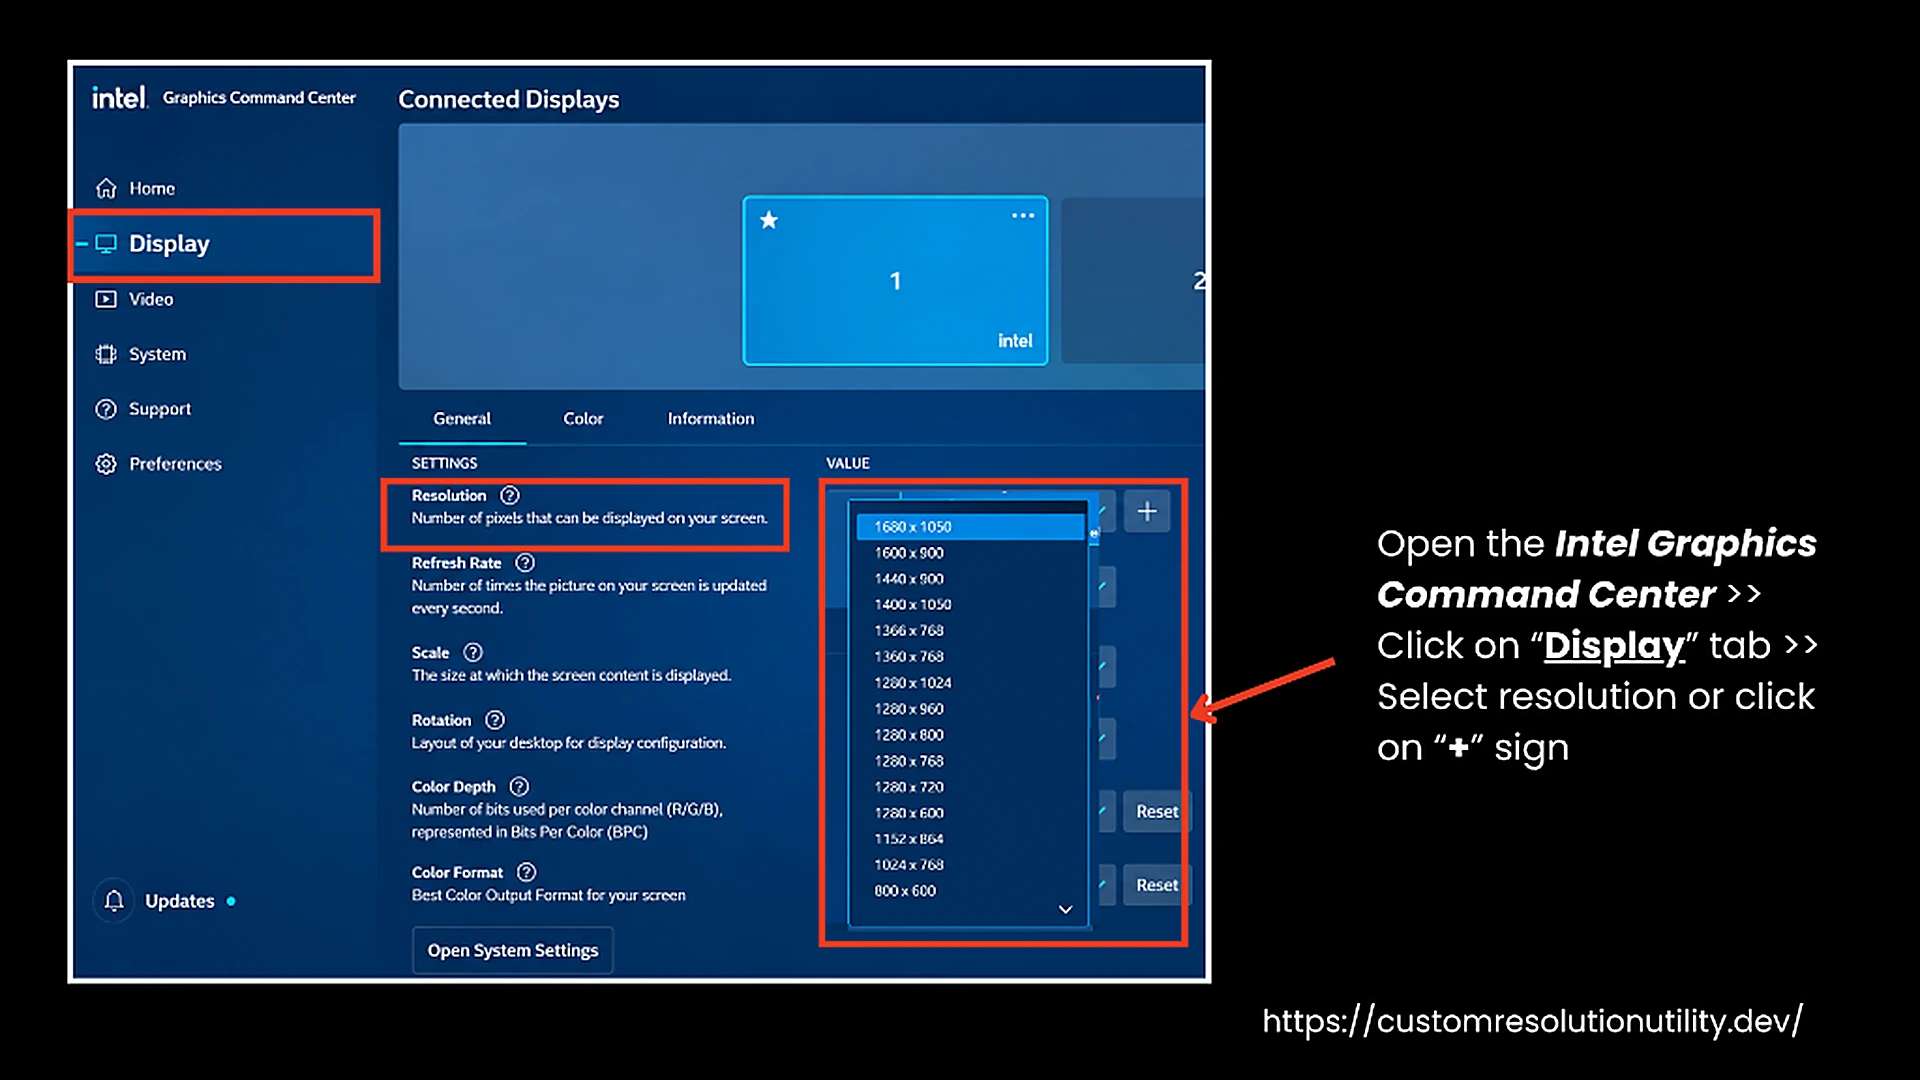
- Open the Intel Graphics Command Center.
- Select the Display tab from the left menu.
- Next to Resolution, click Custom or + sign to enter your target pixel dimensions, then add the refresh rate from the options available.
Method 3: Verify Hardware and Driver Bandwidth
If the custom settings still revert or fail to display:
- Check Cable Bandwidth: Standard HDMI cables (like HDMI 1.4) only support 60 Hz and may not support high refresh rates (144Hz+) at 1440p or 4K. Switch to DisplayPort 1.4 or an HDMI 2.1 cable.
- Clean Install GPU Drivers: Driver corruption can suppress custom timing blocks. Download Display Driver Uninstaller (DDU), boot into Safe Mode to wipe your existing drivers, and install the latest official driver package from NVIDIA, AMD, or Intel.
Memory Clock Not Lowering While Idle
Problem:
On older AMD/ATI GPUs, the memory clock may stay high when idle, especially with low vertical blanking settings, leading to screen distortion.
Solution:
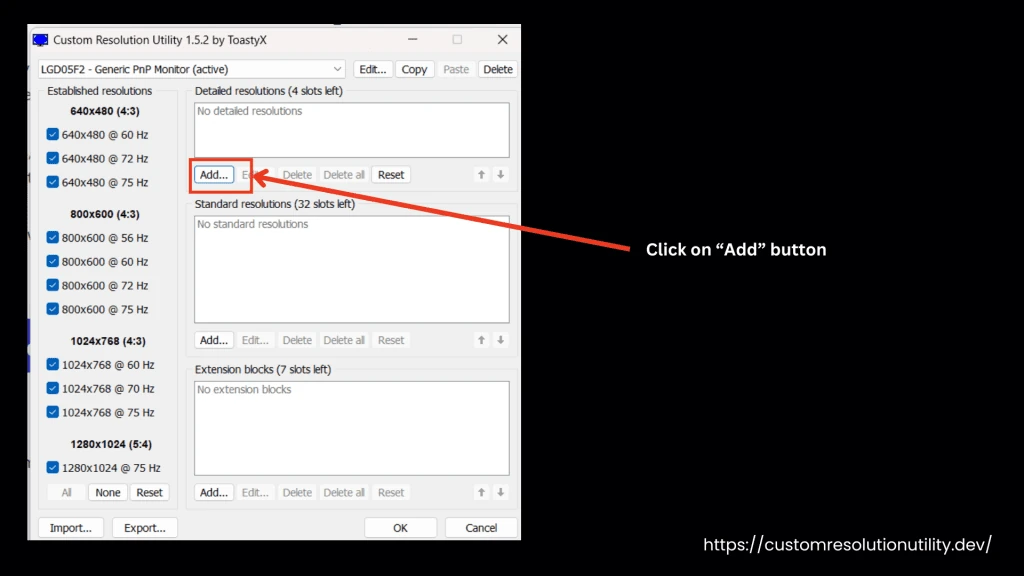
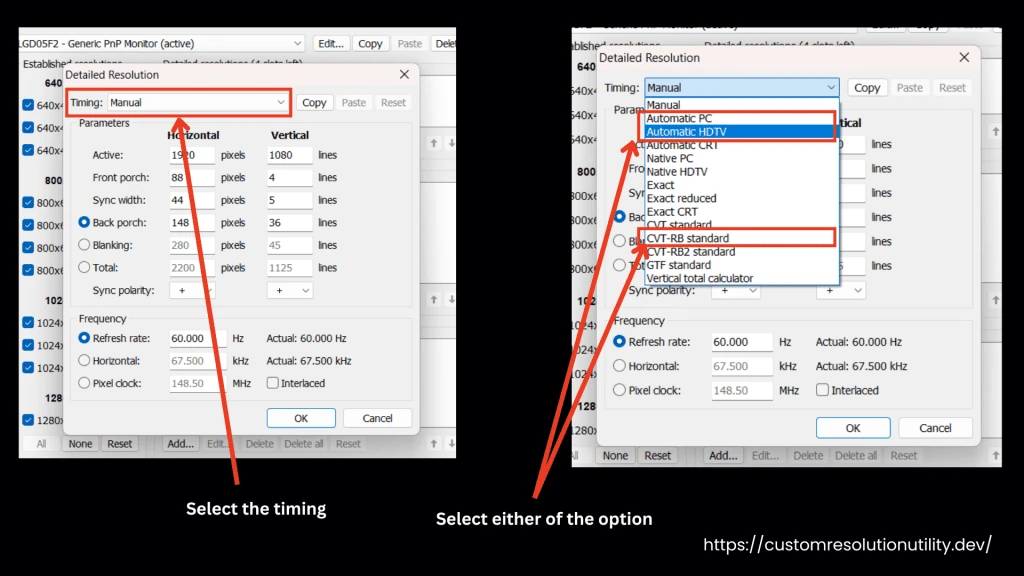
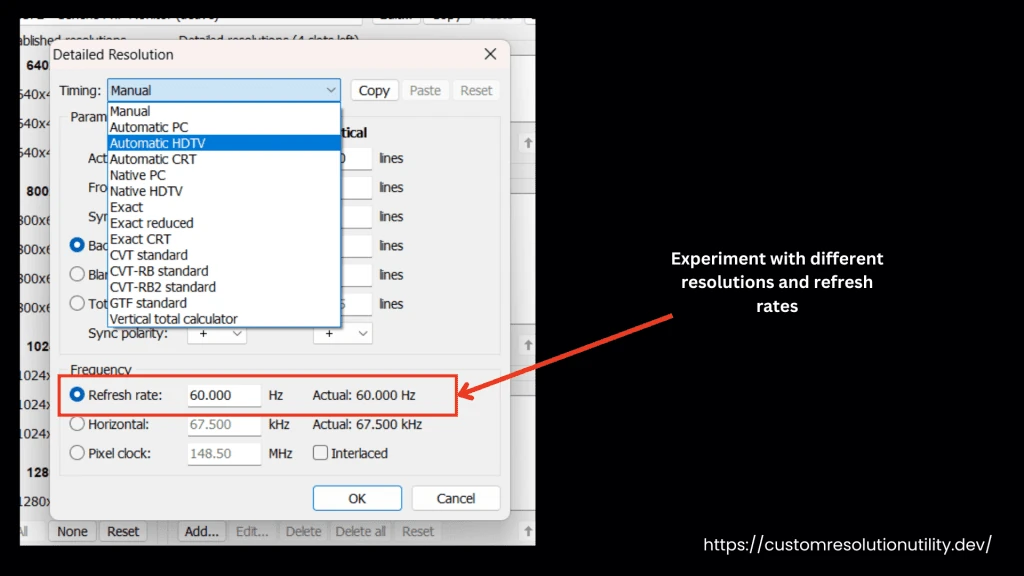
To reduce the memory clock of the GPU, use the “Automatic PC/HDTV” or “CVT-RB standard” options for vertical blanking in CRU. This provides enough time between refresh cycles to prevent corruption.
Screen Distortion with Video Applications
Problem:
Certain video apps, like Skype, can trigger screen scrambling on older GPUs if the vertical blanking is too low, particularly when the GPU memory is overclocked or multiple monitors are in use.
Solution:
Avoid overclocking memory and select “Automatic PC/HDTV” or “CVT-RB standard” vertical blanking options. Limiting app usage that stresses the display can help stabilize it.
Limited Compatibility on Older GPUs
Problem:
Older GPUs may not support certain custom resolutions or refresh rates, which can cause display instability.
Solution:
Experiment with different resolutions and refresh rates to find a stable configuration, especially for older hardware. Keeping CRU and GPU drivers updated also improves compatibility and reduces issues.
Monitor Shows ‘No Signal’ After Changing Higher Refresh Rates
Problem:
Sometimes, when you increase the refresh rate, it causes the monitor to go black, displaying only “No signal” when connected to the PC. The monitor still works with other devices, and the PC connects fine to different screens, but the two are not syncing. This issue often occurs when the refresh rate or resolution is set beyond what the monitor can handle, leading it to lose the connection with the PC.
Solution:
There are two methods to resolve this display issue.
Method 1:
This method is to restore the display settings without reinstalling Windows, including:
- Booting into Safe Mode to perform a System Restore.
- Using System Repair to do the same.
- If no restore points exist, use the Registry Editor (RegEdit) to change refresh rate values directly.
Method 2:
These troubleshooting steps focused on graphics driver settings.
- Deleting the custom resolution from the NVIDIA Control Panel.
- Using Display Driver Uninstaller (DDU) to completely remove and reinstall graphics drivers, which resets all display settings.
- If you can see the BIOS or UEFI screen, it means that basic communication between your monitor and PC is working properly.
Both approaches help fix the black screen issue caused by incorrect display settings but take different routes. The first method focuses on restoring your system to an earlier state, while the second is about adjusting your driver settings and configurations to get things working again.
Monitor Speakers Not Working with Custom Resolution Utility (CRU)
Problem:
Many users experience issues with their monitor speakers not working correctly after changing display settings. This can happen when custom resolutions or other audio settings are modified, resulting in a loss of audio output from the monitor.
Solution:
To resolve this issue, follow these steps:
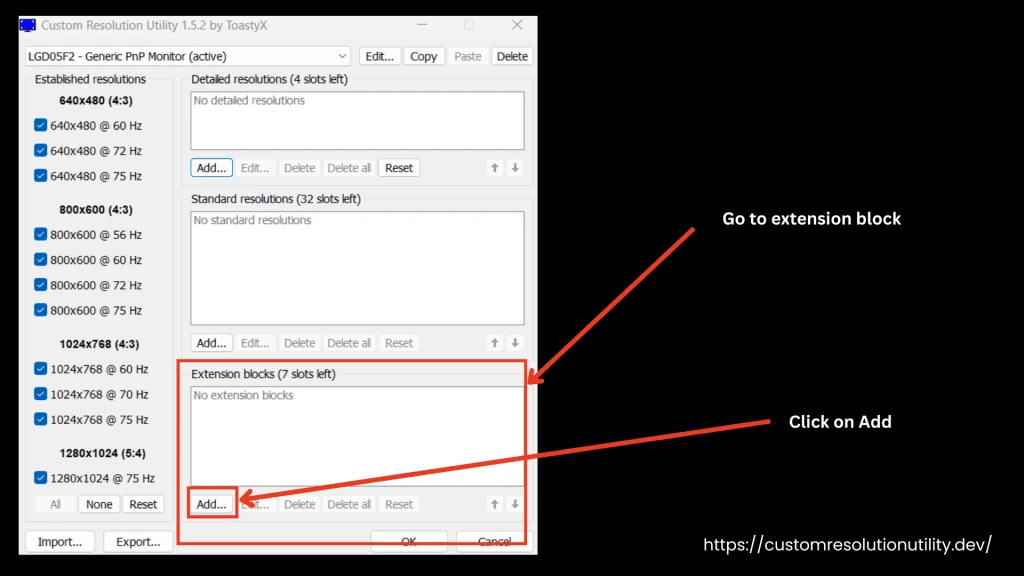
- Open the Custom Resolution Utility (CRU).
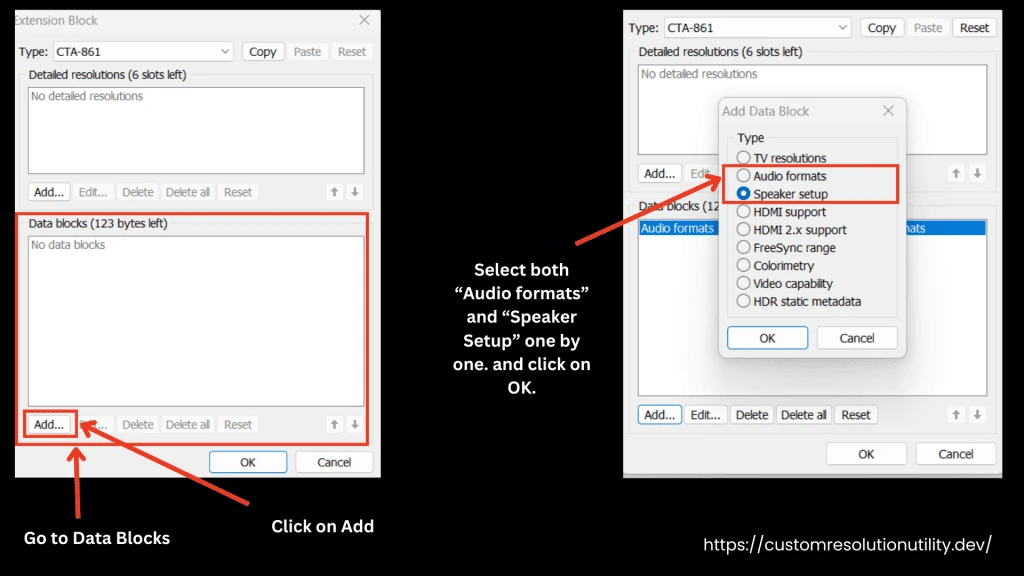
- In the “Extension Blocks” section, click “Add.”
- Under “Data Blocks,” click “Add” and select both “Audio Formats” and “Speaker Setup.”
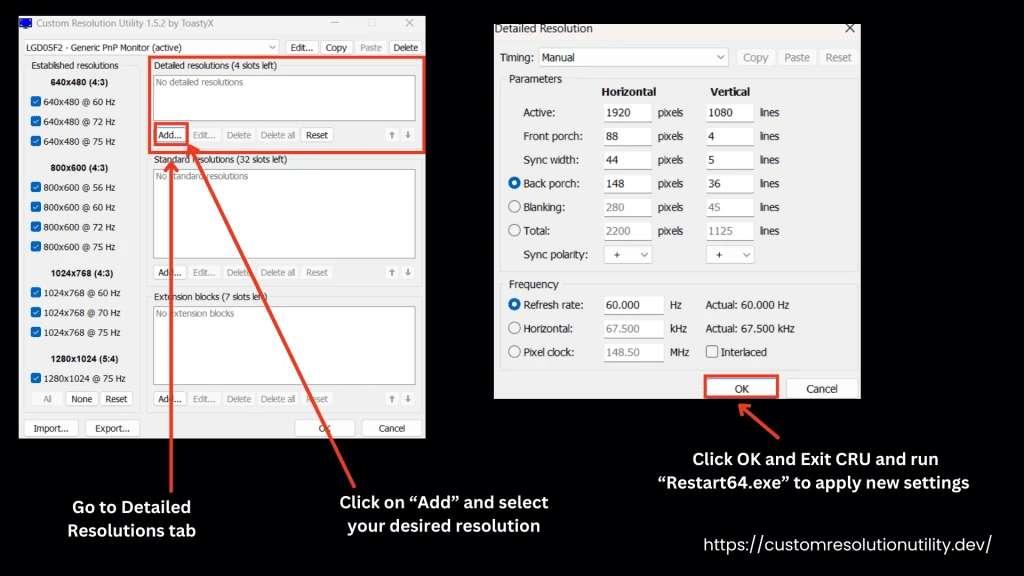
- Optionally, add your desired resolution in the “Detailed Resolutions” section to ensure compatibility.
- Click “OK” and exit CRU.
- Run the “restart64.exe” file to apply the new settings.
Problems Setting Custom Resolutions with CRU
Problem:
Users often face difficulties when setting custom resolutions for displays using the Custom Resolution Utility. They either can’t find their display in the drop-down list, have trouble adding new resolutions, or notice that the changes don't take effect after restarting the graphics driver. These problems obstruct achieving optimal display settings and refresh rates.
Solution:
Steps to Set Custom Resolutions Using CRU
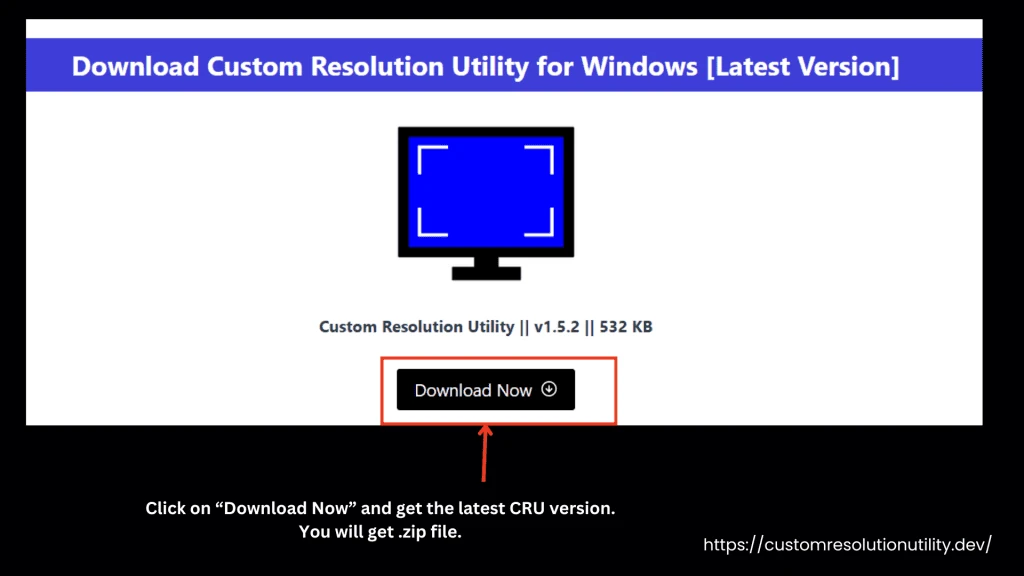
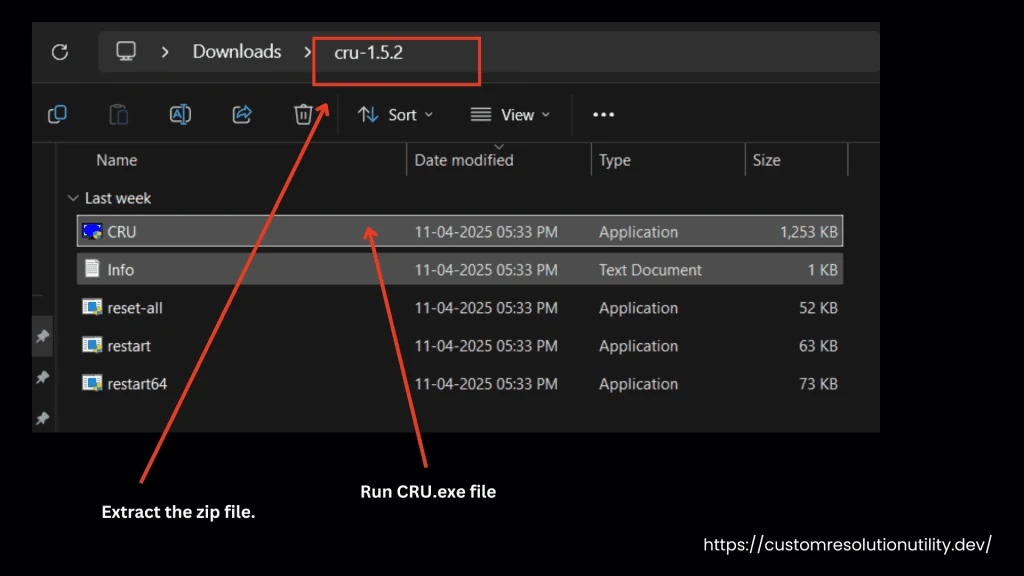
- Download the Custom Resolution Utility form our website, and extract the contents of the ZIP file.
- Open the folder that you have extracted and run CRU.exe.
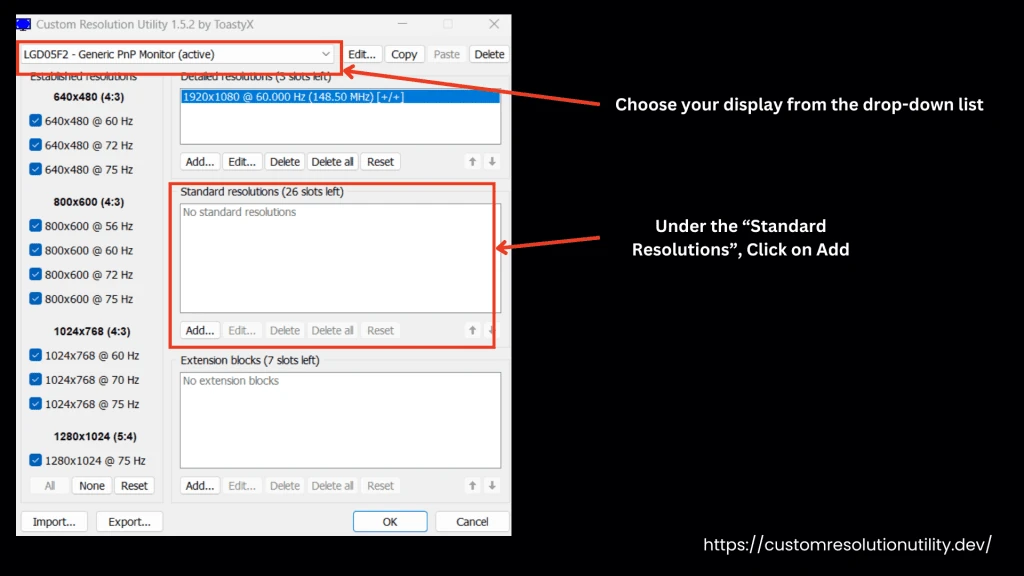
- In the CRU window, you will choose your display from the drop-down list at the top.
- Under the “Standard Resolutions” section, you will click on Add to add the standard resolution.
- A “Standard Resolution” window will pop up showing you preset resolution options.
- From the given preset options, you can enter your desired resolution settings and confirm.
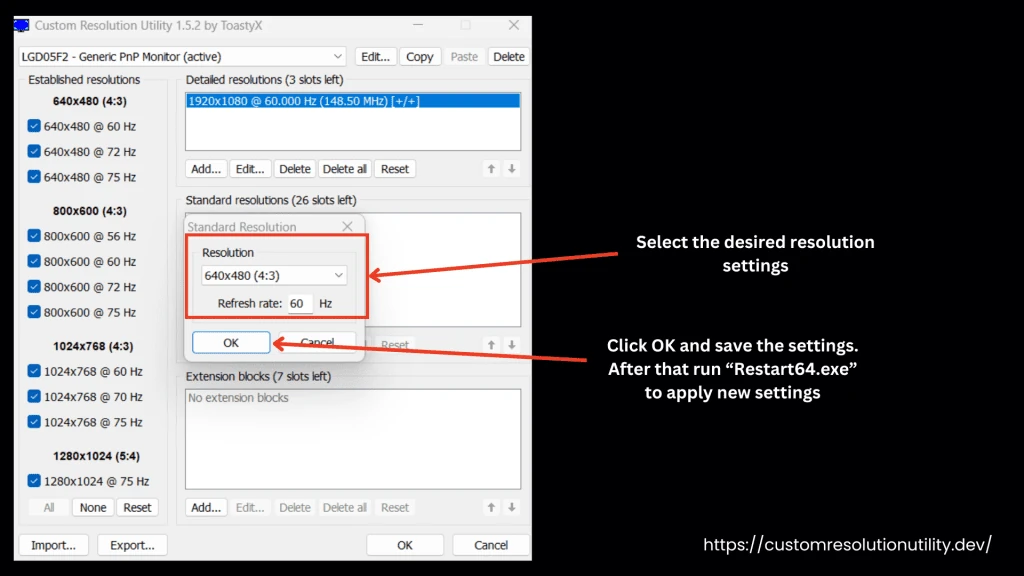
- Now at the end, you can press OK to save all the settings. To test the saved changes, run restart64.exe (located in the CRU folder) to apply the new settings.
Driver Conflicts or Incompatibility
Problem:
CRU relies on the GPU drivers to apply custom resolutions. It’s not always the older version of the GPU that stops CRU from working, sometimes, newer GPU drivers may have compatibility issues, and they obstruct resolutions from applying or make settings revert after a restart.
Solution:
Rolling back to a compatible driver version, or updating to a newer driver version if available, can often fix this.
DisplayPort or HDMI Limitations
Problem:
Certain cables or adapters, especially those with DisplayPort to HDMI or DVI, restrict the desired custom resolution and refresh rate from being applied.
Solution:
If you can, use a direct connection and ensure that both the cable and ports support the custom resolution and refresh rate you want to apply.
Operating System Restrictions
Problem:
Windows updates, especially major ones, sometimes interfere with custom resolution settings by resetting display configurations or restricting access to certain display properties.
Solution:
Reapplying settings after updates or temporarily disabling certain Windows features, like Display Scaling, might resolve this.
CRU Configuration Limitations with Multiple Monitors
Problem:
When working with multiple monitors that have different resolutions and refresh rates, adjusting a custom resolution on one monitor can sometimes impact the other and cause issues with display alignment or resolution.
Solution:
Set up each monitor separately in CRU to make sure that each one has a resolution and refresh rate that works well with it.
EDID (Extended Display Identification Data) Conflicts
Problem:
EDID data tells the computer the capabilities of a monitor, but some displays have inaccurate or restrictive EDID profiles. When CRU tries to override these with custom resolutions, the monitor may fail to recognize the settings.
Solution:
Use CRU’s “Edit EDID” feature to manually adjust EDID information or try a different extension block configuration that better matches the display’s actual capabilities.
Limited Support on Intel GPUs or Integrated Graphics
Problem:
Older or integrated GPUs, such as Intel integrated graphics, may have limited support for custom resolutions (especially high refresh rates). This can prevent CRU from applying settings correctly.
Solution:
Lower the custom resolution or refresh rate or test the utility on a compatible GPU if available.
If these issues persist, users may need to explore alternative software solutions or wait for driver updates that better support custom resolutions with their hardware configuration.
Conclusion
To sum up, fixing issues with the Custom Resolution Utility is more common with older monitors, but newer models can also face similar problems due to compatibility, adapters, or cable types. By following basic troubleshooting steps, you can set up custom resolutions smoothly with CRU, amplifying your display’s performance for both work and gaming. Proper settings not only improve visual quality but also help your GPU function more efficiently.