If you are a video game player who thinks custom resolutions are just a placebo, we are here to help you achieve the resolution you want within the limits of your monitor. Bigger models and wider targets are every gamer's dream, and a custom resolution can simply change the feel of the game, making you a next-level gamer. Stretched resolutions like 1440 × 1080 are mostly unavailable on Windows-based computers, and the Custom Resolution Utility simply helps you achieve that with GPU scaling.
Because CRU performs EDID registry overrides and does not modify any hardware, it is safe and easy to use if you have a compatible operating system, graphics card, and monitor. Let's continue with the Custom Resolution Utility guide.
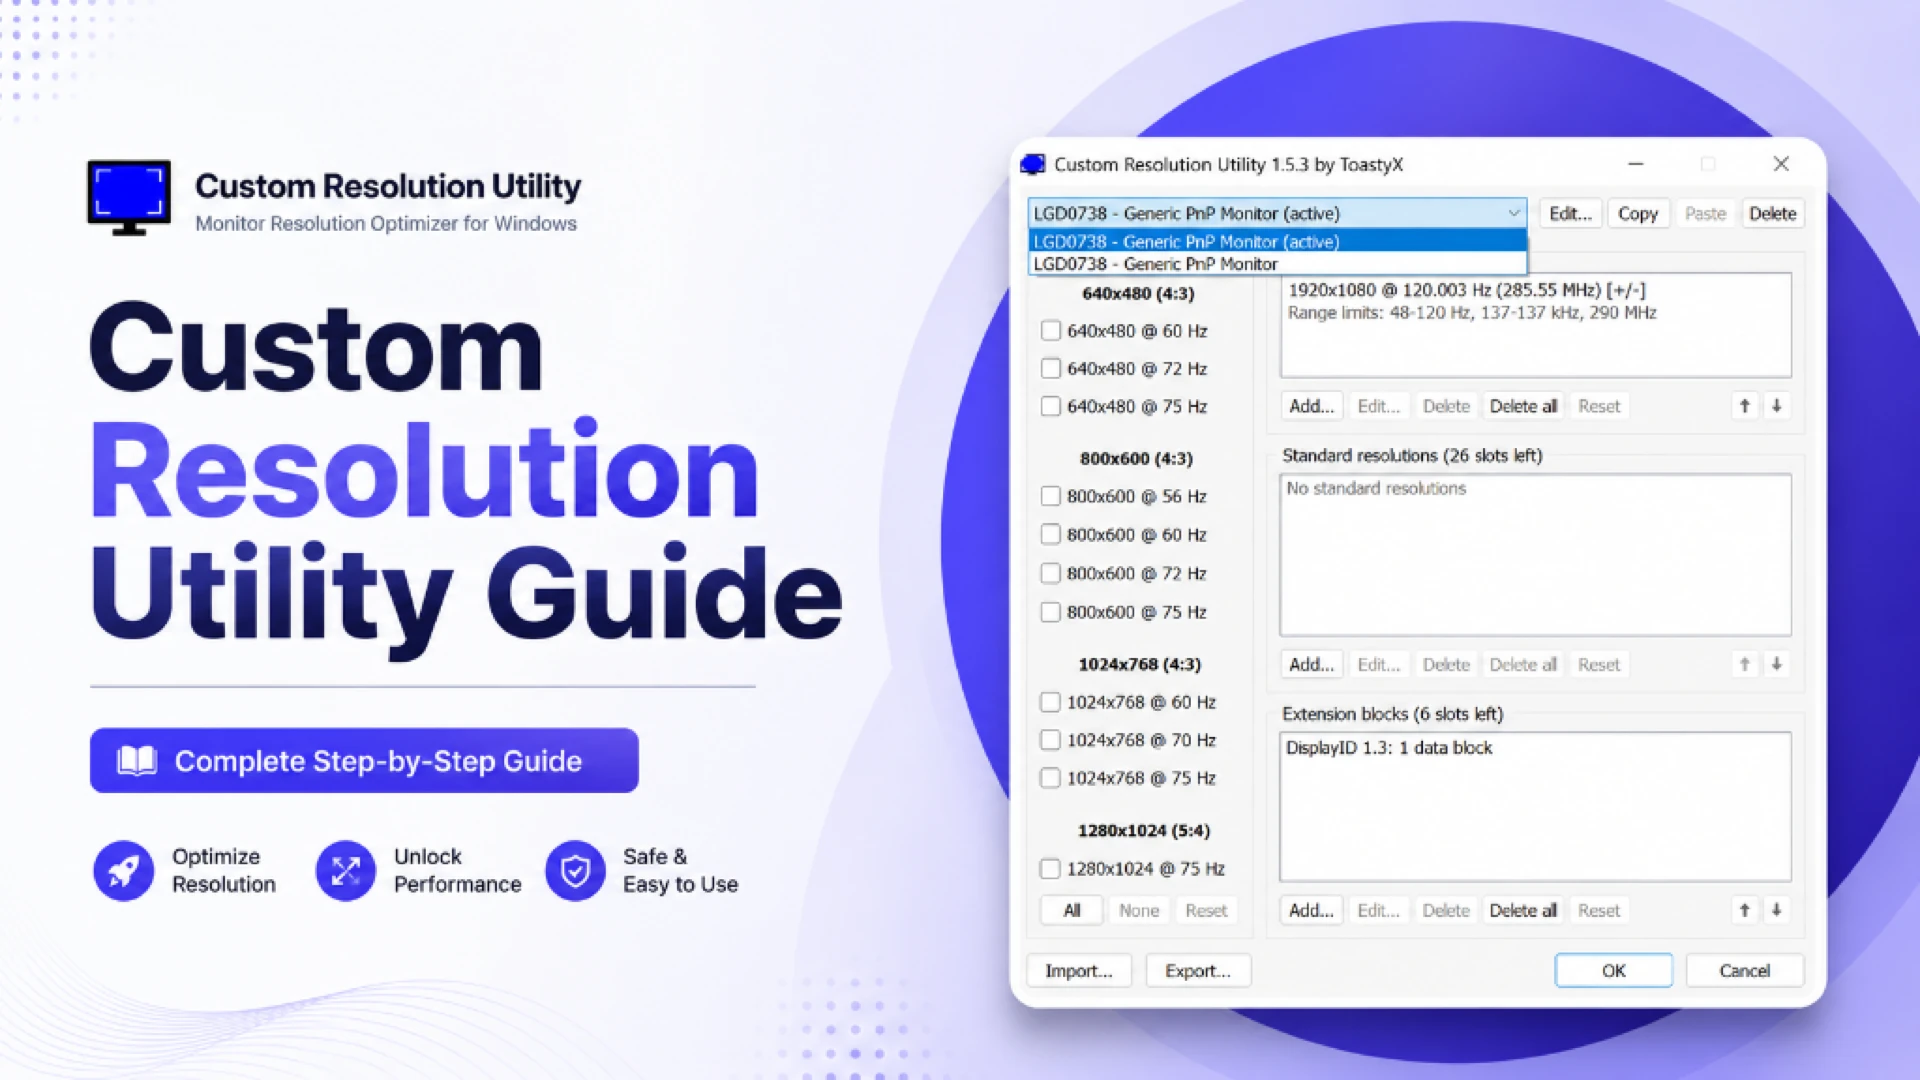
Getting Started With CRU: Download and Setup
Downloading the Custom Resolution Utility, also known as CRU, is the very first step before making any changes to your Windows resolution. You can download CRU from any reliable source or directly from our download page.
Once you have downloaded CRU, you are in luck. There is no need to install it, as it comes ready to use with an easy-to-navigate interface.
Here is what you need to have in order to run CRU and use custom resolutions and refresh rates on your PC, Windows computer, or laptop.
System Requirements:
Before using CRU, you need to have Windows Vista or above, as Windows XP does not support EDID override capabilities. Simply, CRU works on Windows only when your monitor, graphics card, drivers, and cable support the custom display mode you want to add. Also, your system must have AMD, NVIDIA, or Intel graphics drivers installed, along with administrative rights, to make any changes to the display registry.
| Requirement | Description |
|---|---|
| Operating System | Windows Vista or later (Windows 10/11 recommended). |
| GPU Drivers | AMD, NVIDIA, or Intel drivers must be installed. |
| Administrator Access | Necessary for modifying registry entries. |
| Monitor Knowledge | Understanding your monitor's maximum limits to prevent black screens. |
Supported Operating Systems:
CRU is a Windows-based utility and can only be used on PCs and laptops running Windows-based operating systems. You can’t change the resolution on macOS devices using this program.
Graphics Card Requirements:
CRU works by creating a software EDID override that the graphics driver reads. Compatibility, therefore, depends heavily on the installed GPU and its driver.
CRU generally supports:
Intel laptops and systems using switchable or hybrid graphics may have limited support because their internal displays can be controlled differently. If CRU does not detect or change the laptop screen, test it with an external monitor.
Monitor Requirements:
CRU also needs a compatible monitor. The monitor must support the resolution, refresh rate, timing, and bandwidth you want to use. CRU cannot provide display capabilities beyond its physical limits.
Before adding a new display mode, confirm:
- The monitor’s native resolution
- Its officially supported a refresh-rate range
- The maximum resolution and refresh rate accepted through each input
- Whether adaptive sync, HDR, or high-bit-depth color affects the available bandwidth
Start with conservative settings and increase the refresh rate gradually.
How to Use Custom Resolution Utility on Laptop/PC/Windows: Step-by-Step
Follow the steps below to download, extract, and configure CRU correctly on your PC. Make sure you download the tool, keep it saved in the same folder as restart64.exe and reset-all.exe, and know their functions. Remember, CRU.exe is the main program used to change your resolution settings. restart64.exe refreshes your graphics driver so the changes can take effect. If you experience any problems, reset-all.exe restores all CRU settings to their original state.
1. Downloading and Extracting:
Before making any custom resolutions, download the software and extract the files.
- Download the Software: Search for the official release by ToastyX, or download it from our website.
- Extract the Files: CRU is a portable application. Extract the ZIP folder to a dedicated location, such as your desktop or a "Utilities" folder.
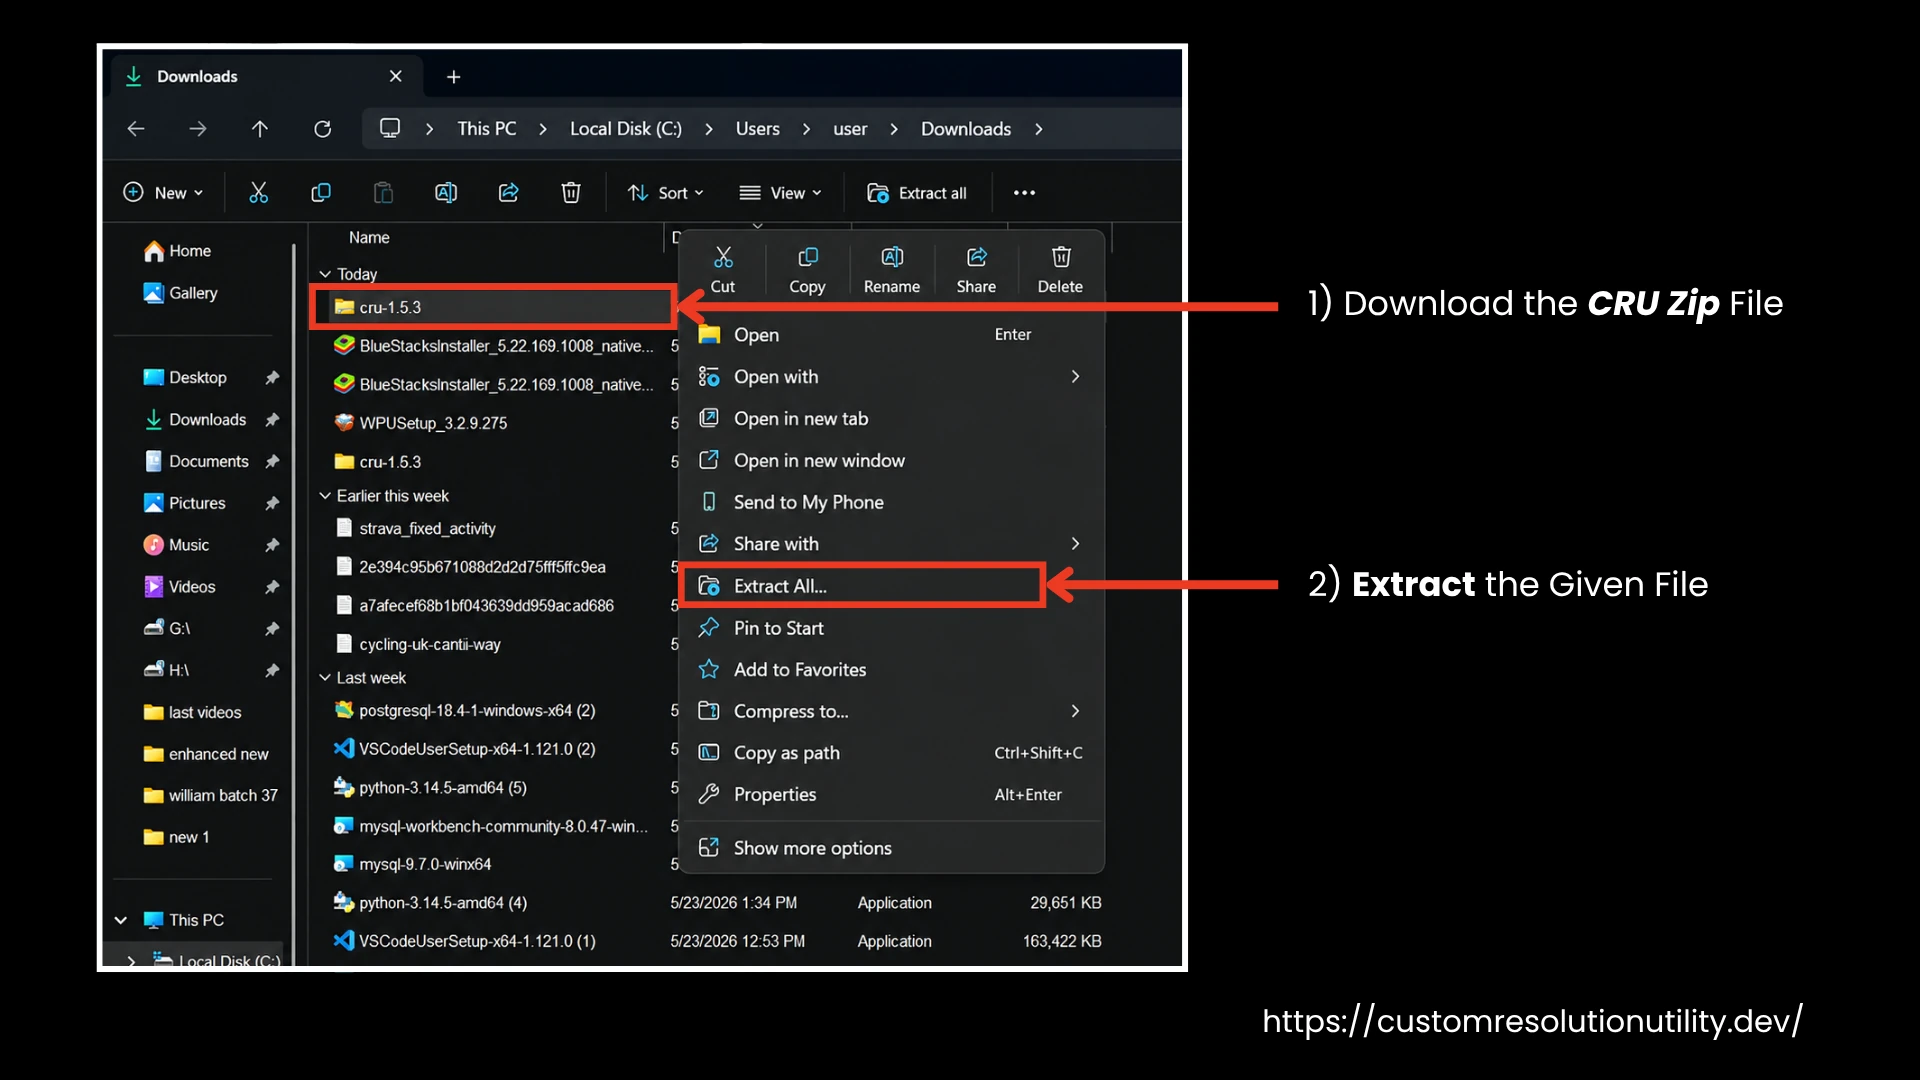
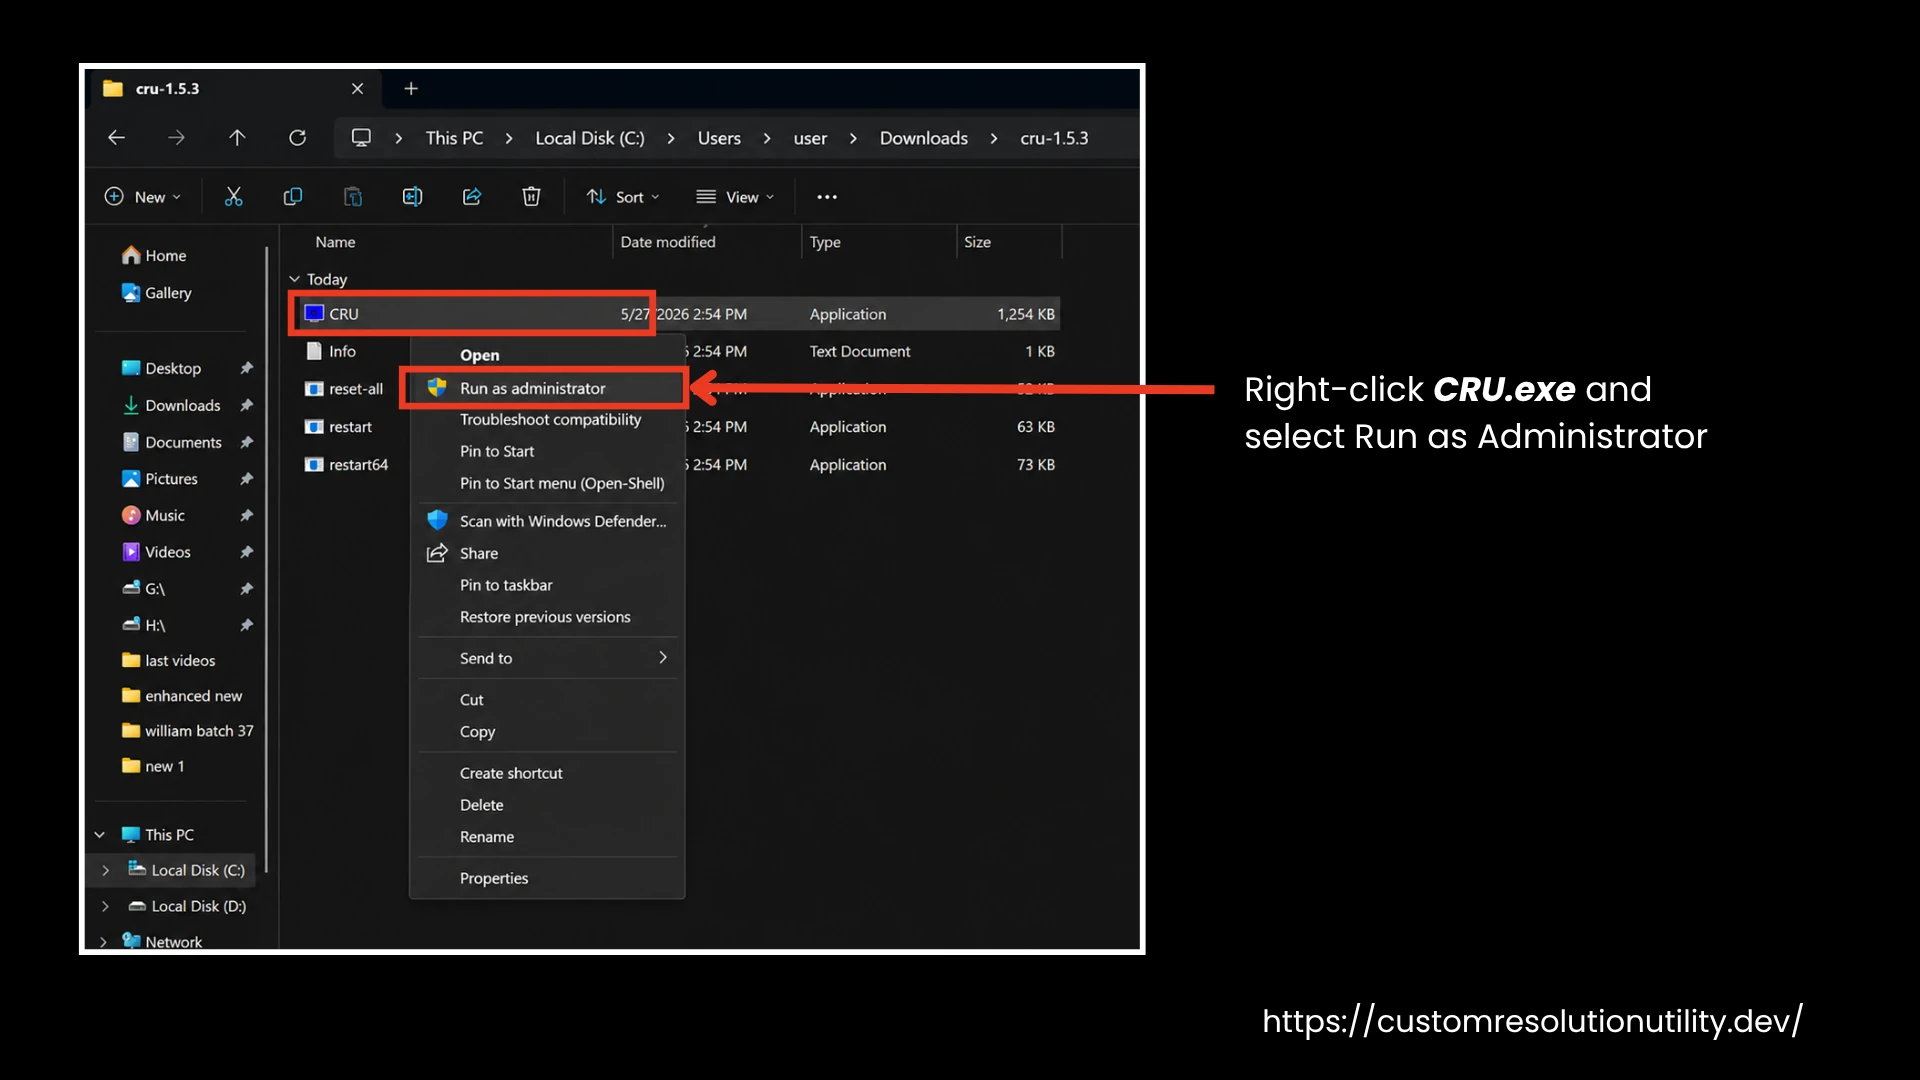
- Run as Administrator: Right-click CRU.exe and select Run as Administrator to ensure the tool can save changes to your system registry.
2. Selecting Your Display:
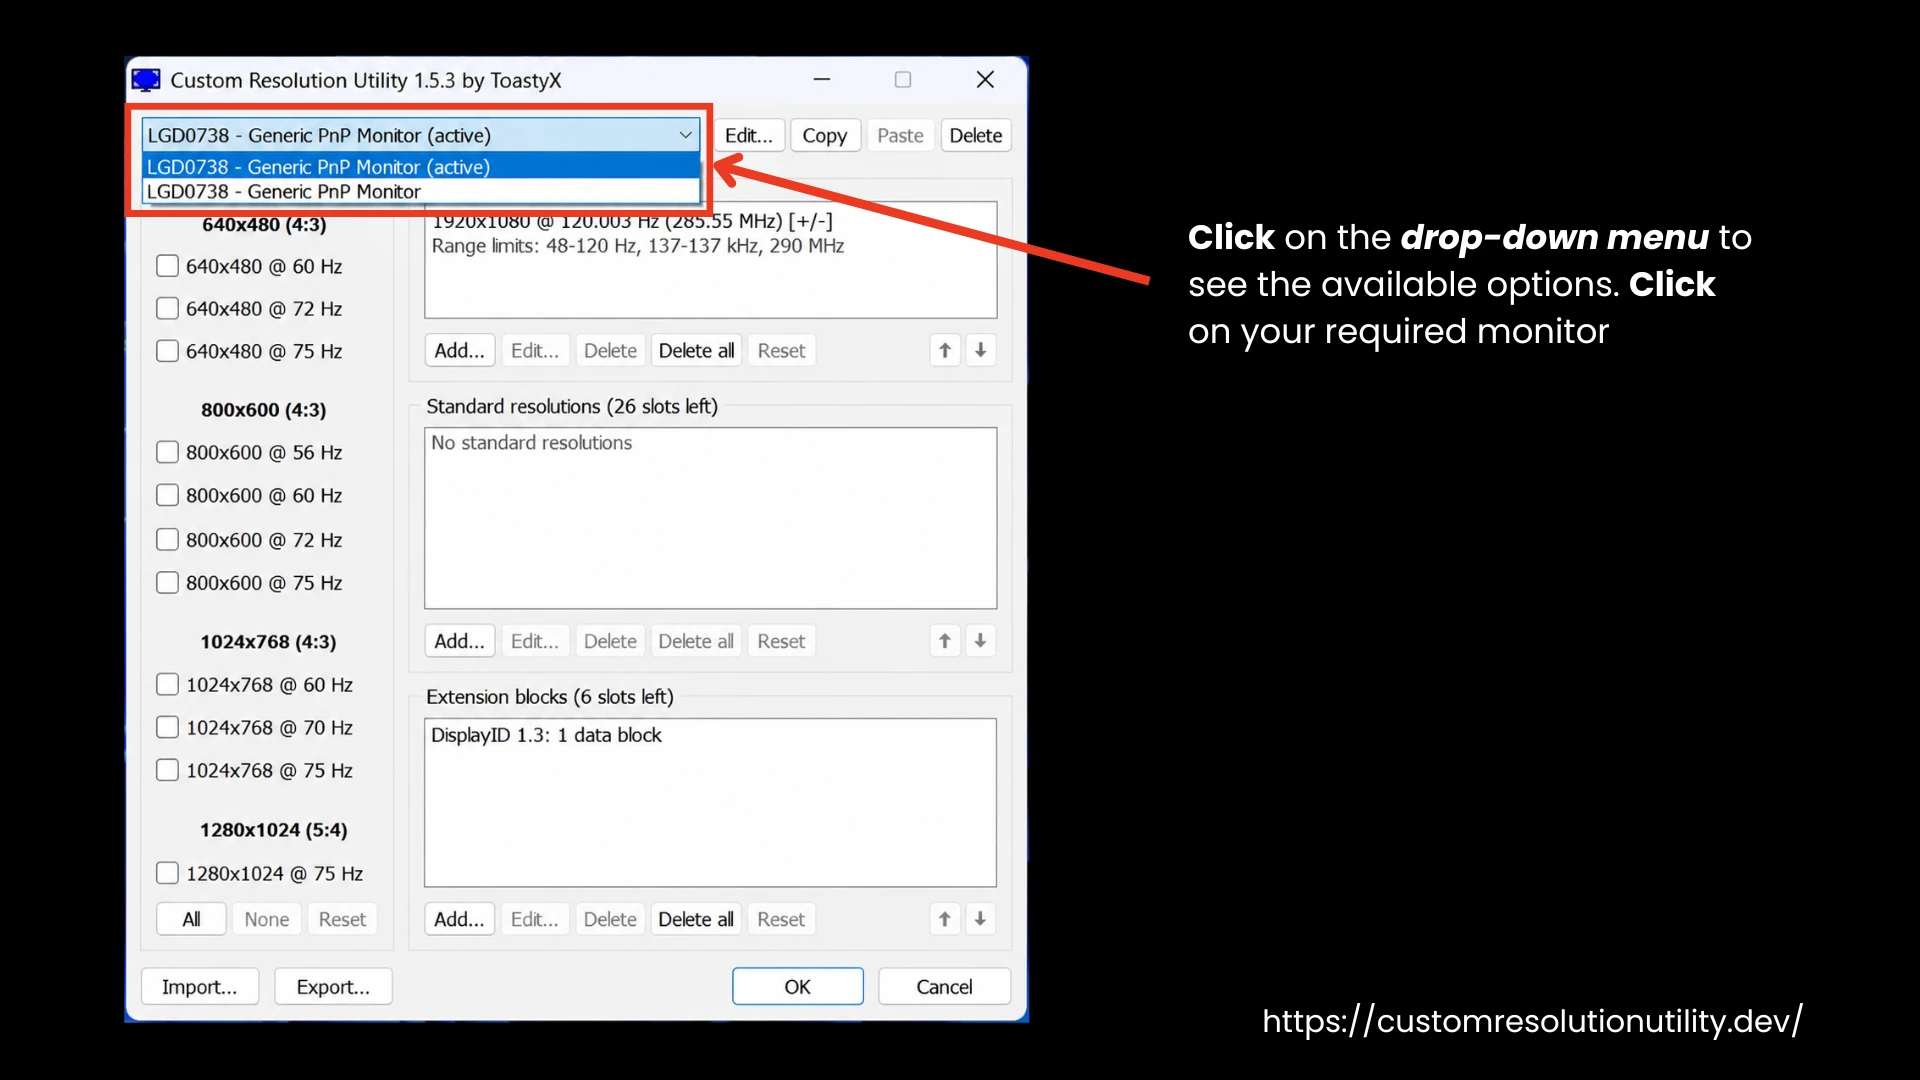
When the application opens, you will see a dropdown menu at the top:
- Identify the Monitor: Click on the drop-down menu to see the available options and ensure the correct display is selected. Active monitors are usually marked as (active). Click on your required monitor if you are using more than one monitor.
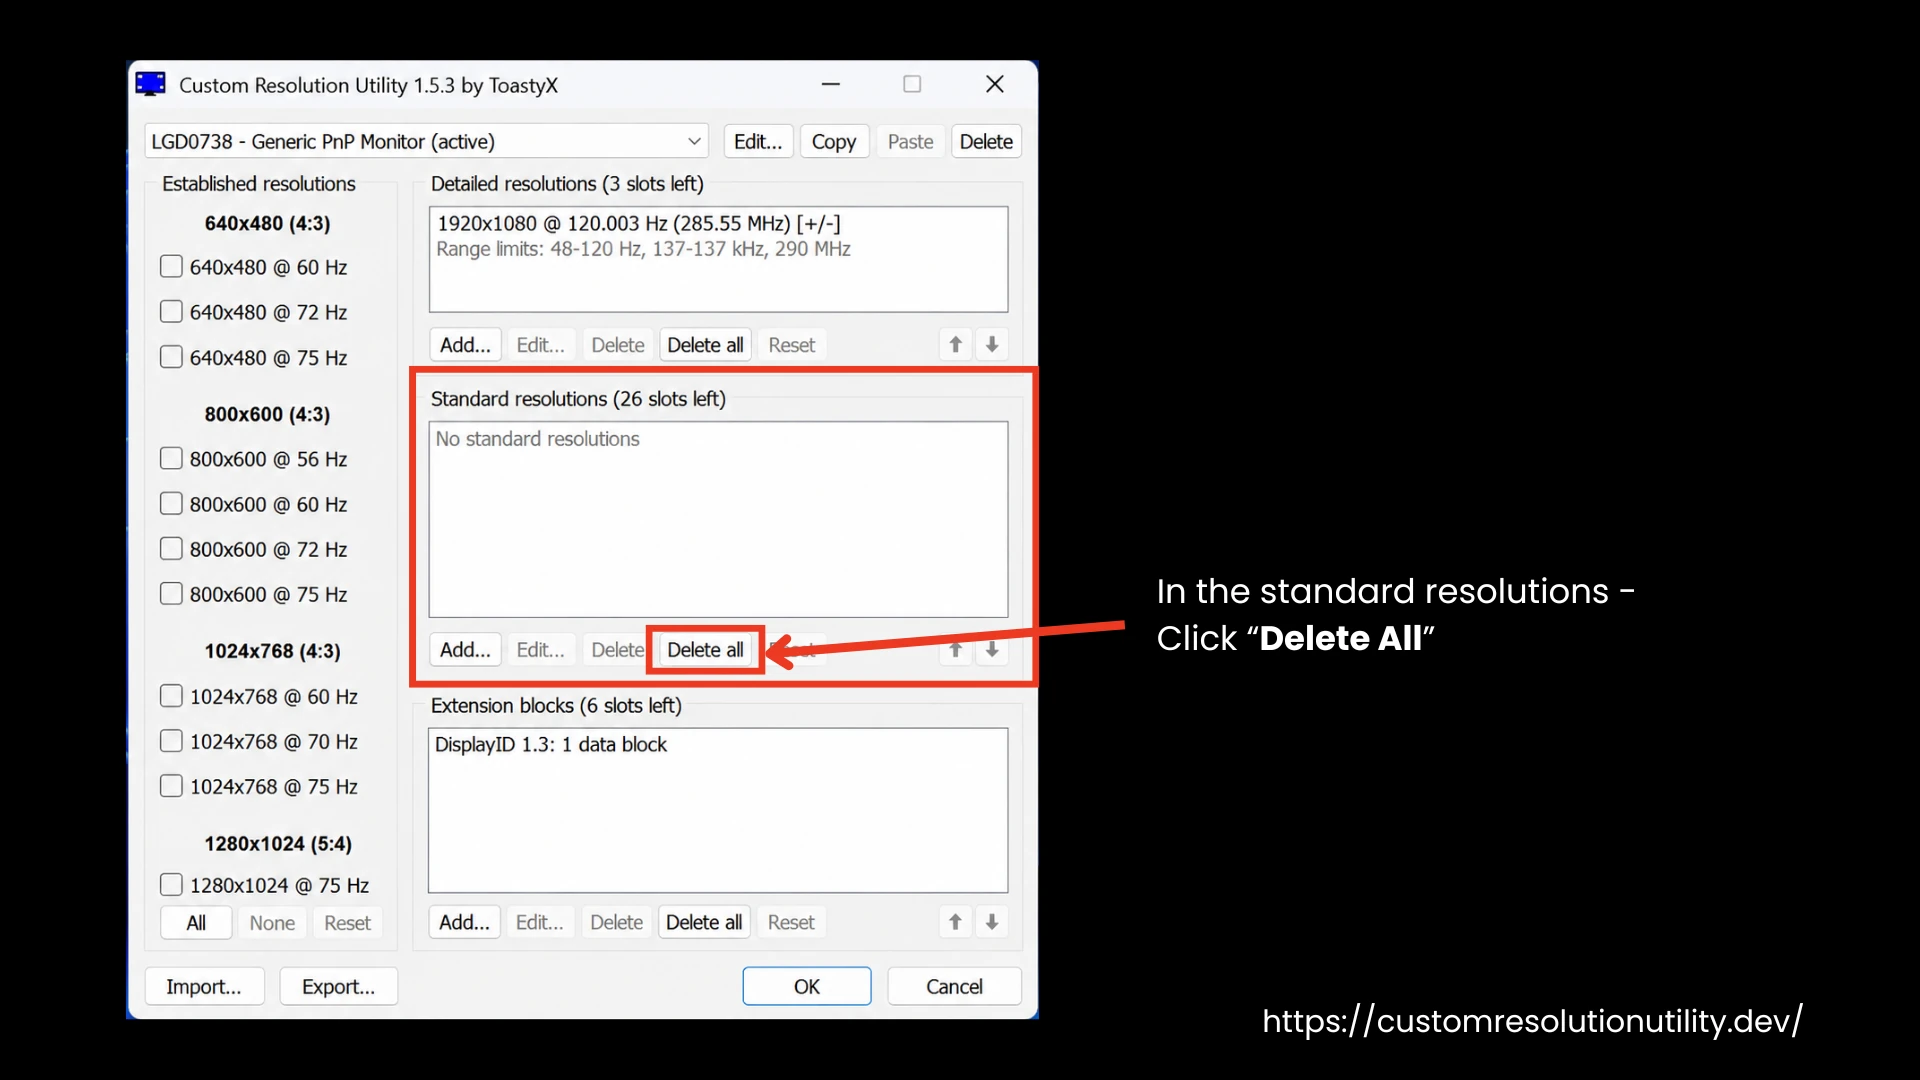
- Delete Standard Resolutions: In the standard resolution options, click the delete all button so that you don’t have a prior setting of resolutions. Don’t worry, it will not delete any native resolutions of your PC, these are custom presets that may cause any conflicts with your newly added settings in later stages.
- Delete Extension Block Settings: In the extension block settings, choose all the listed resolutions and press “Edit”. It will take you to another Pop-up box, where you select “Delete all” and press ok. This will help you delete all the data containing color, timing, and scaling presets in the extension block.
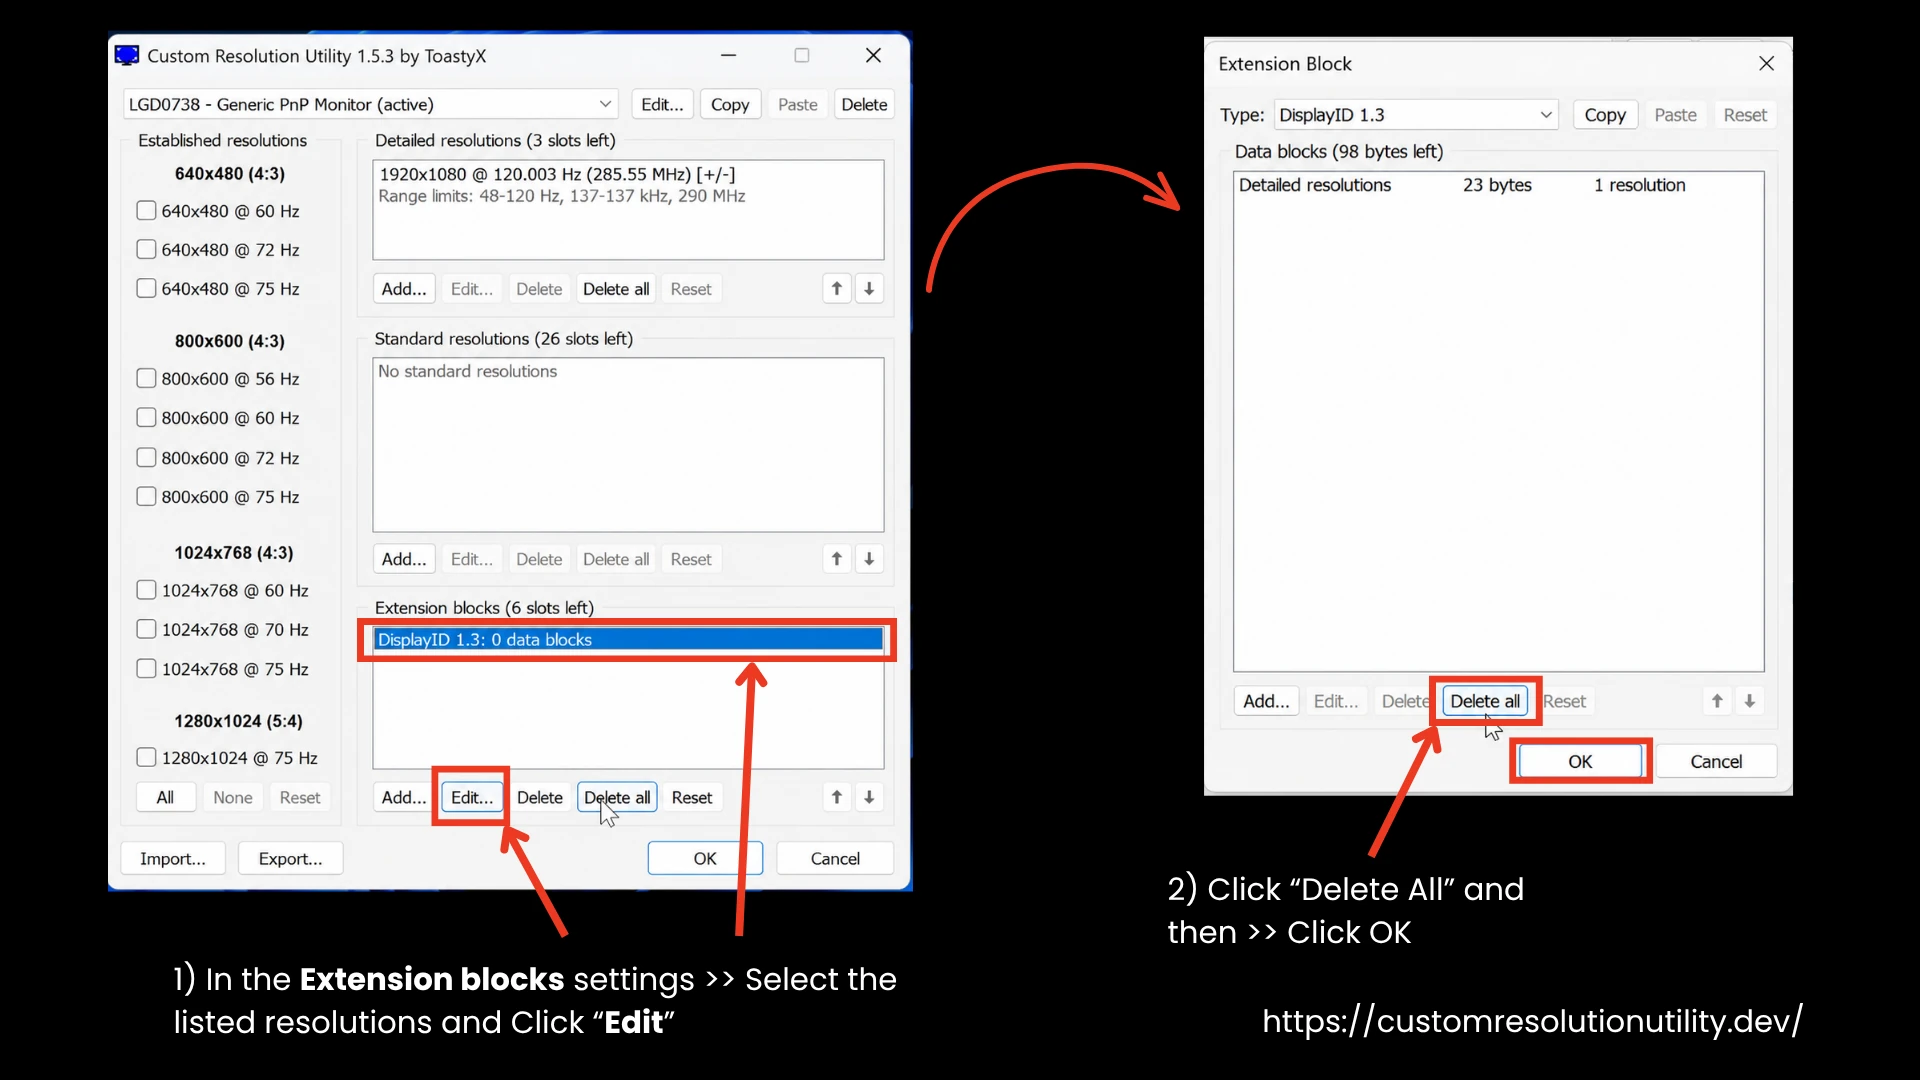
Clearing the extension block is extremely important if you have ever used custom resolutions, switched GPUs, drivers, or used other third-party scaling tools. This step is equally important and safe for your monitors, as it does not change anything but cleans the previously used presets.
3. Adding a Custom Resolution:
This is the core functionality of the software. To add a new resolution or refresh rate:
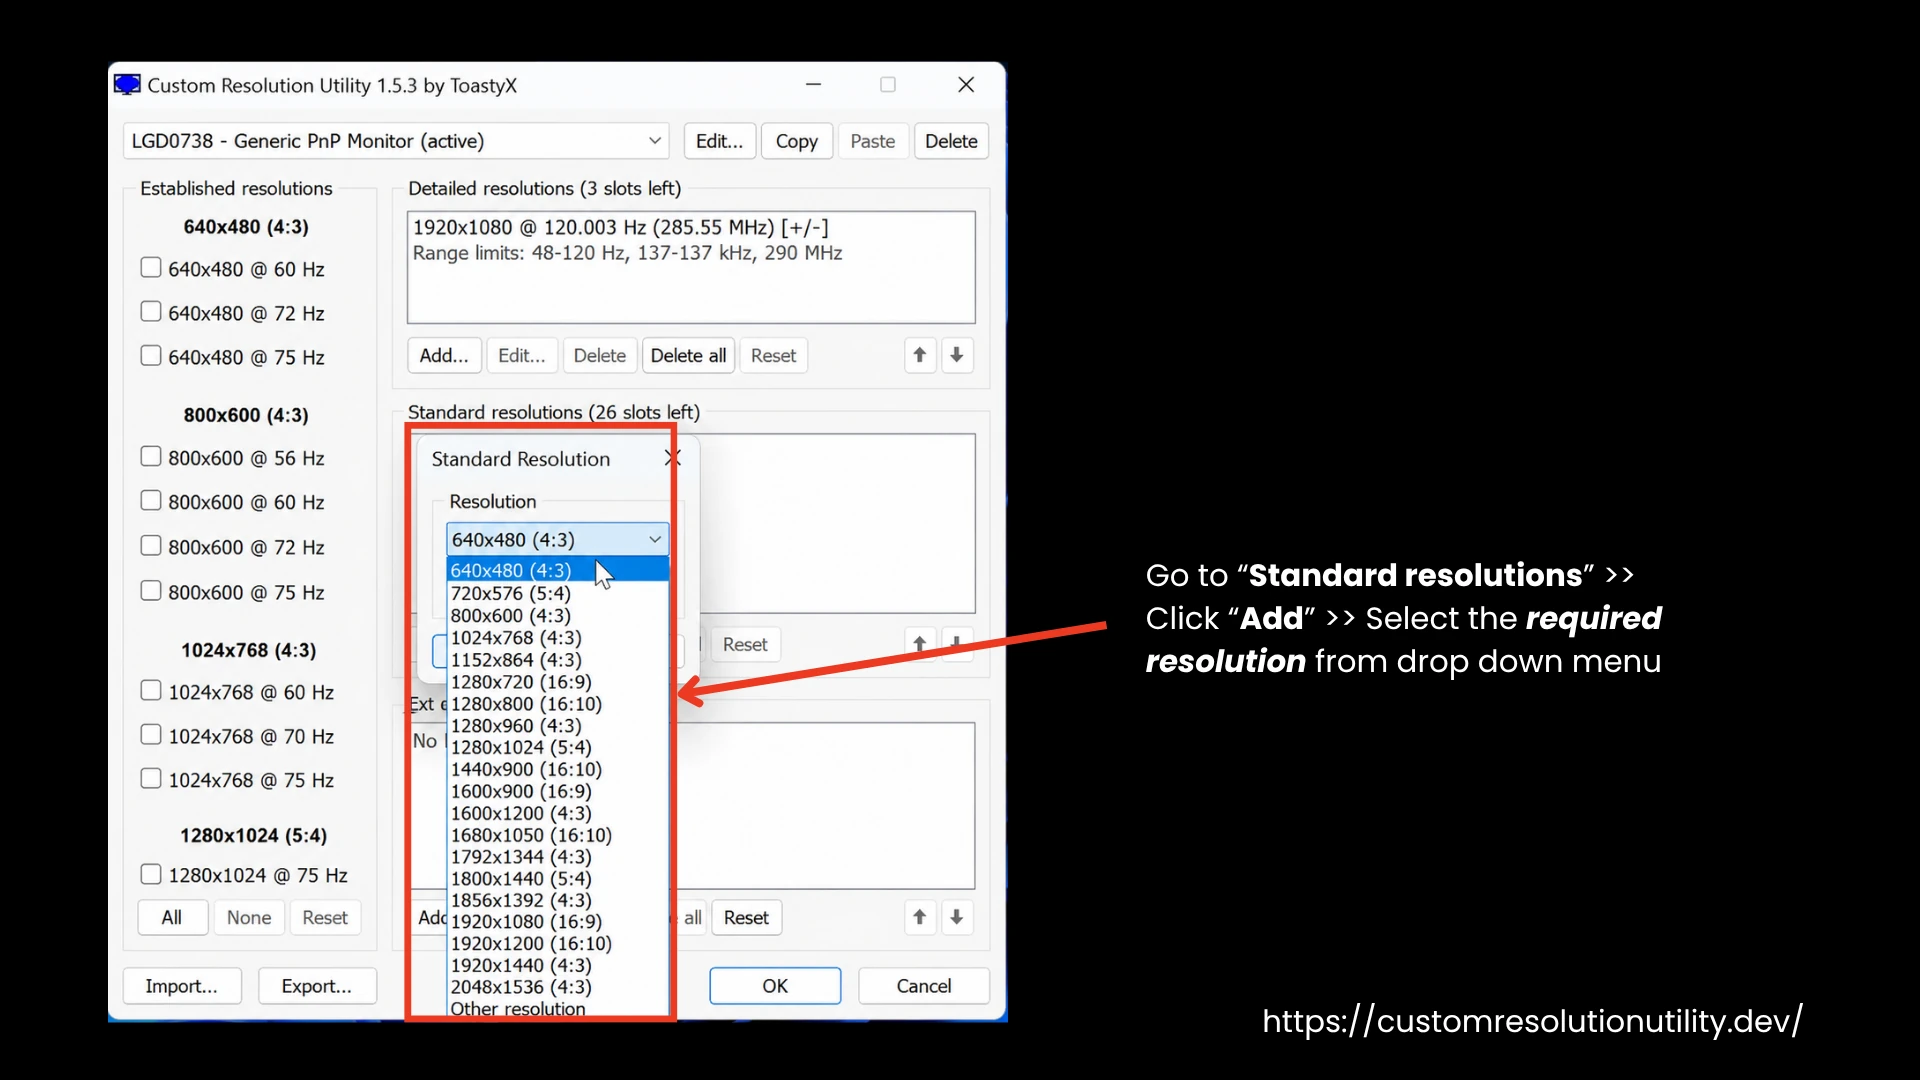
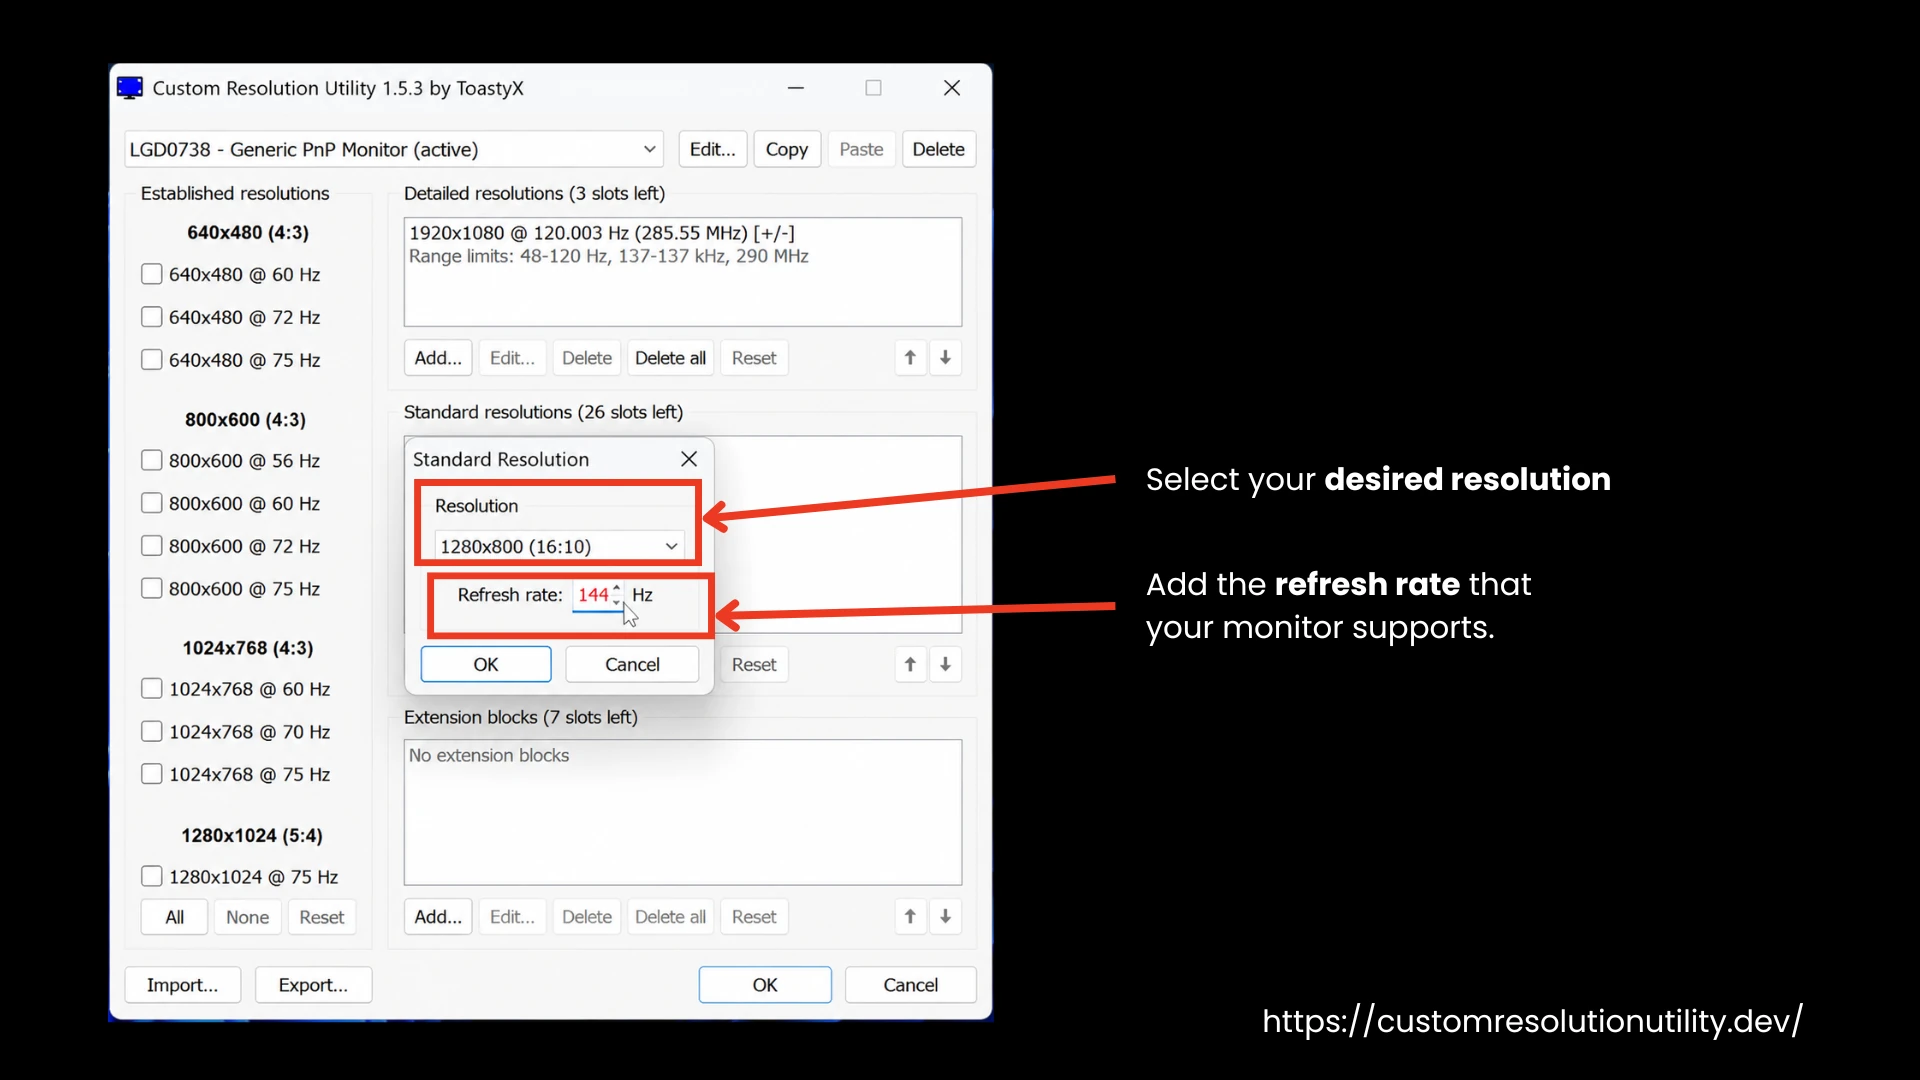
- Navigate to Standard Resolutions: Click the Add... button under "Standard Resolutions," which will open another drop-down menu with a list of custom resolutions. Now, what if your required resolution is not in the drop-down menu? Here, we use another setting that we will discuss in the "Stretched Resolution" section. For now, let’s continue with the built-in settings provided by CRU.
- Enter Parameters:
- Width & Height: Enter your desired resolution (e.g., 1280x800).
- Refresh Rate: Enter your target frequency (e.g., 60Hz or 120Hz).
Remember, you can only add the refresh rate that your monitor supports. Check your model number and monitor capability before choosing a refresh rate. In the following example, our monitor only supports 120Hz, so we cannot add 144Hz to it. That’s why the software marks it as red, showing the user that we should not select 144Hz.
- Multiple Resolution Options: Multiple resolutions can be added by repeating the same process. Once you have added your required settings, move on to confirm.
- Confirm: Click OK to save the entry to the list.
4. Applying Your Changes:
Unlike other software, changes in CRU do not take effect immediately. You must restart the graphics driver to see the results.
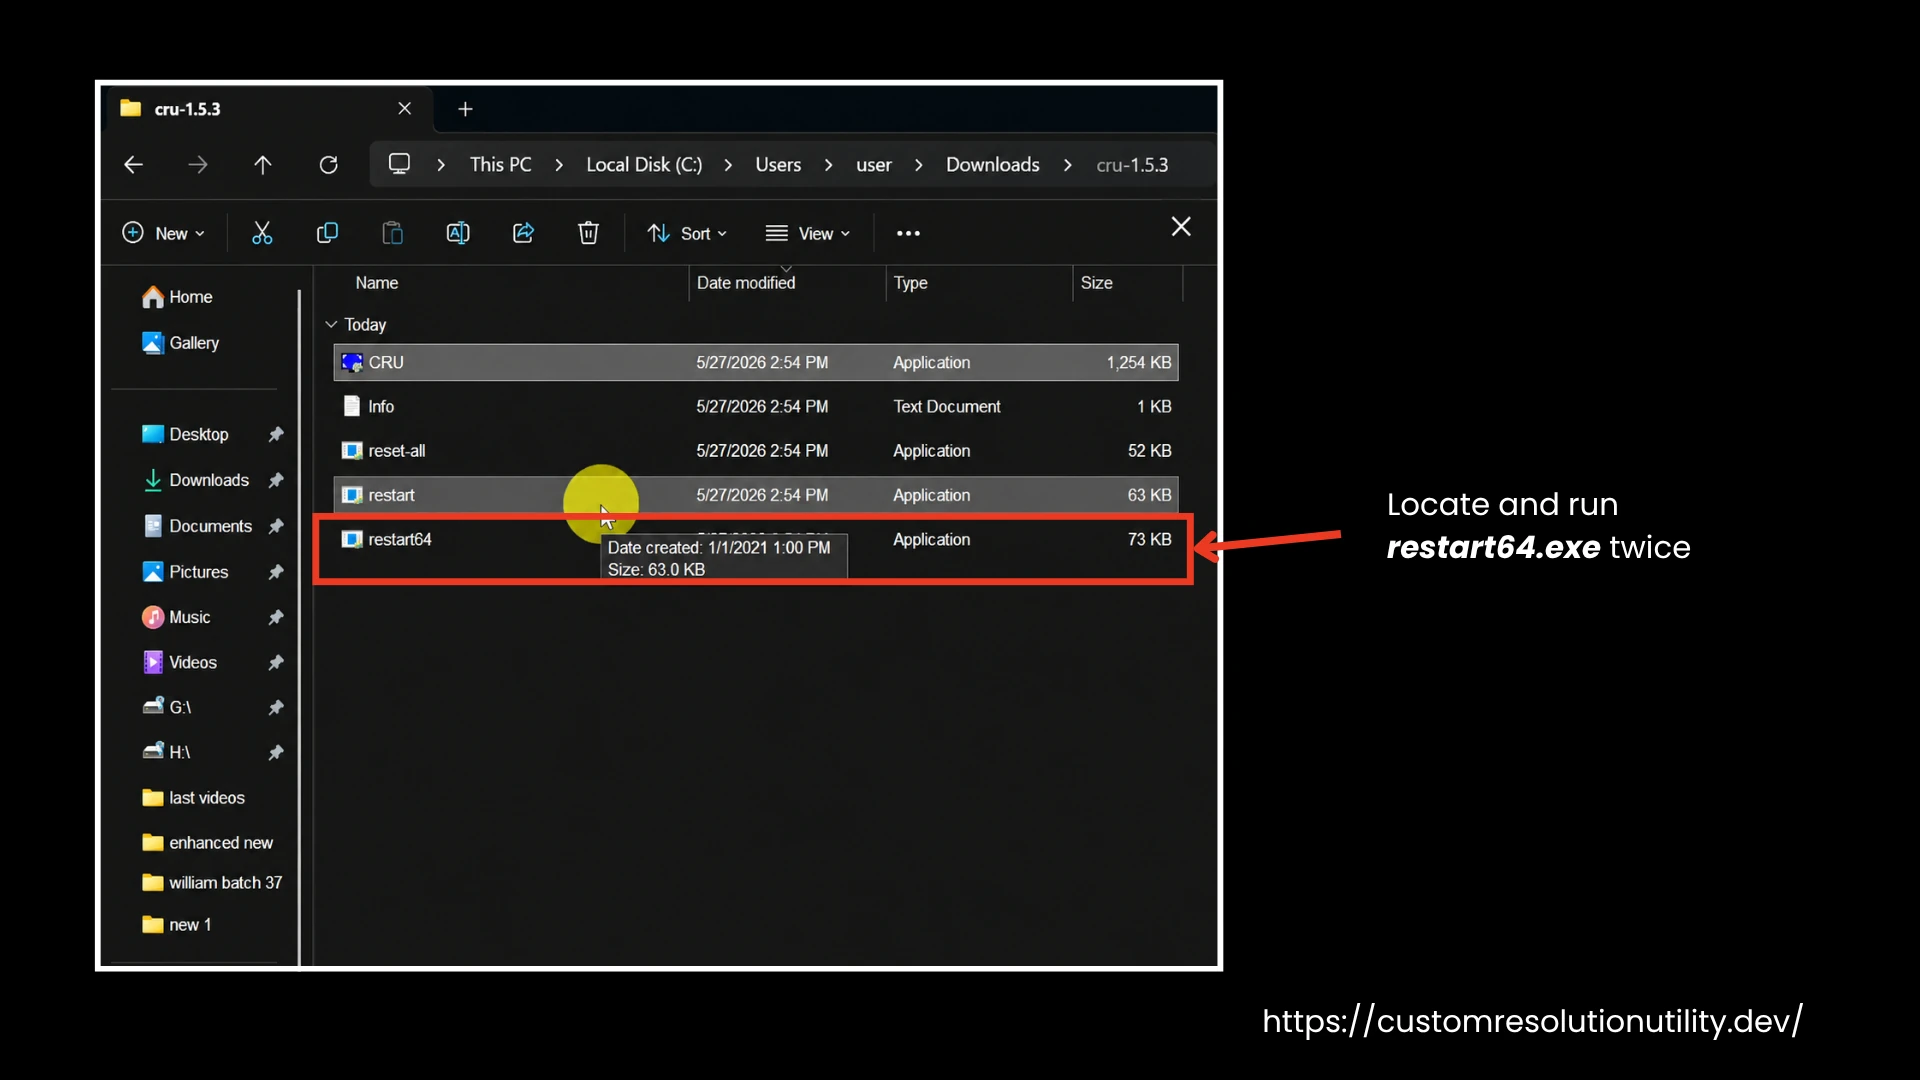
- Locate the Restart Tool: In the same folder where you extracted CRU, you will find restart.exe (for 32-bit) or restart64.exe (for 64-bit).
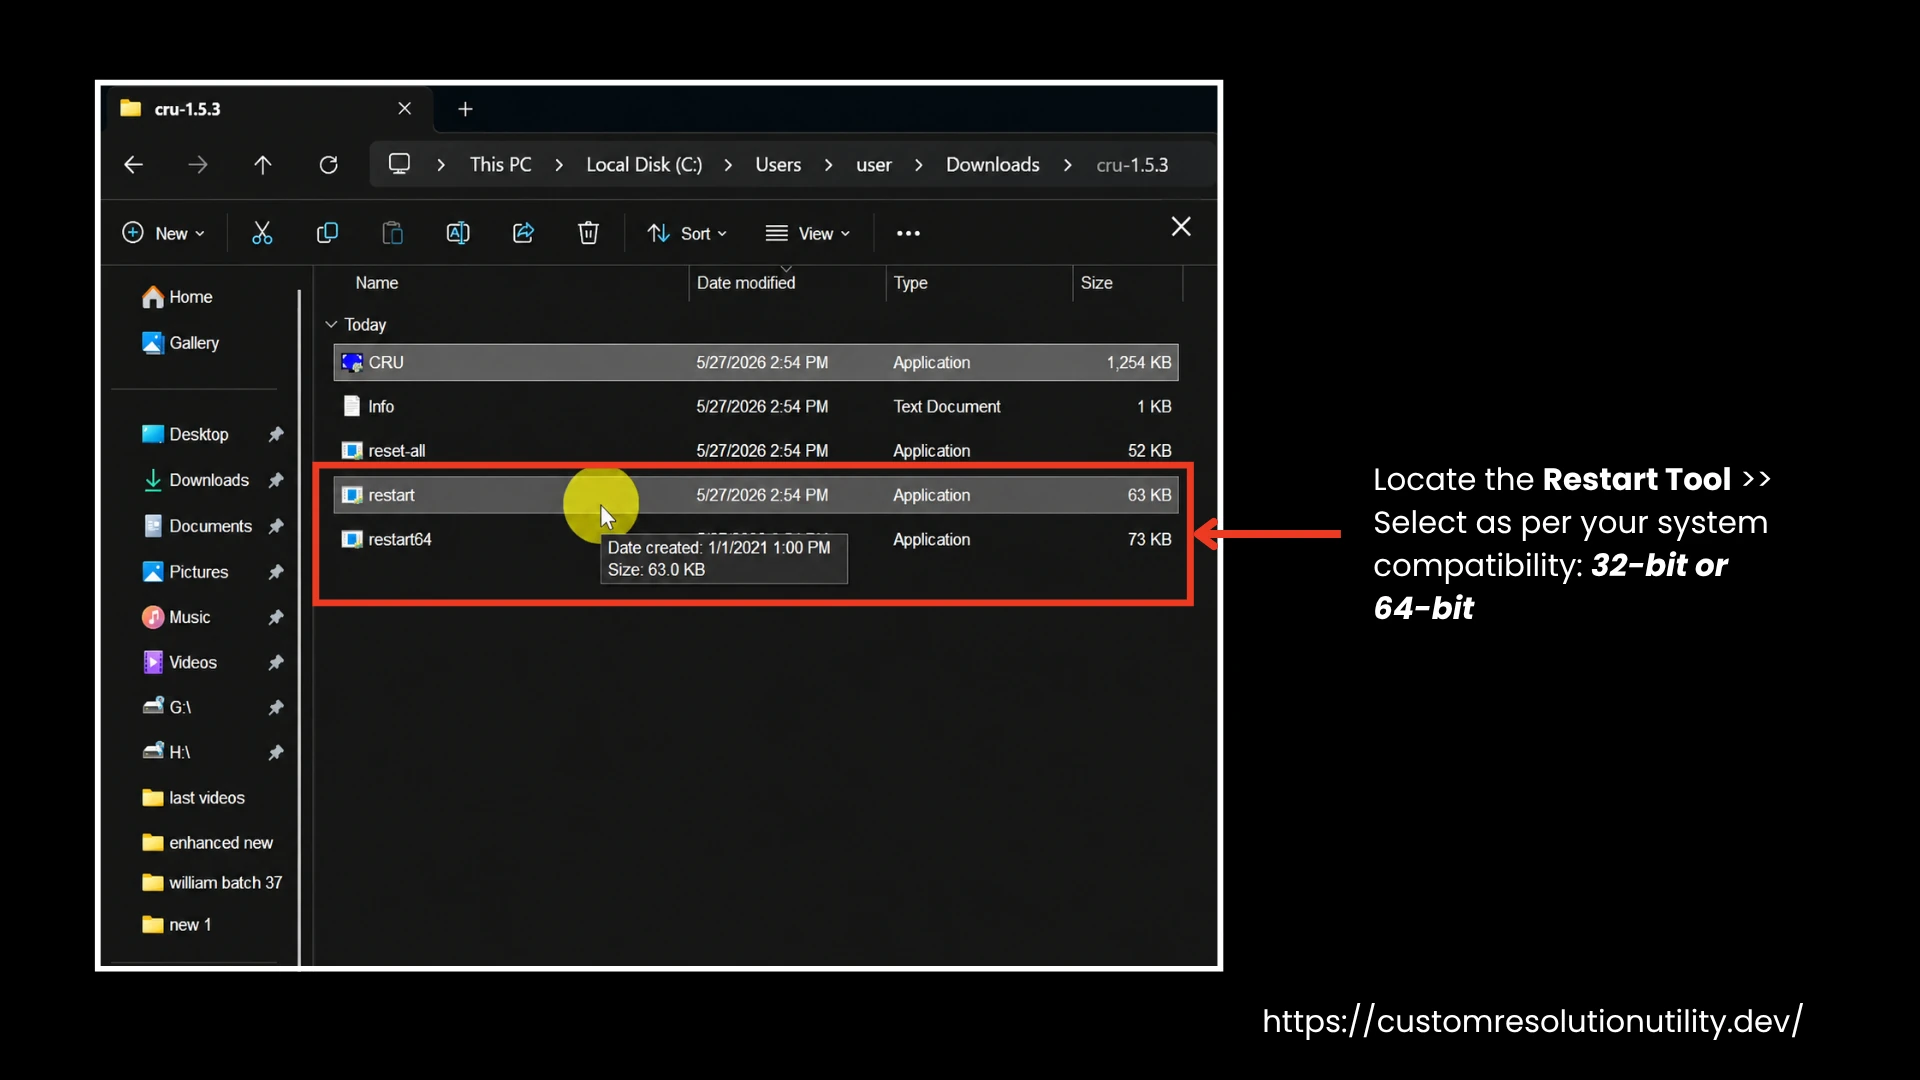
- Run the Restart Tool: Run the appropriate version. Your screen will flicker and go black for a few seconds while the graphics driver reloads.
If you are recording a video or using a screen recorder, interruptions may occur, so ensure that you close all programs running in the background. After the restart is complete, you will see the following message.
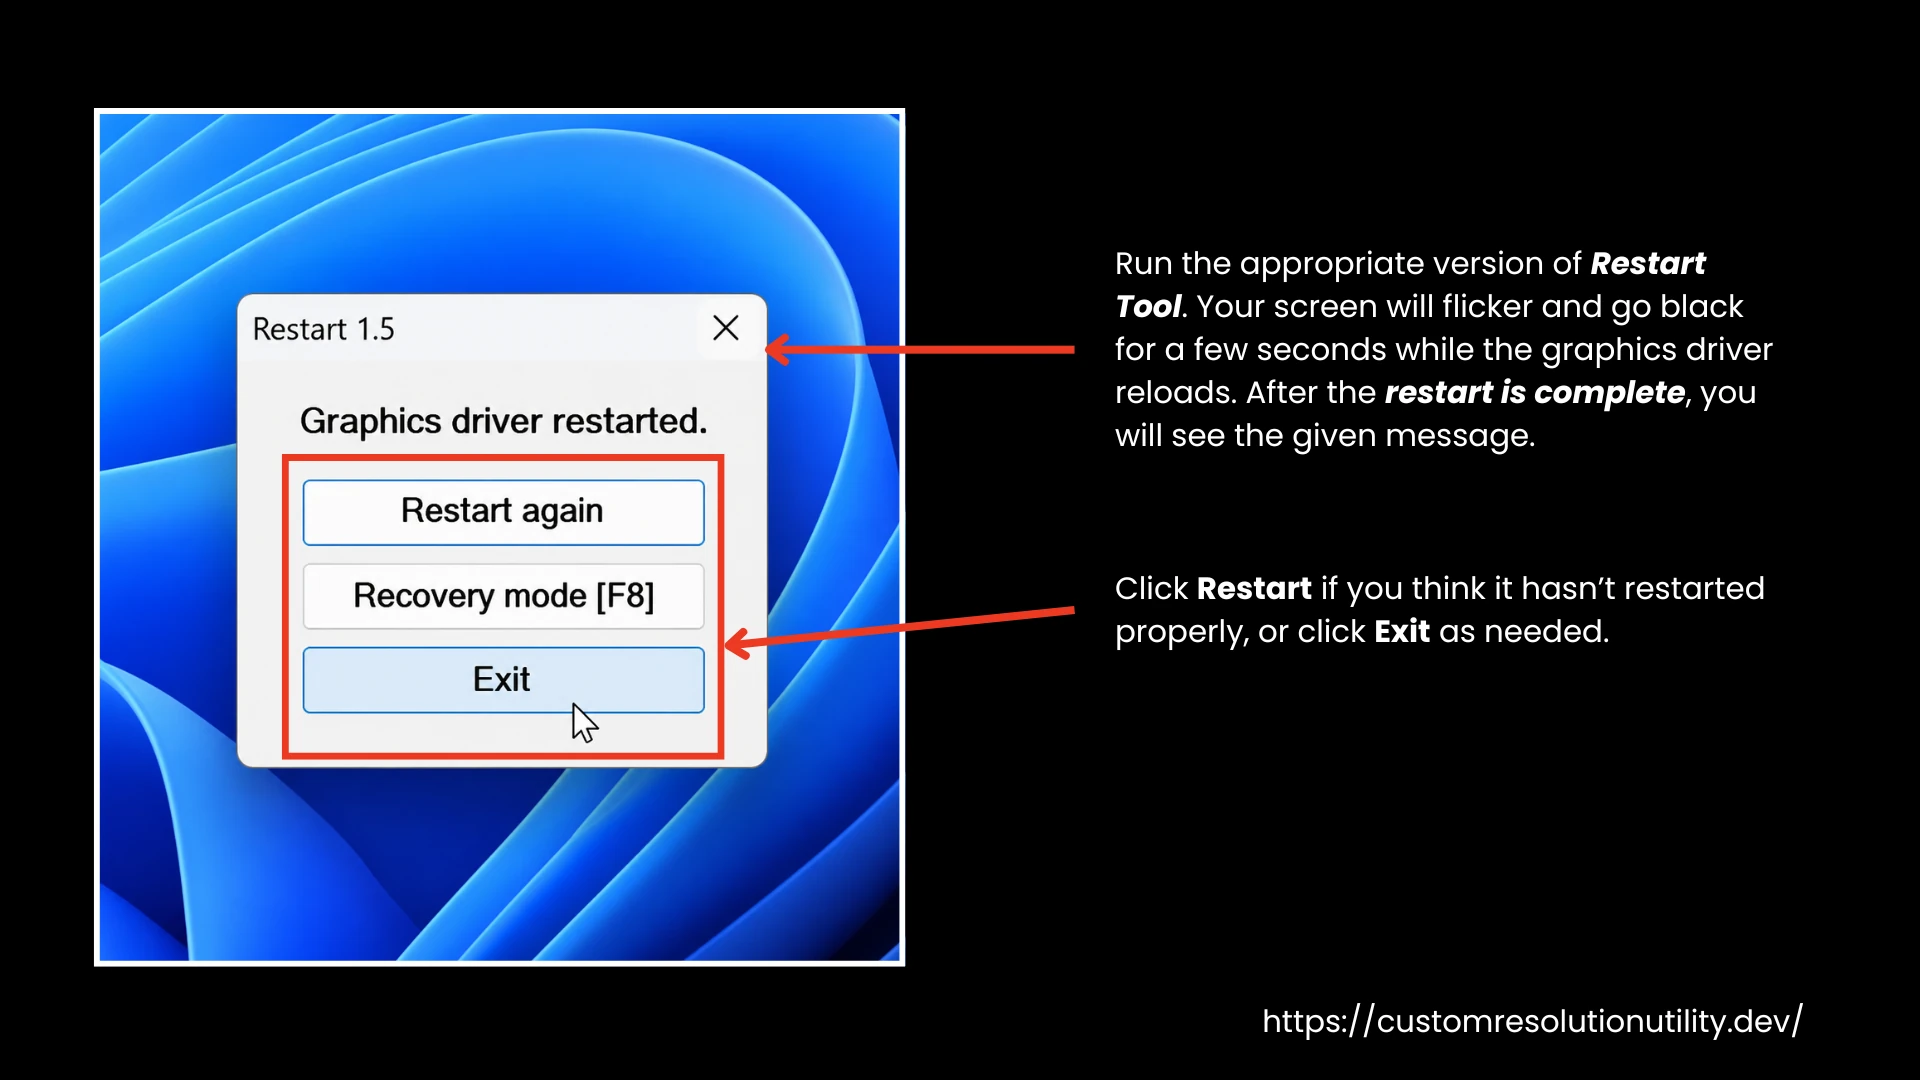
- Restart or Exit: Click Restart if you think it hasn’t restarted properly, or click Exit as needed.
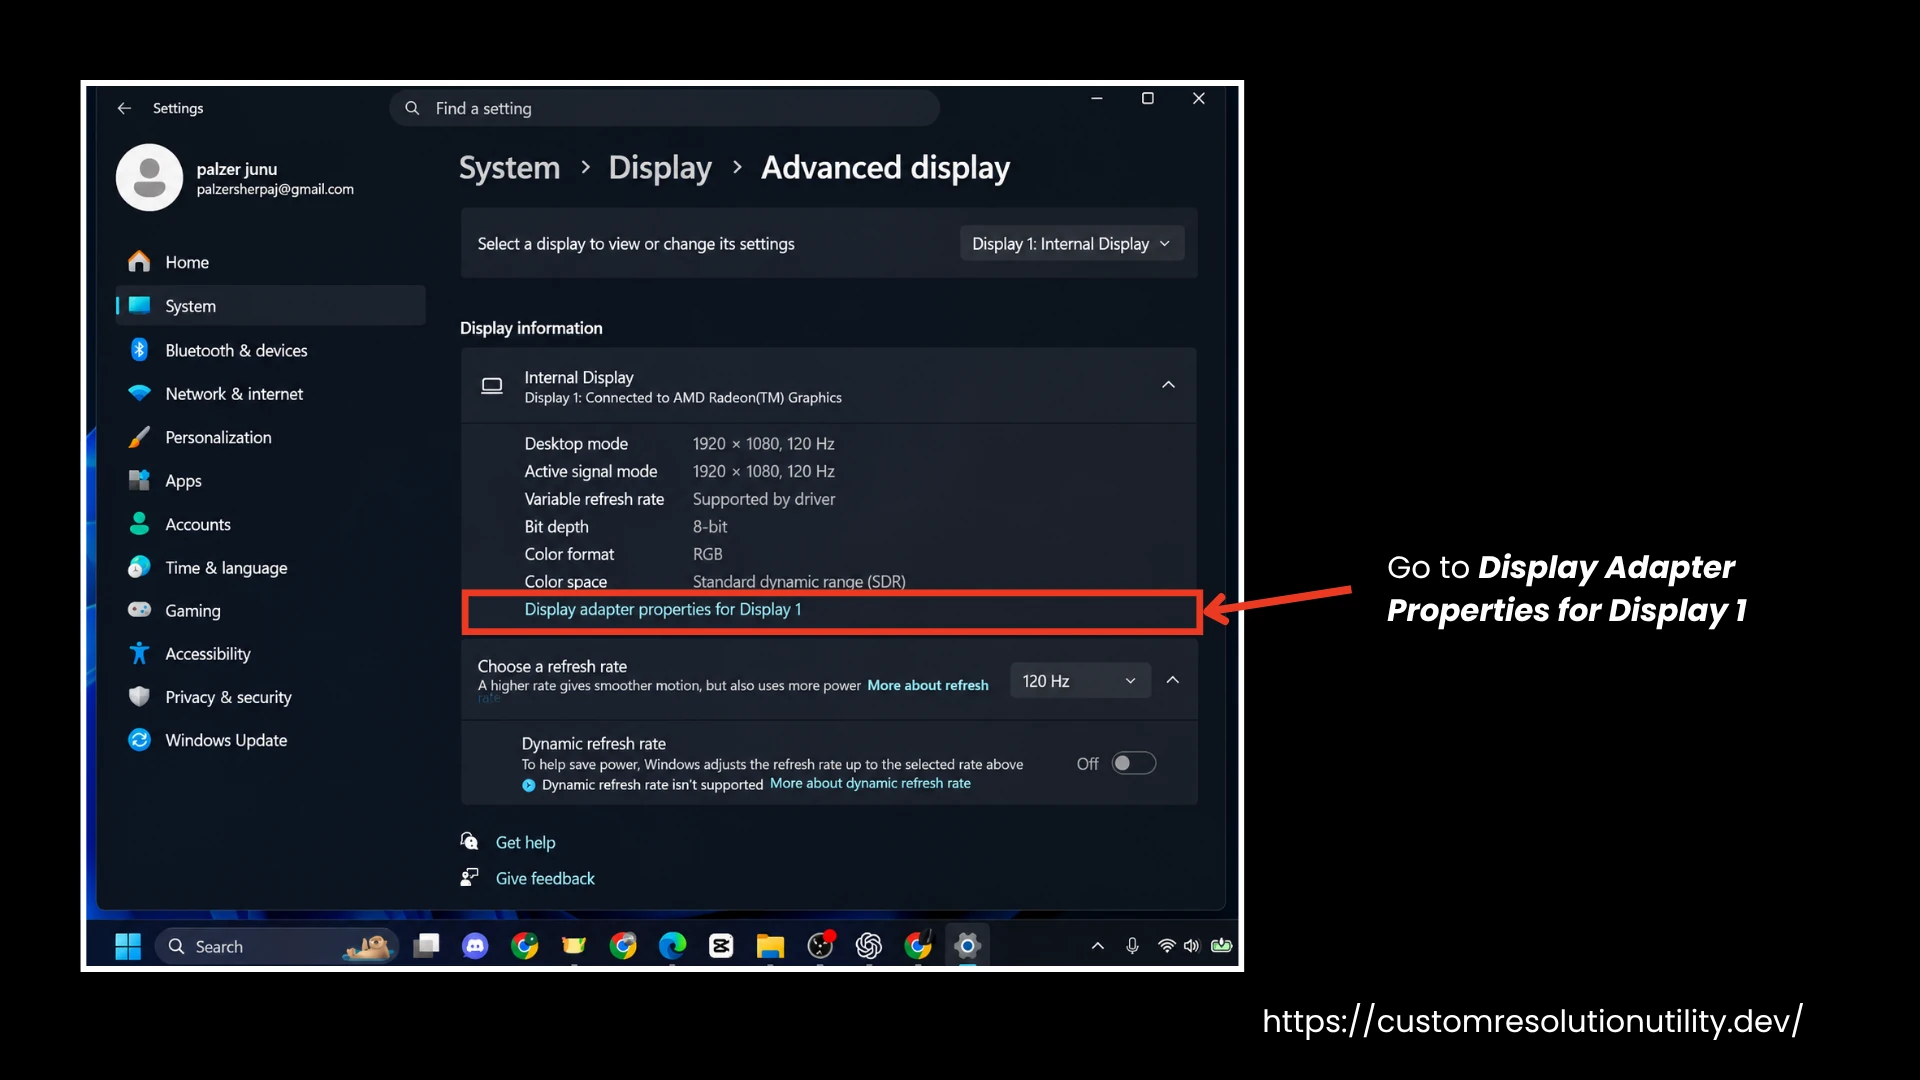
- Final Verification: Once your screen comes back, go to Windows Display Settings > Advanced Display Settings to select your new custom resolution.
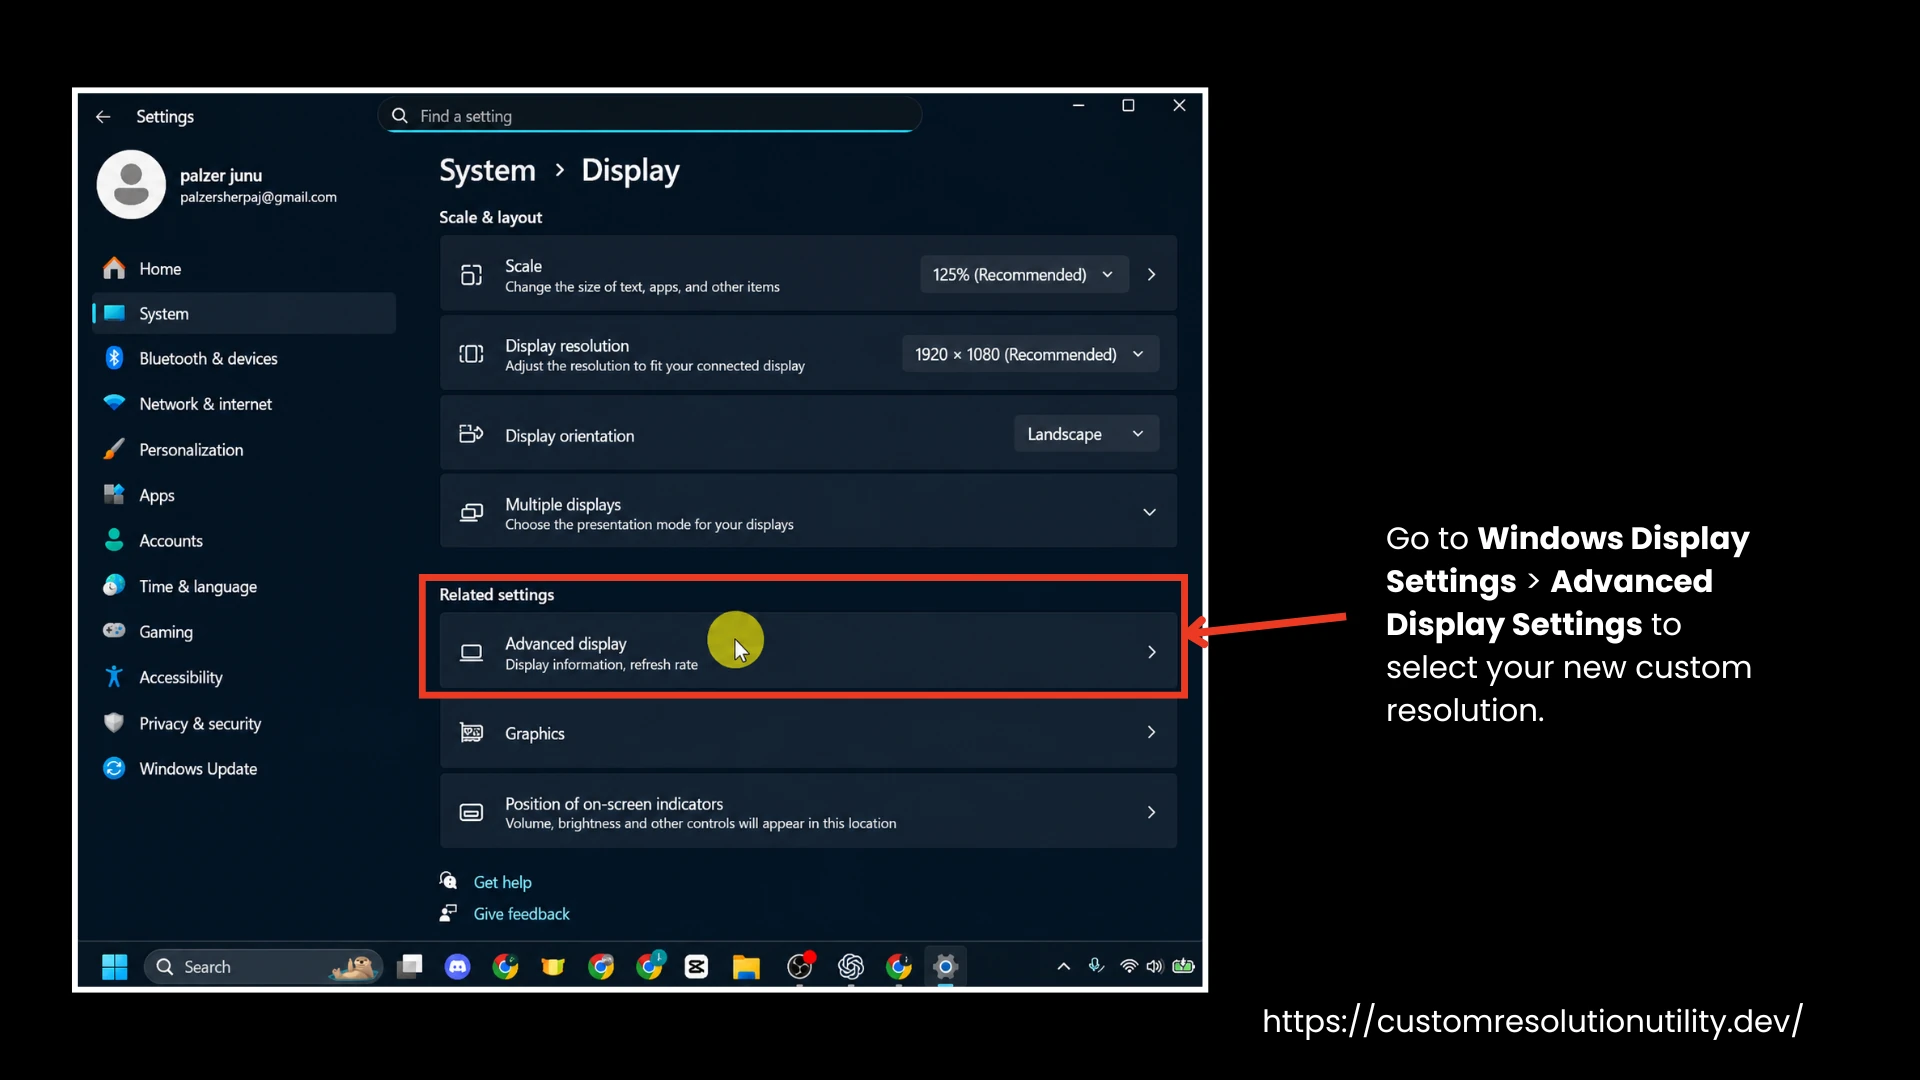
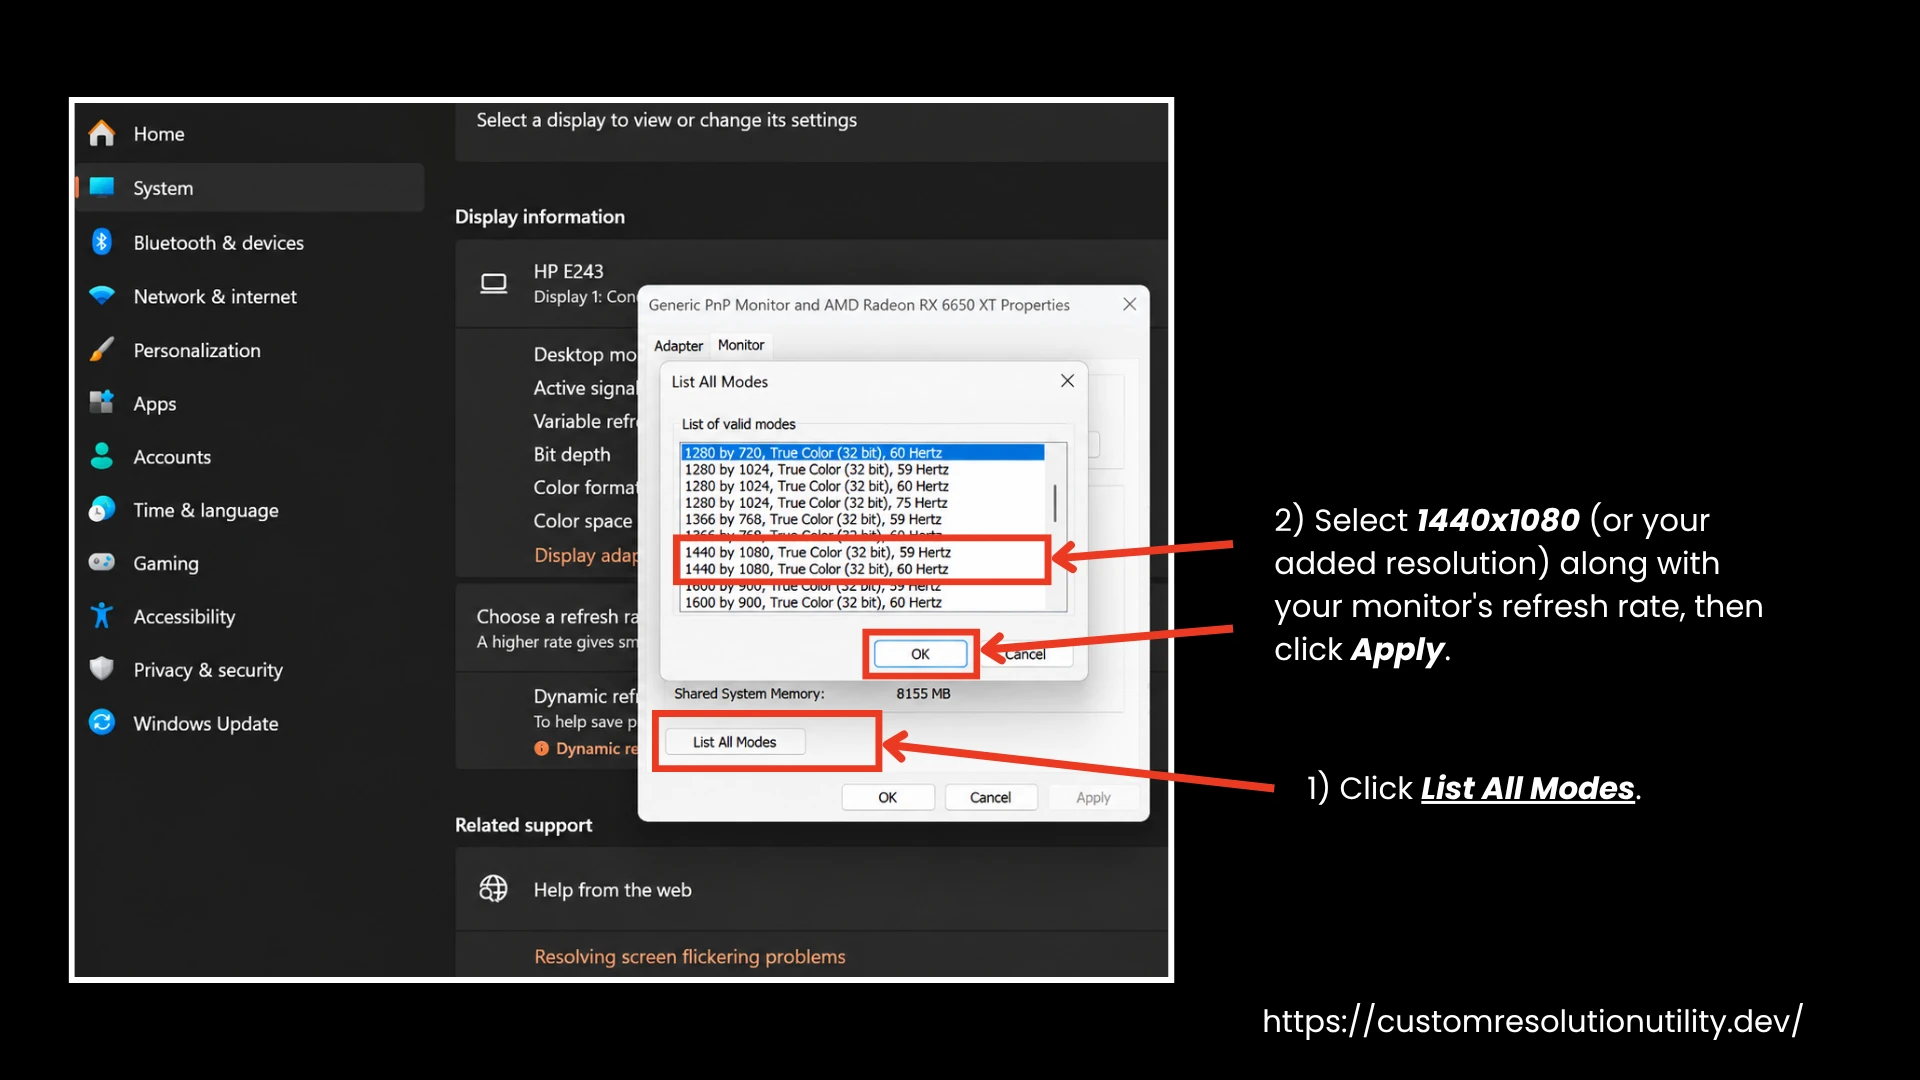
- In advanced display settings, go to Display Adapter Properties for Display 1.
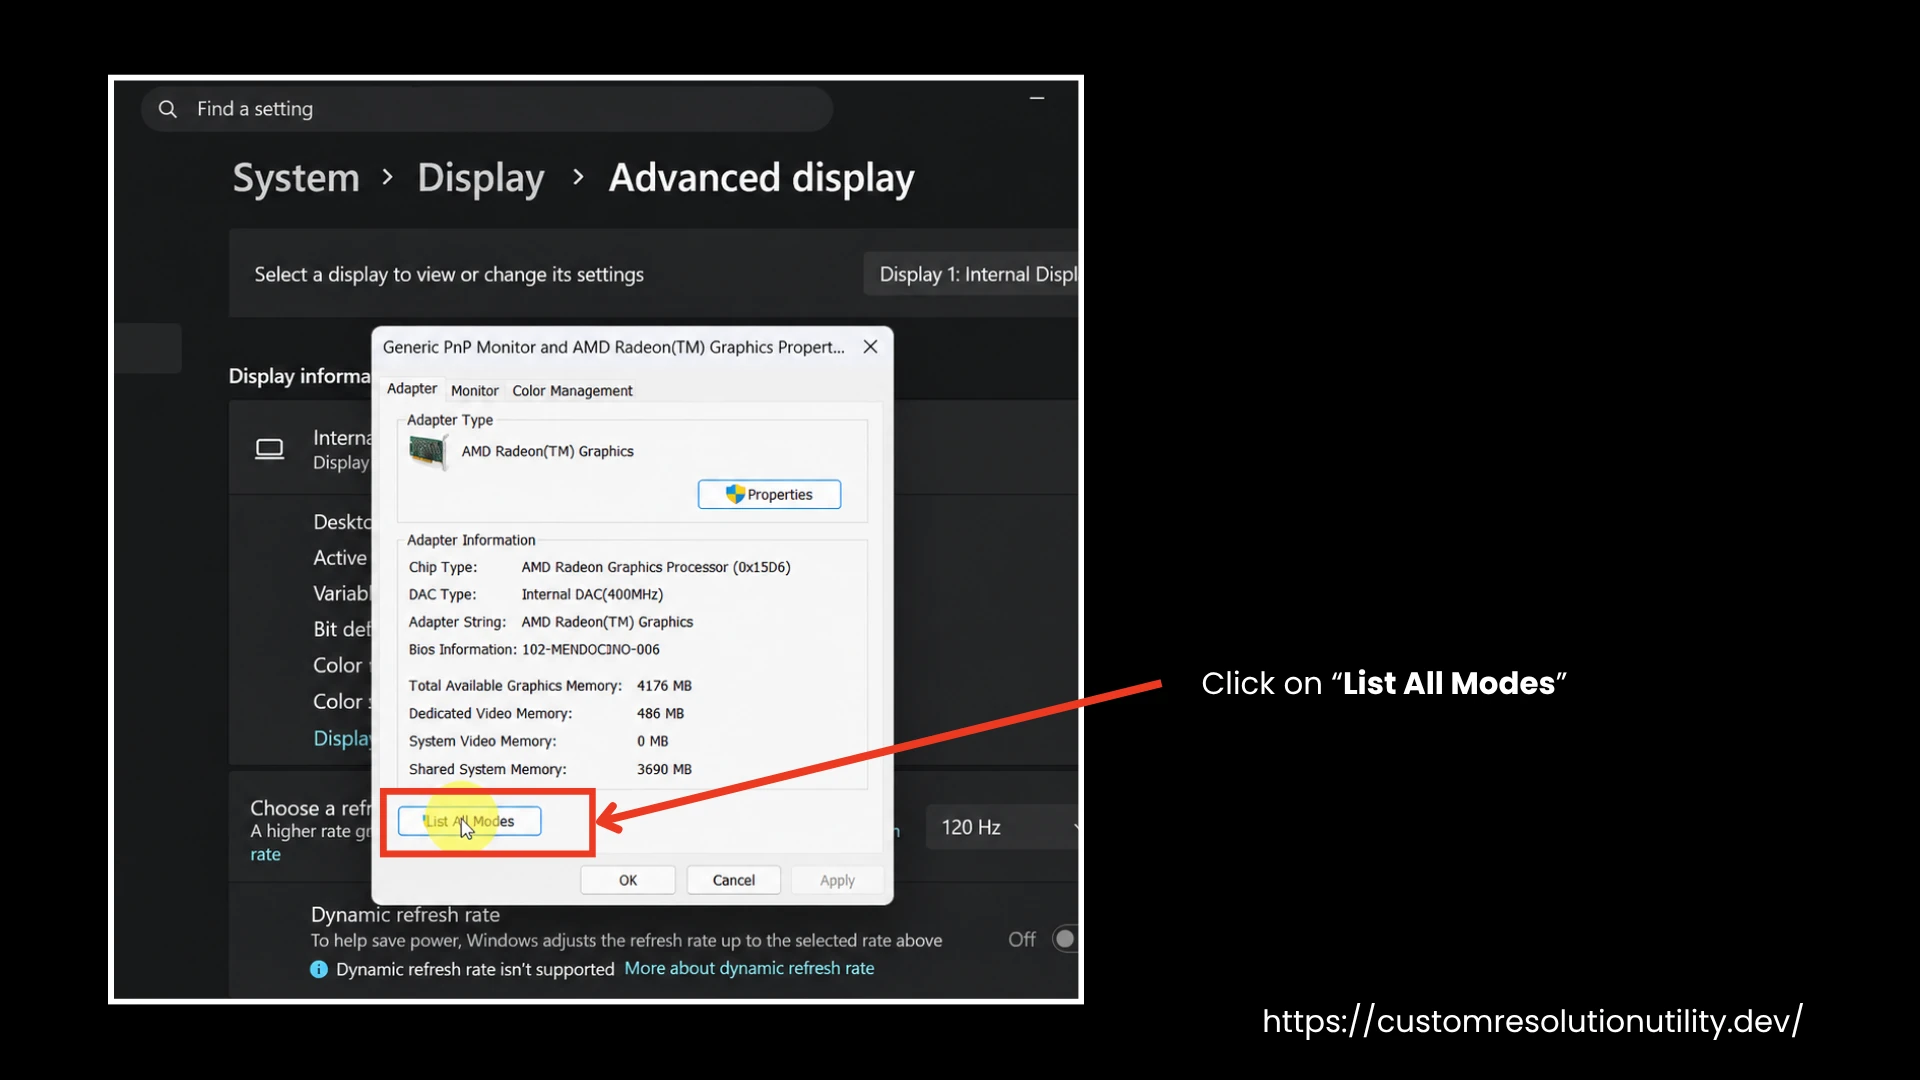
- Once you click this option, a new pop-up will appear showing many settings. Click on "List All Modes."
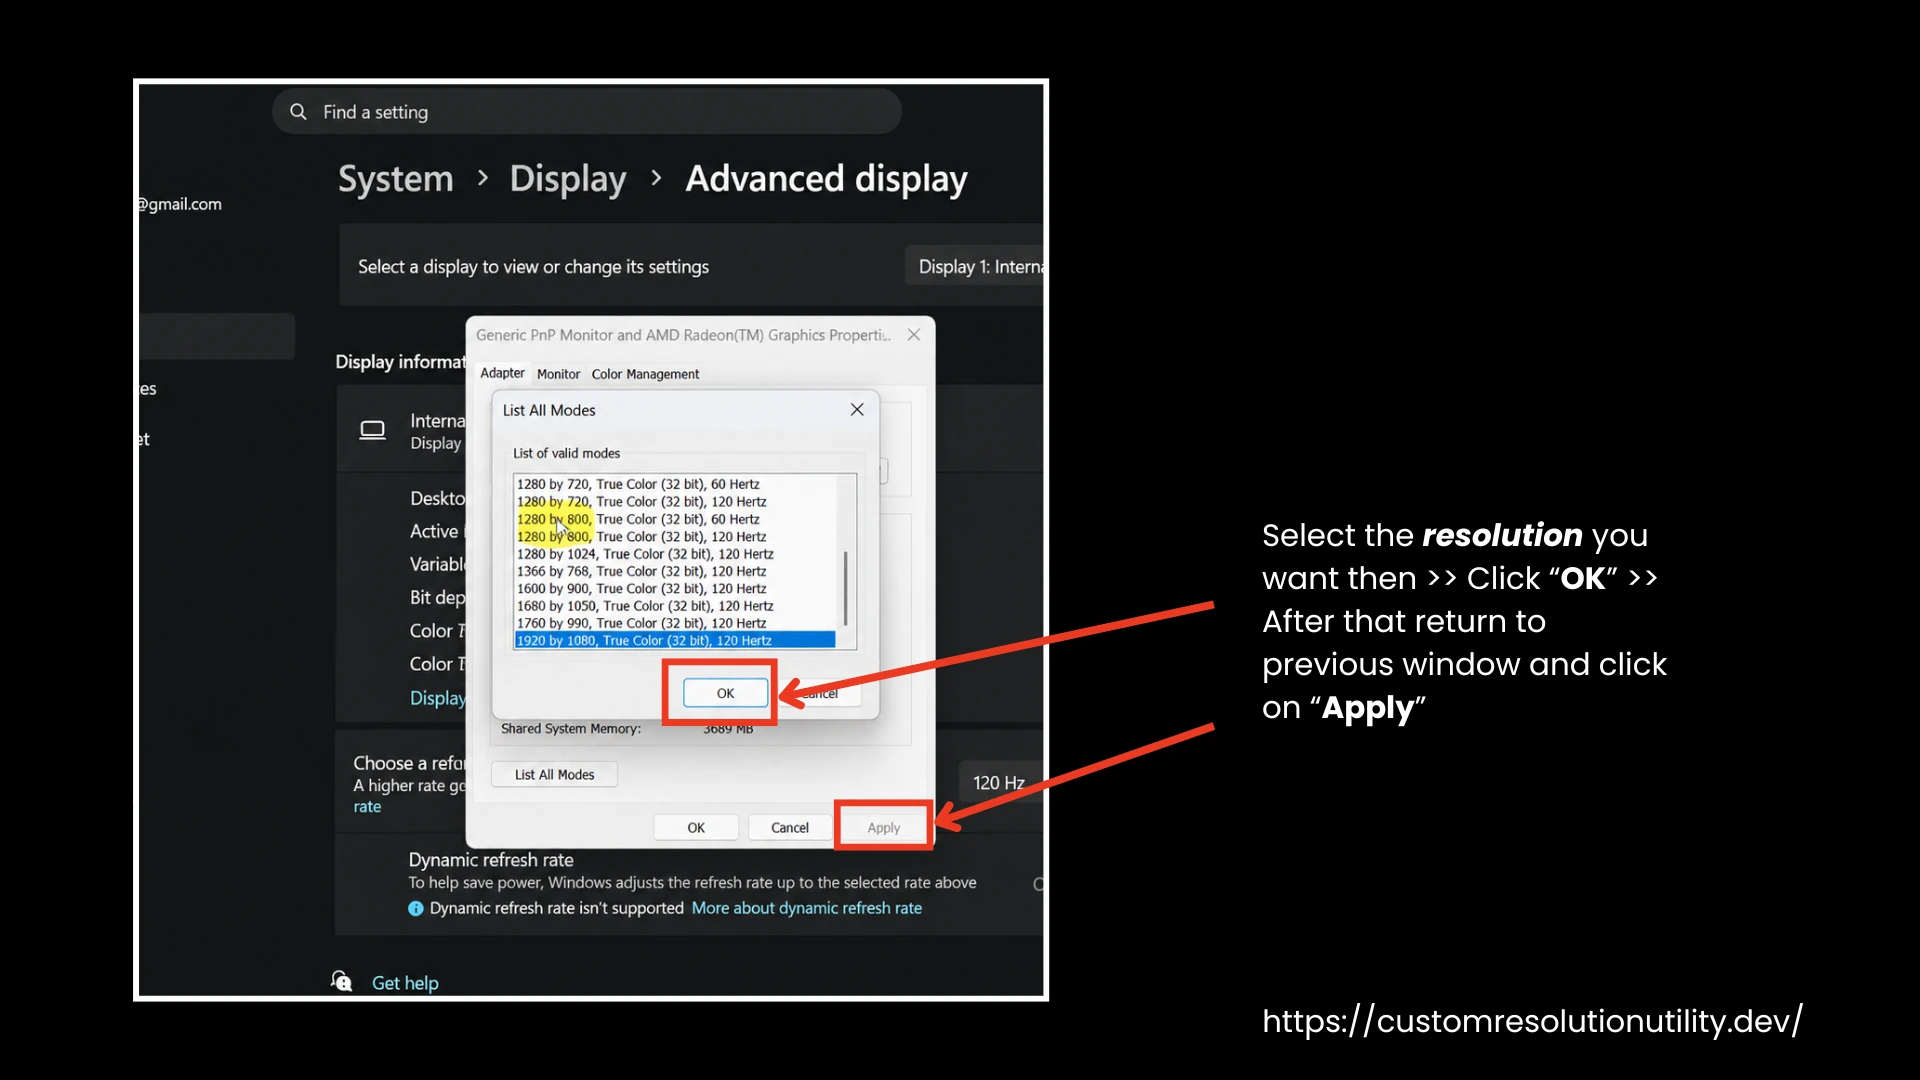
- It will open a new pop-up box showing you the custom resolution list.
- These are the custom resolutions you previously added, and now you can choose any of them to make changes to your display settings.
- Choose the one you want and press "OK."
- After that, this pop-up box will automatically close and return to the previous one where the different settings are shown. Then, click "Apply."
5. Safety and Resetting:
If you enter a resolution that your monitor cannot handle, you may encounter a "No Signal" message or a black screen.
- Recovery: If the screen remains black, wait 15 seconds. If Windows doesn't revert, boot into Safe Mode.
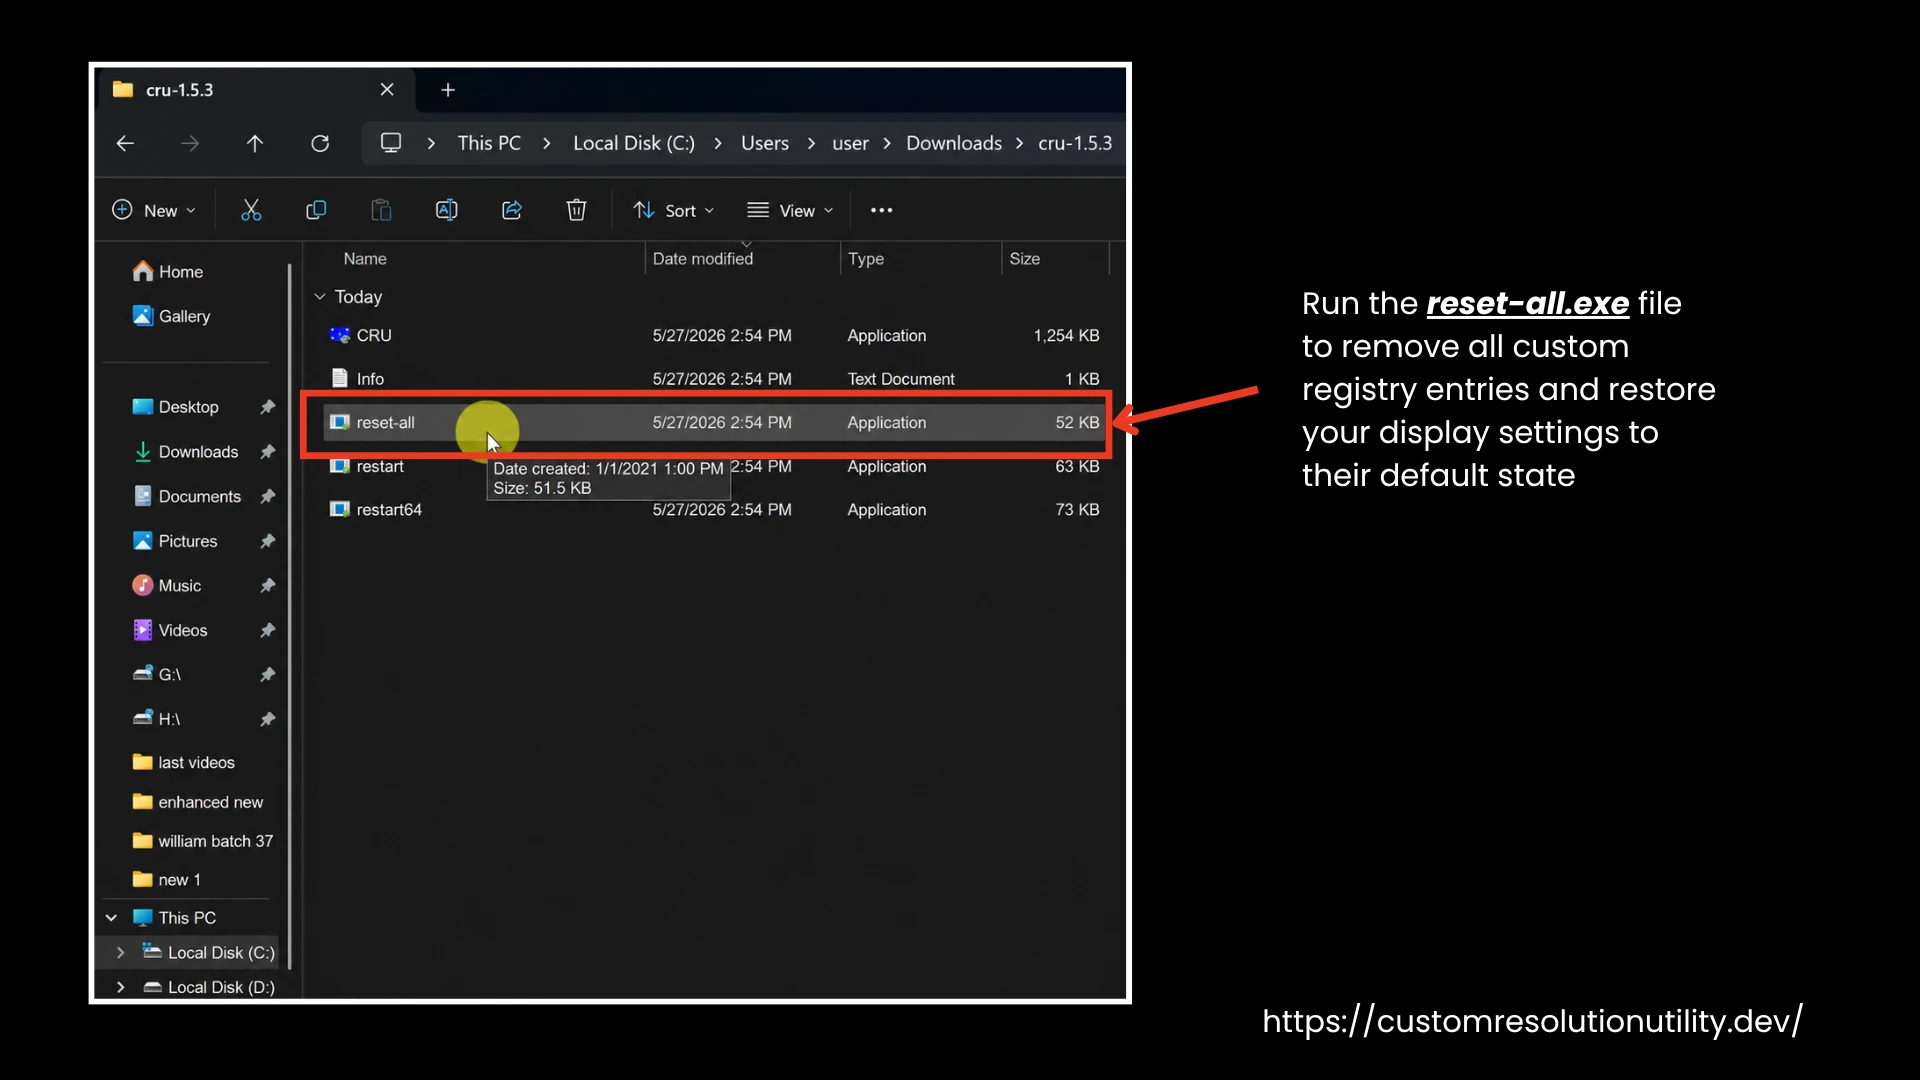
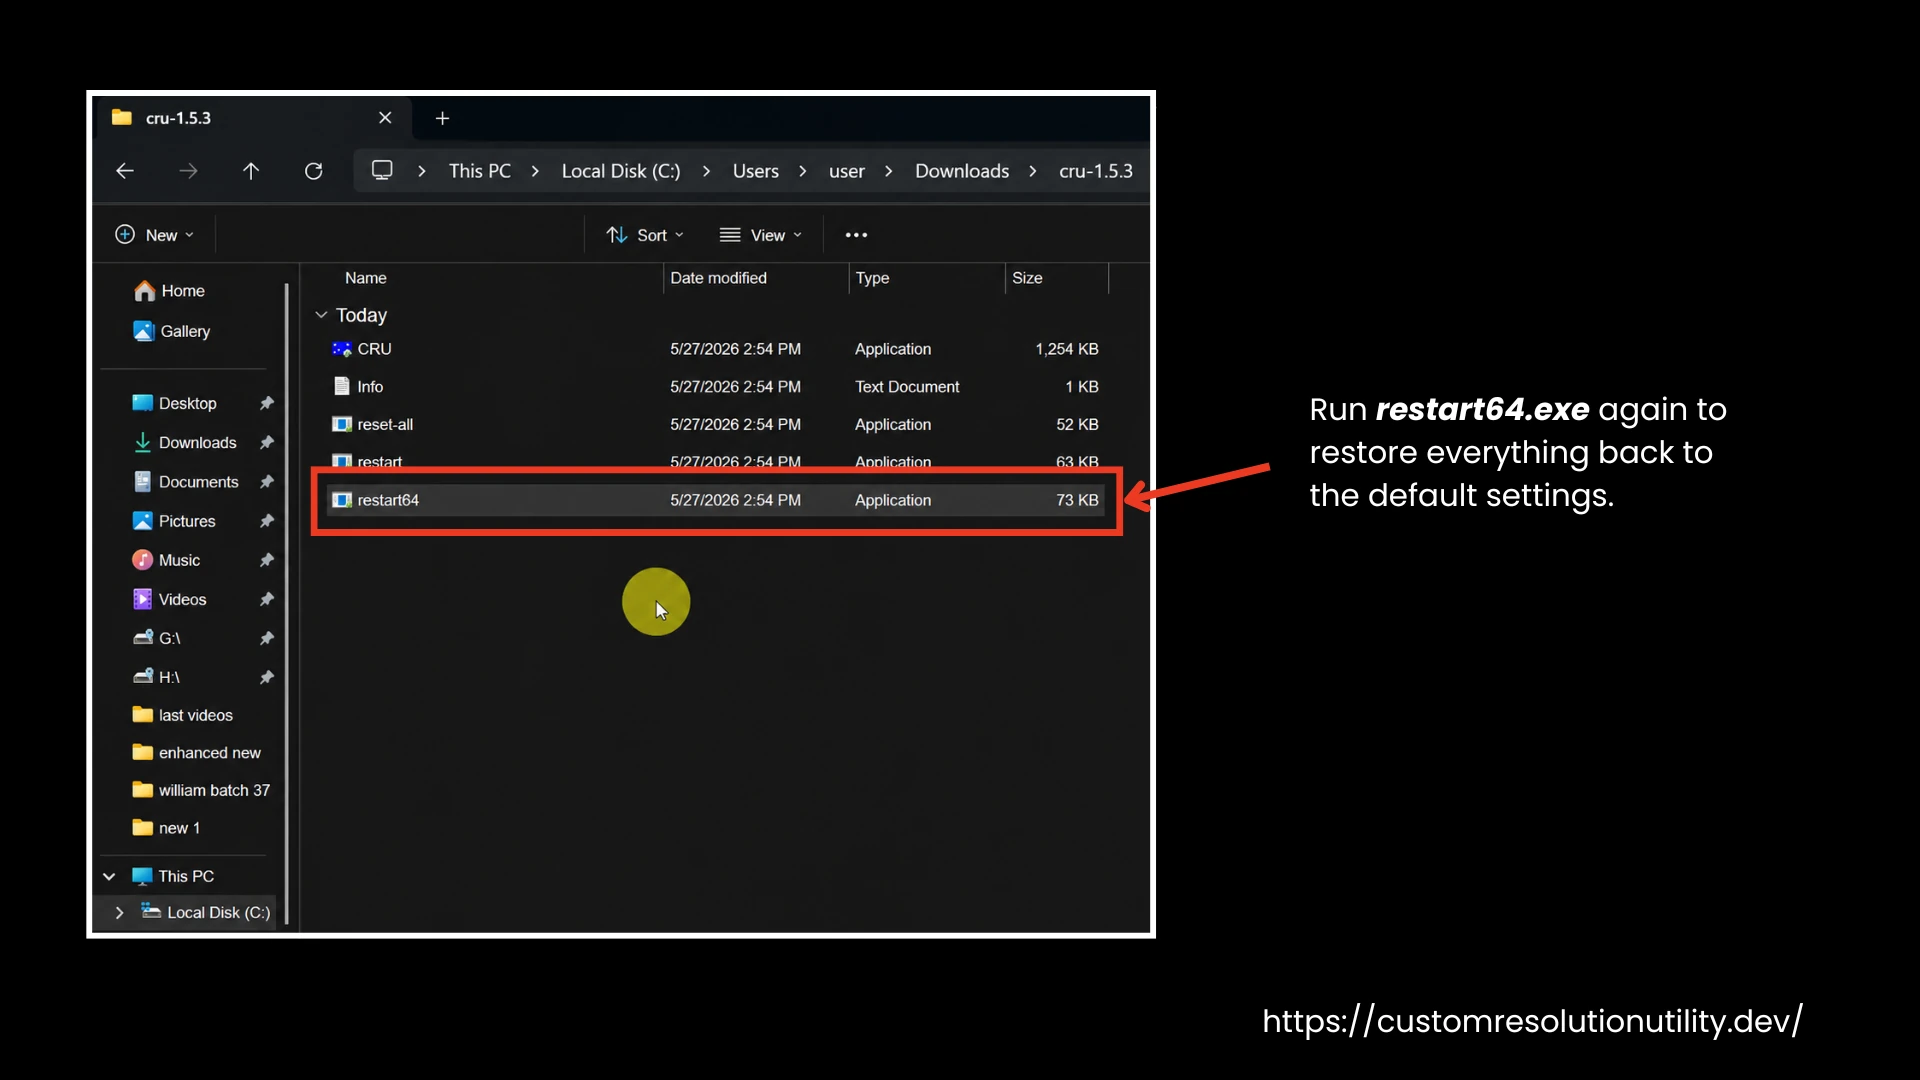
- Reset All: Run the reset-all.exe file included in the CRU folder. This will remove all custom registry entries and restore your display settings to their default state.
- Restart Driver: Run restart64.exe again to apply the factory reset. This will restore everything back to the default settings.
Important Considerations While Using CRU
CRU does not automatically verify that every custom resolution or refresh rate is safe for your hardware. Unsupported settings can cause flickering, visual artifacts, signal loss, black bars, or a black screen.
Change one setting at a time, test it carefully, and keep CRU’s reset-all.exe utility available so you can remove the overrides if something goes wrong. See our CRU troubleshooting guide to learn the solutions to potential problems that you might come across while choosing different resolutions and refresh rates.
How to Get Stretched Resolution Using CRU
Stretched resolution is commonly used for wider views, bigger models, and competitive gameplay. Before we learn how to add it using CRU, let’s understand what stretched resolution is.
Stretched Resolution:
Stretched resolution means you can use a resolution with less width than your selected resolution, but it still fills your screen. Stretched resolution uses a narrower display setting and expands the image to fit your entire screen. This makes everything appear wider, which is why many players use it in competitive and FPS games.
For example, if your monitor normally runs at 1920×1080, you can switch to a narrower resolution such as 1650×1080 or 1440×1080. When the game opens in full-screen mode, the monitor or graphics card stretches the smaller image across the screen.
Before knowing the Stretched Resolution Setting, know the key differences.
How To Set Stretch Resolution in CRU?
Setting stretched values in CRU follows the same process from downloading CRU, extracting the files, running it as administrator, choosing your monitor, and deleting all the presets from Standard Resolutions and Extended Block Settings as discussed above. Here is a step-by-step guide on how to add stretched resolutions using Custom Resolution Utility (CRU).
Download & Prepare CRU:
Clean Existing Resolution Entries:
Add Your Stretched Resolution:
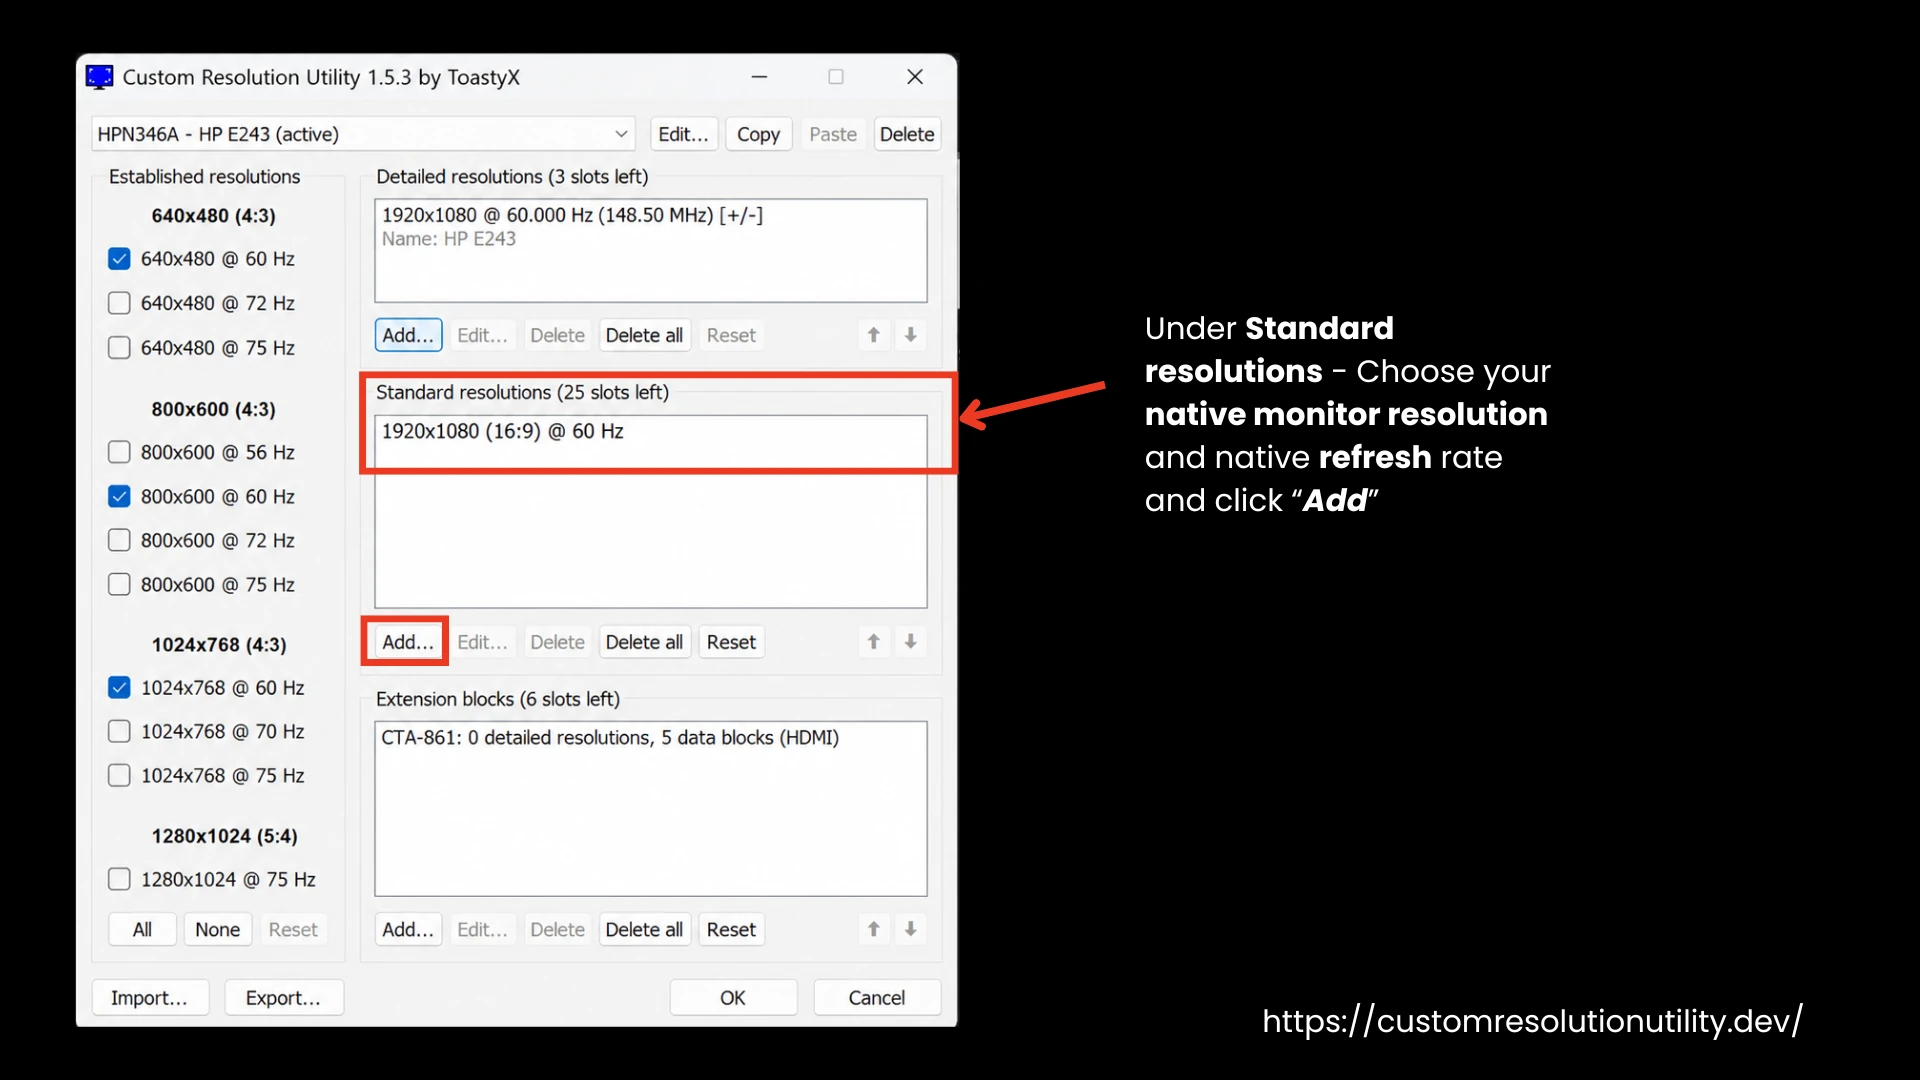
- Under Standard resolutions, choose your native monitor resolution (e.g., 1920x1080) and your native refresh rate (e.g., 144Hz, 165Hz, or 240Hz), and click Add…
- Under Detailed resolutions, enter your preferred stretched resolution (e.g., 1440x1080 for 4:3).
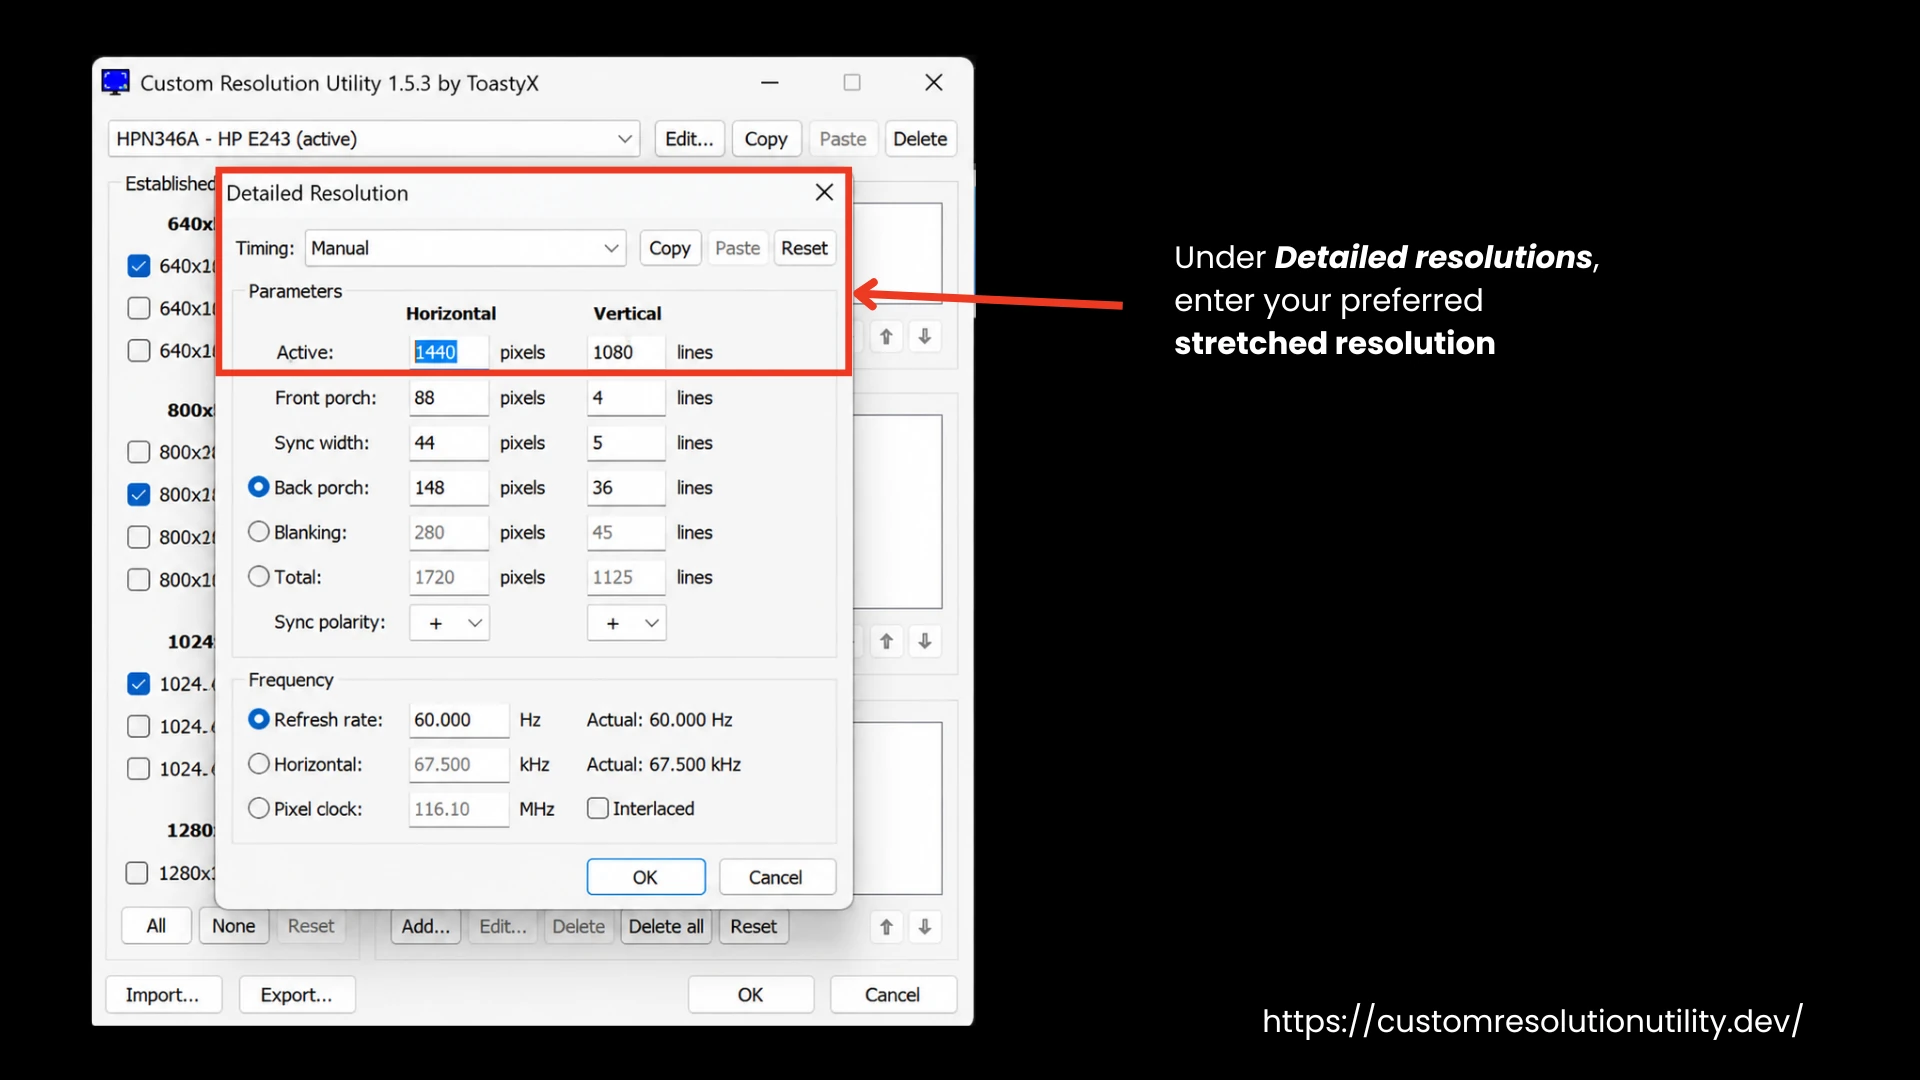
- Set the refresh rate to a rate natively supported by your monitor.
- Under Timing, select Exact reduced to ensure maximum compatibility and avoid flickering.
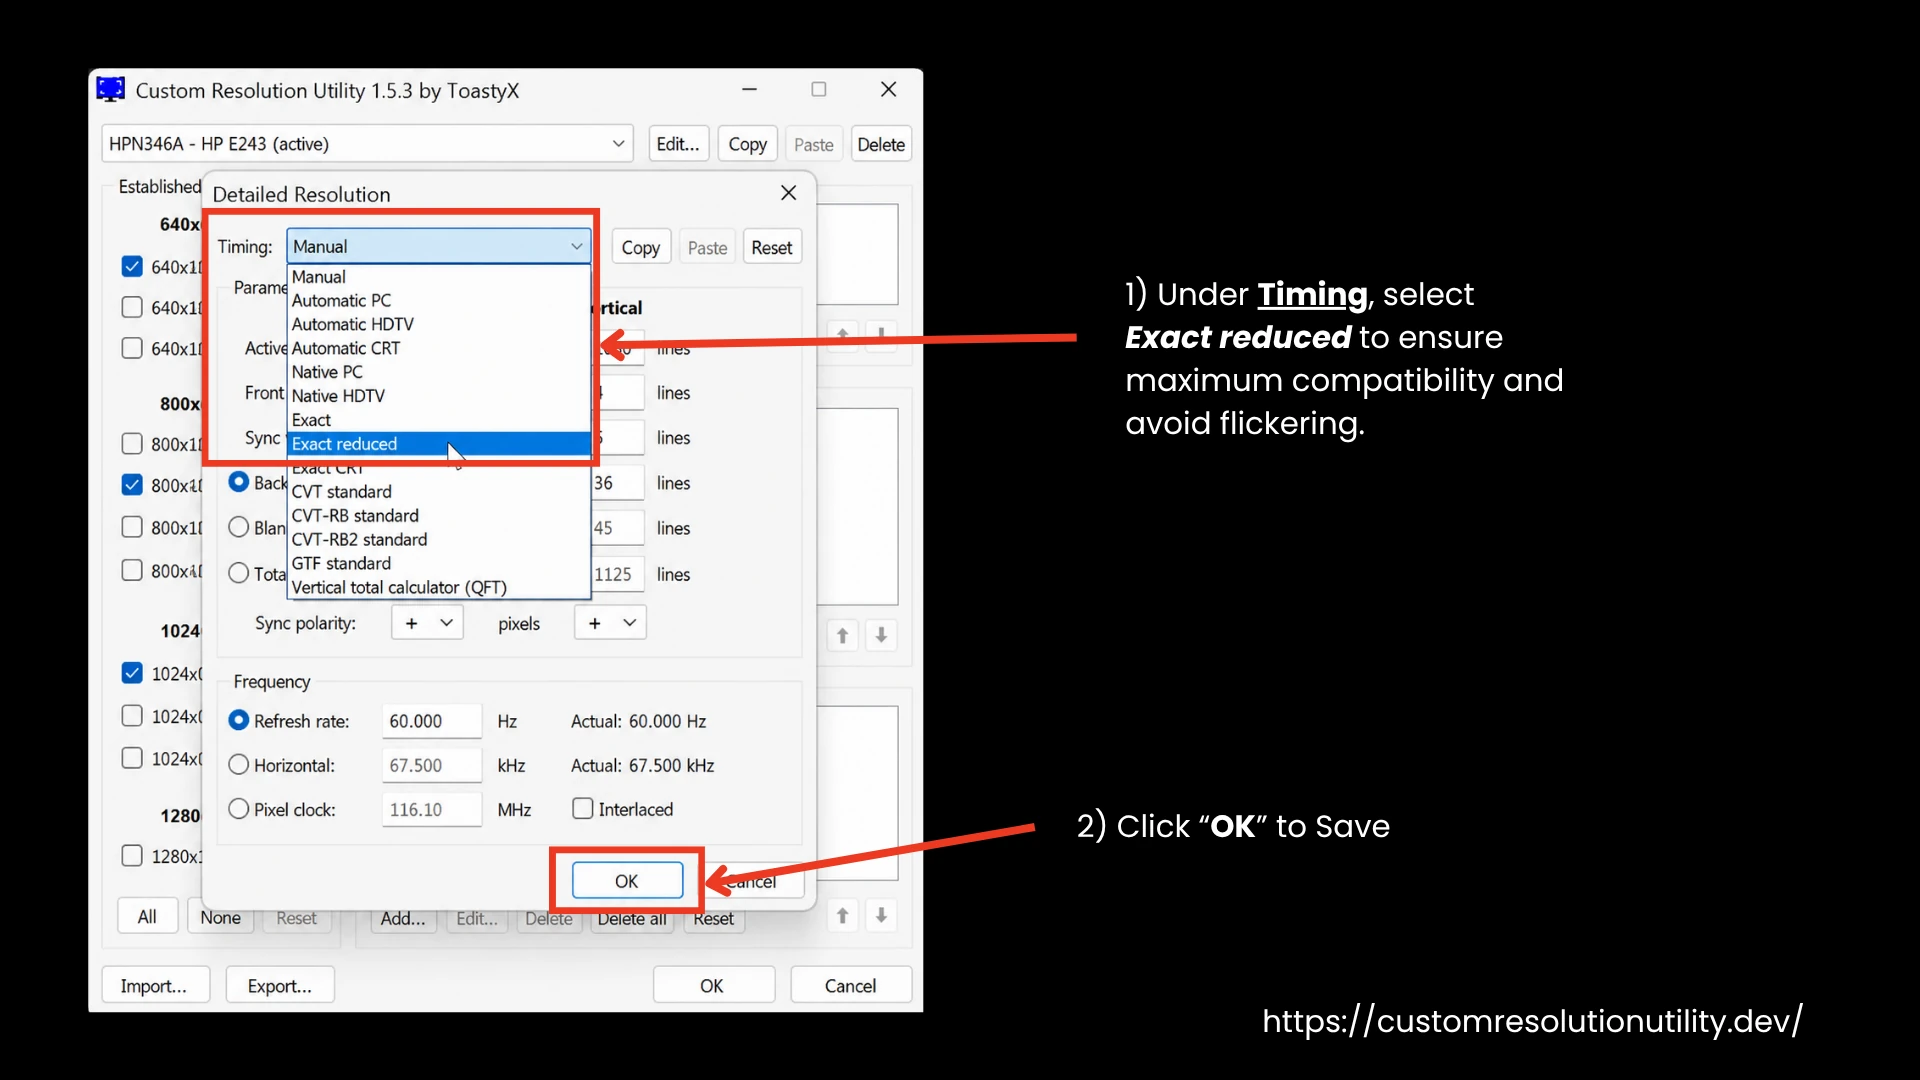
- Click OK to save.
Apply Changes:
- Inside the CRU folder, locate and run restart64.exe twice.
- Your display may temporarily go black or flicker while the display driver resets, without requiring a full system reboot.
Enable the Resolution in Windows:
- Right-click your desktop and open Display settings.
- Go to Advanced display > Display adapter properties for Display 1.
- Click List All Modes.
- Select 1440x1080 (or your added resolution) along with your monitor's refresh rate, then click Apply.
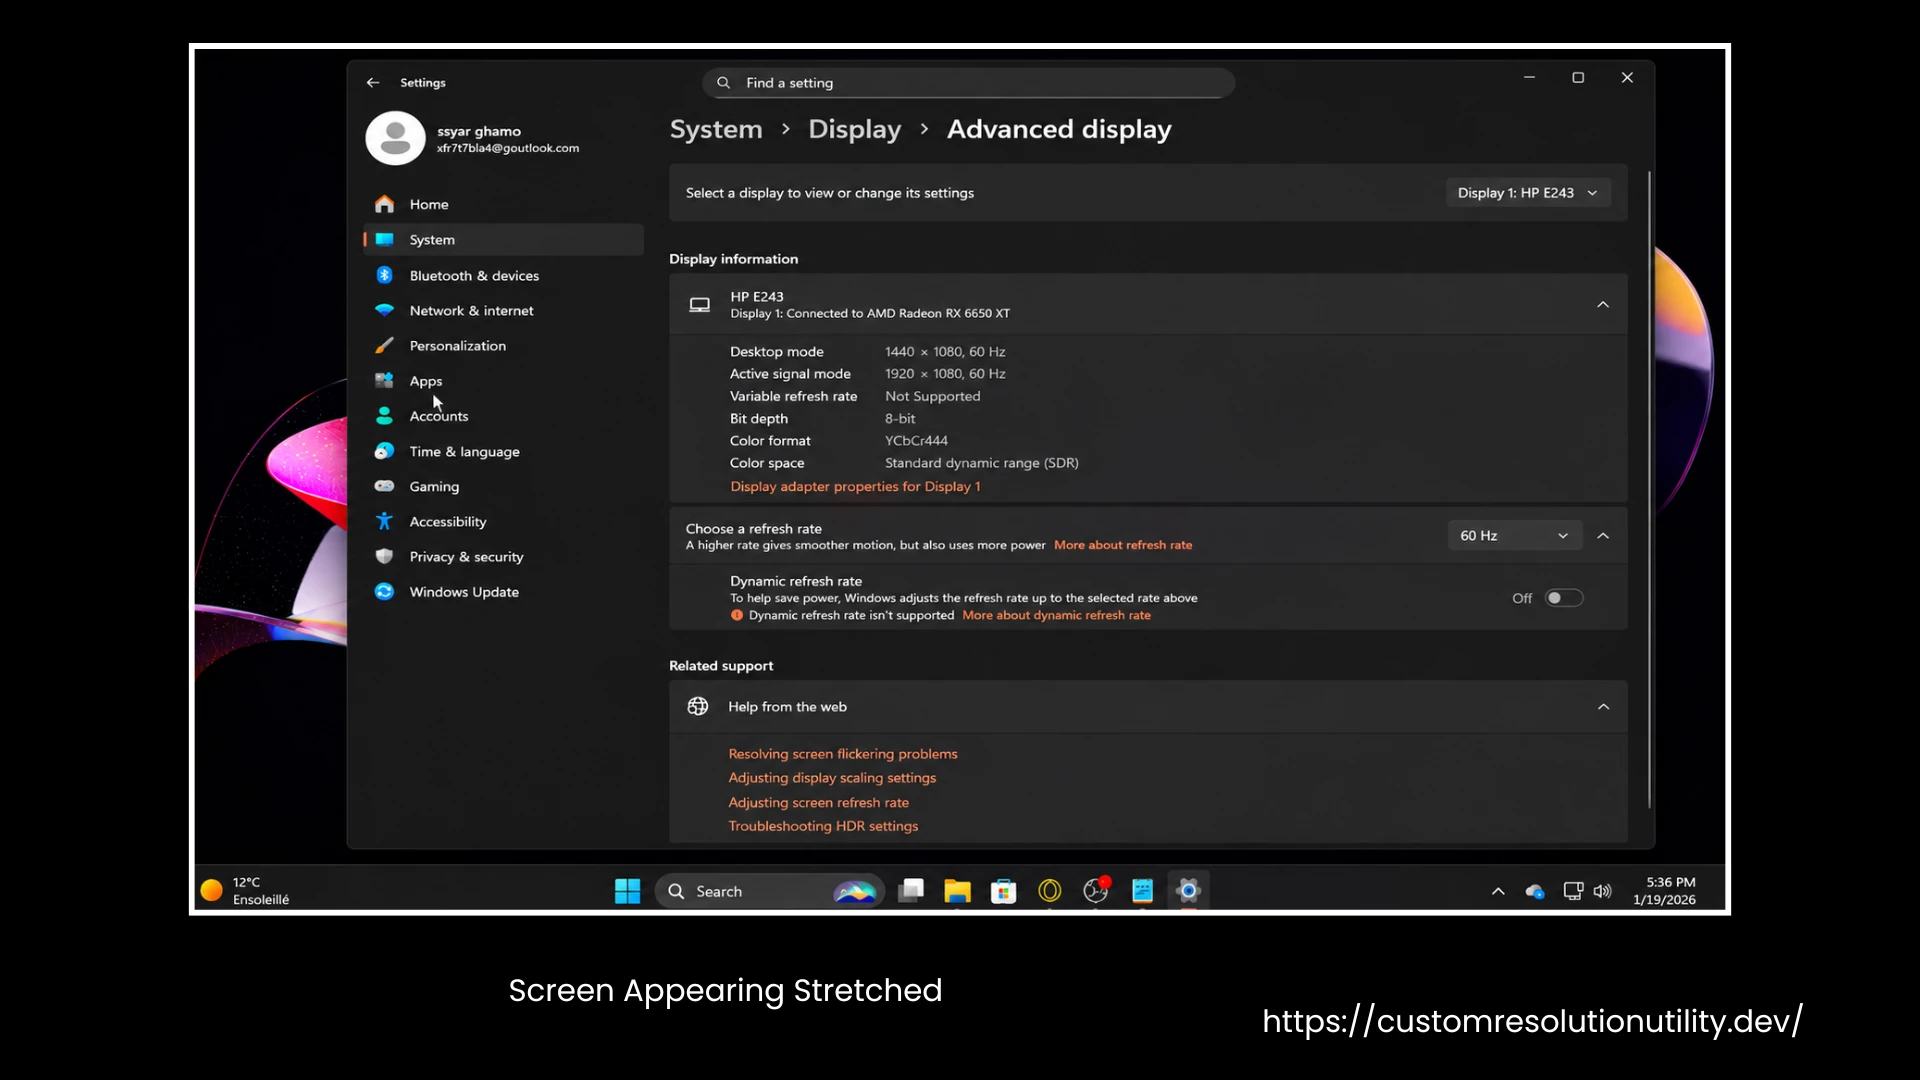
At this point, if your screen appears stretched, it means the resolutions are working correctly and you have achieved your objective. The scaling is still controlled by Windows or your GPU, which now needs to be reset.
Now, the next step is to configure AMD scaling settings to ensure the resolution is stretched properly.
Configure GPU Scaling (AMD Adrenaline Setup):
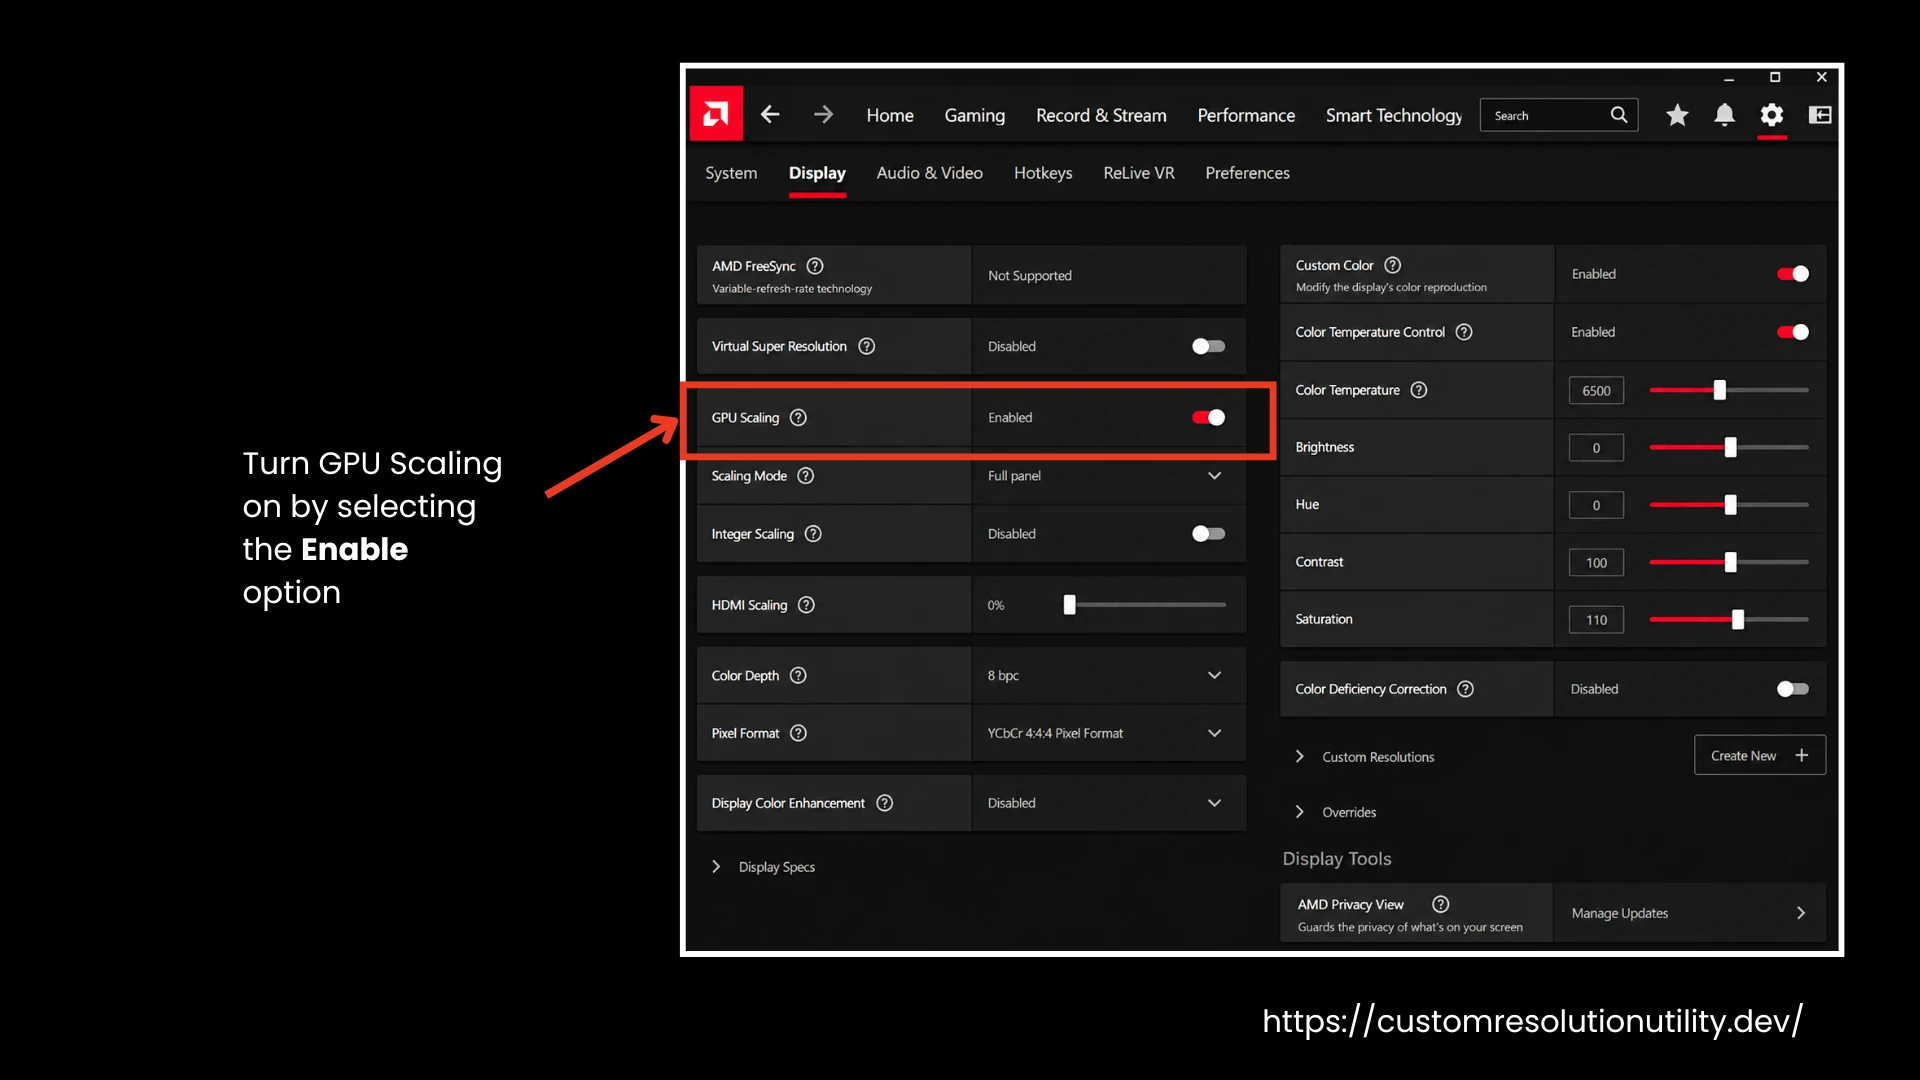
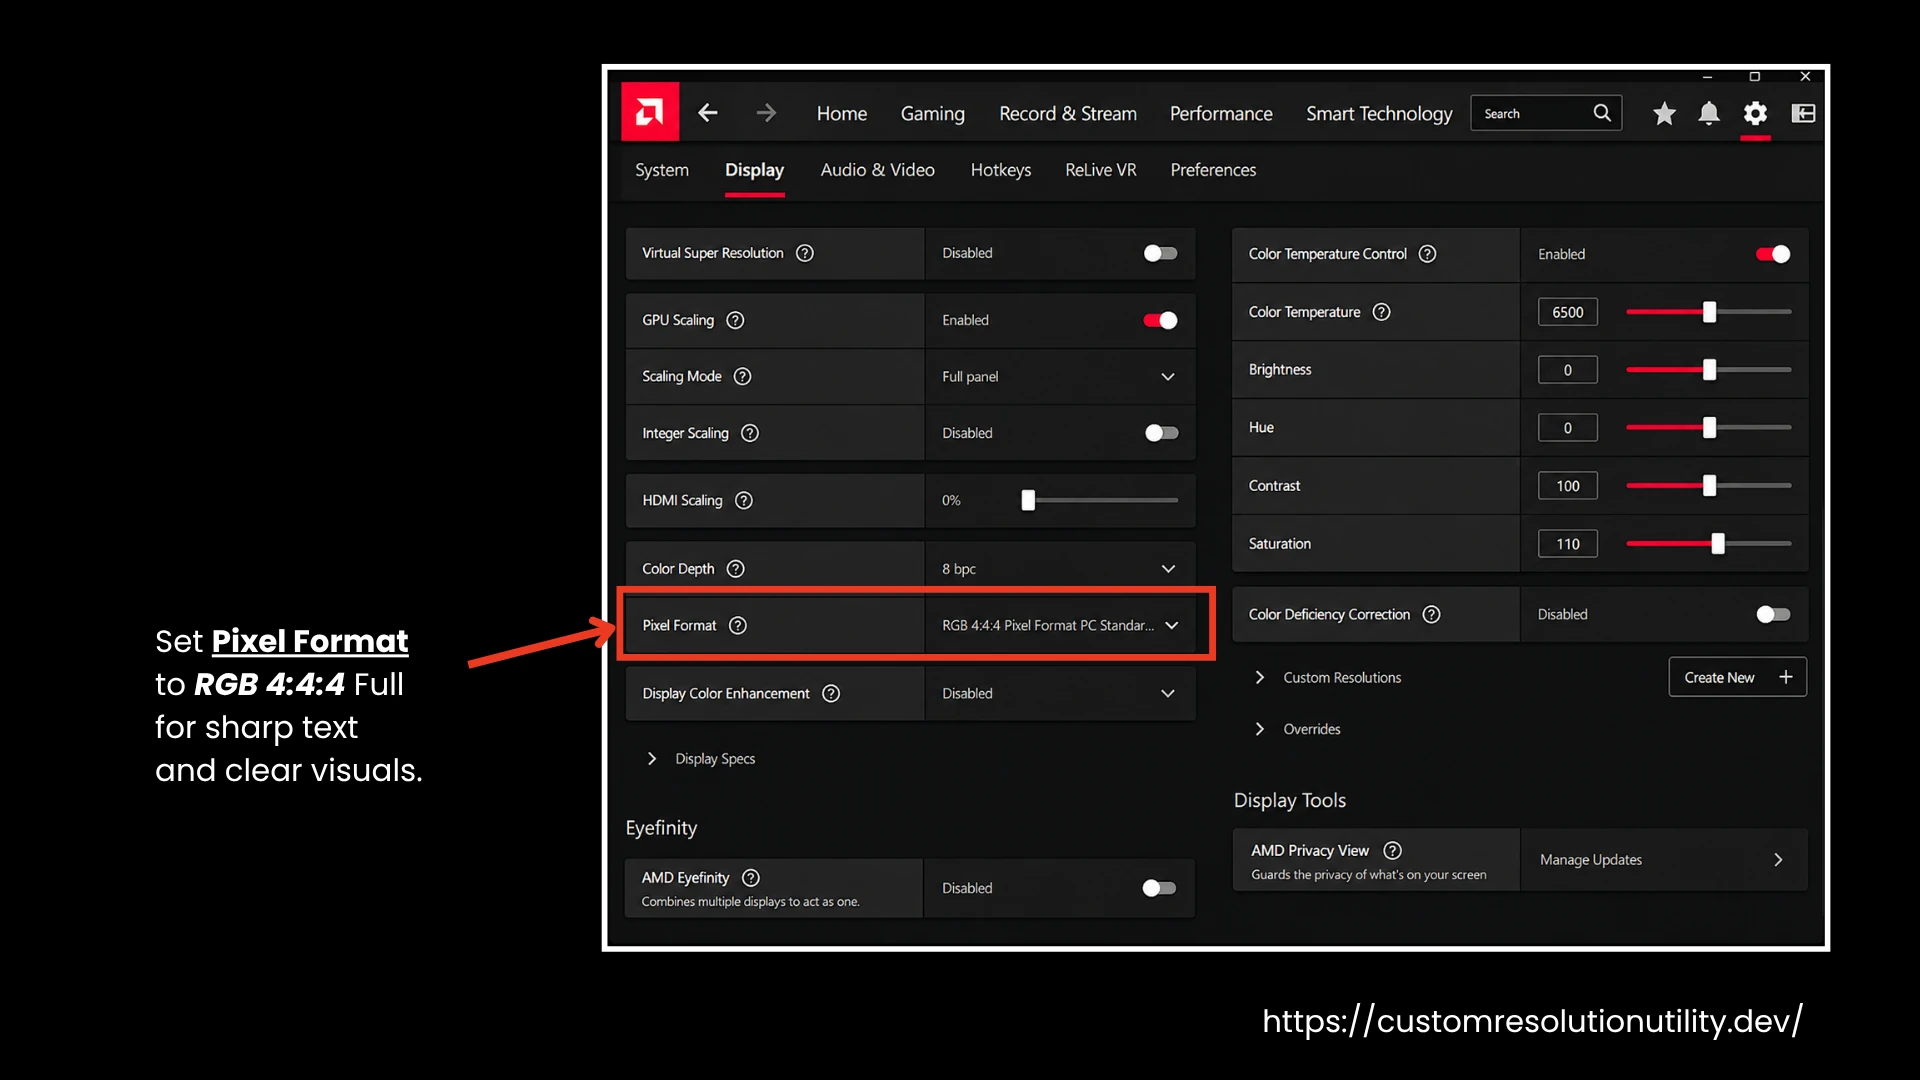
This step is critical and important as well. To stretch the resolution properly across the full screen without black bars:
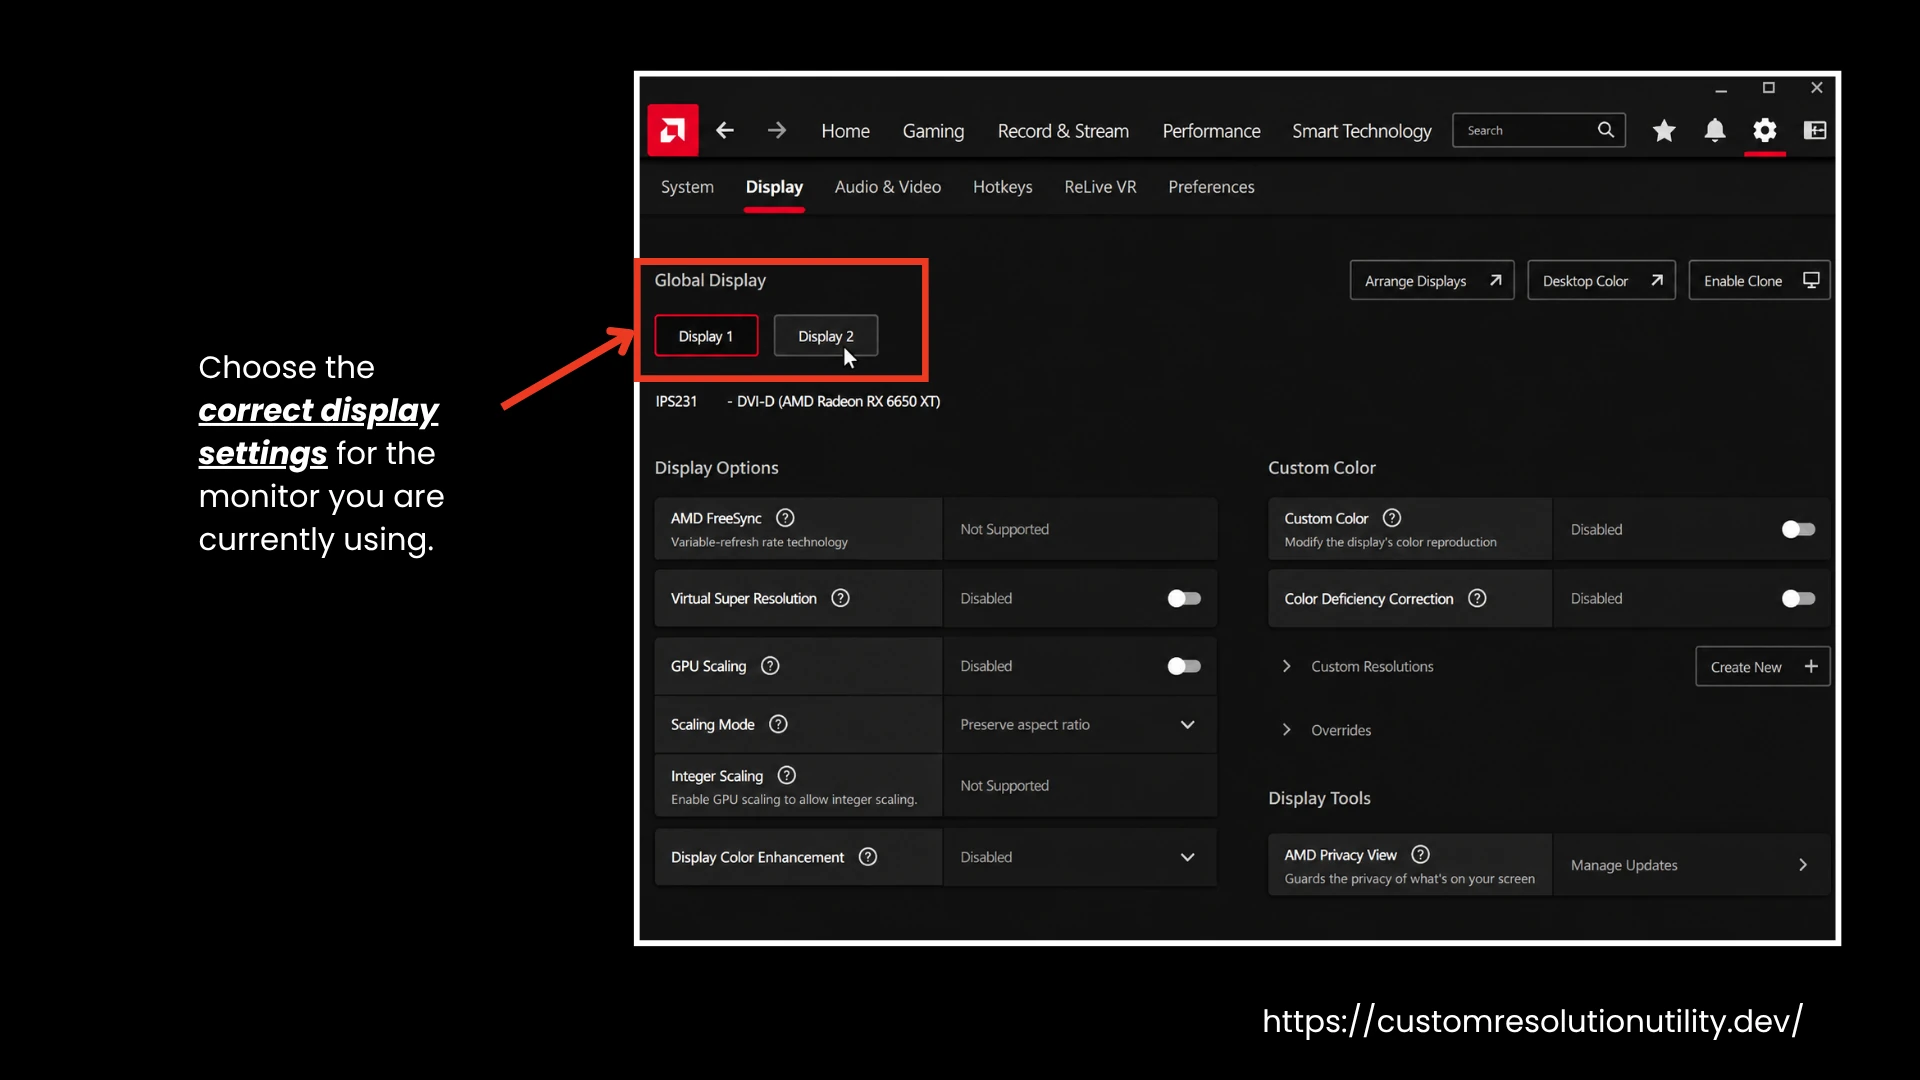
- Open AMD Software: Adrenaline Edition and navigate to Settings > Display
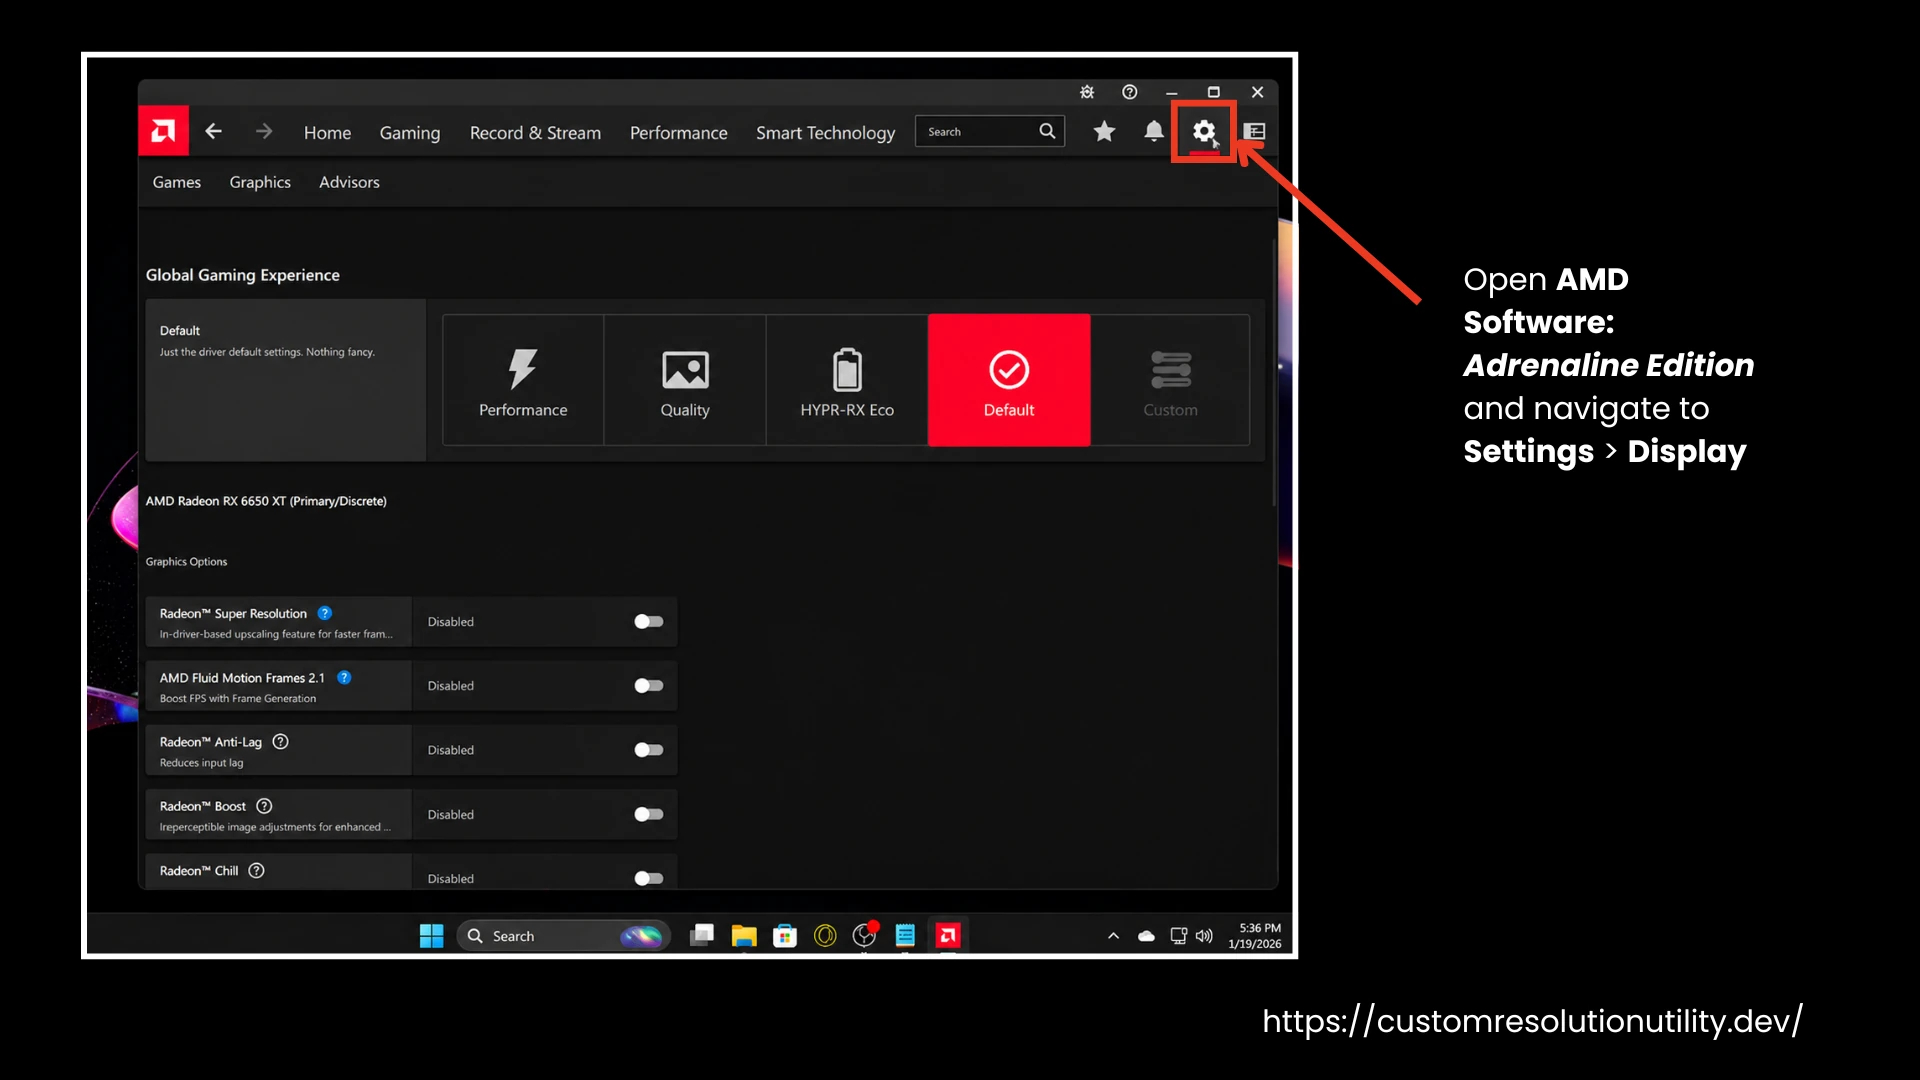
- Make sure you choose the correct display settings for the monitor you are currently using.
- Turn GPU Scaling on by selecting the Enable option.
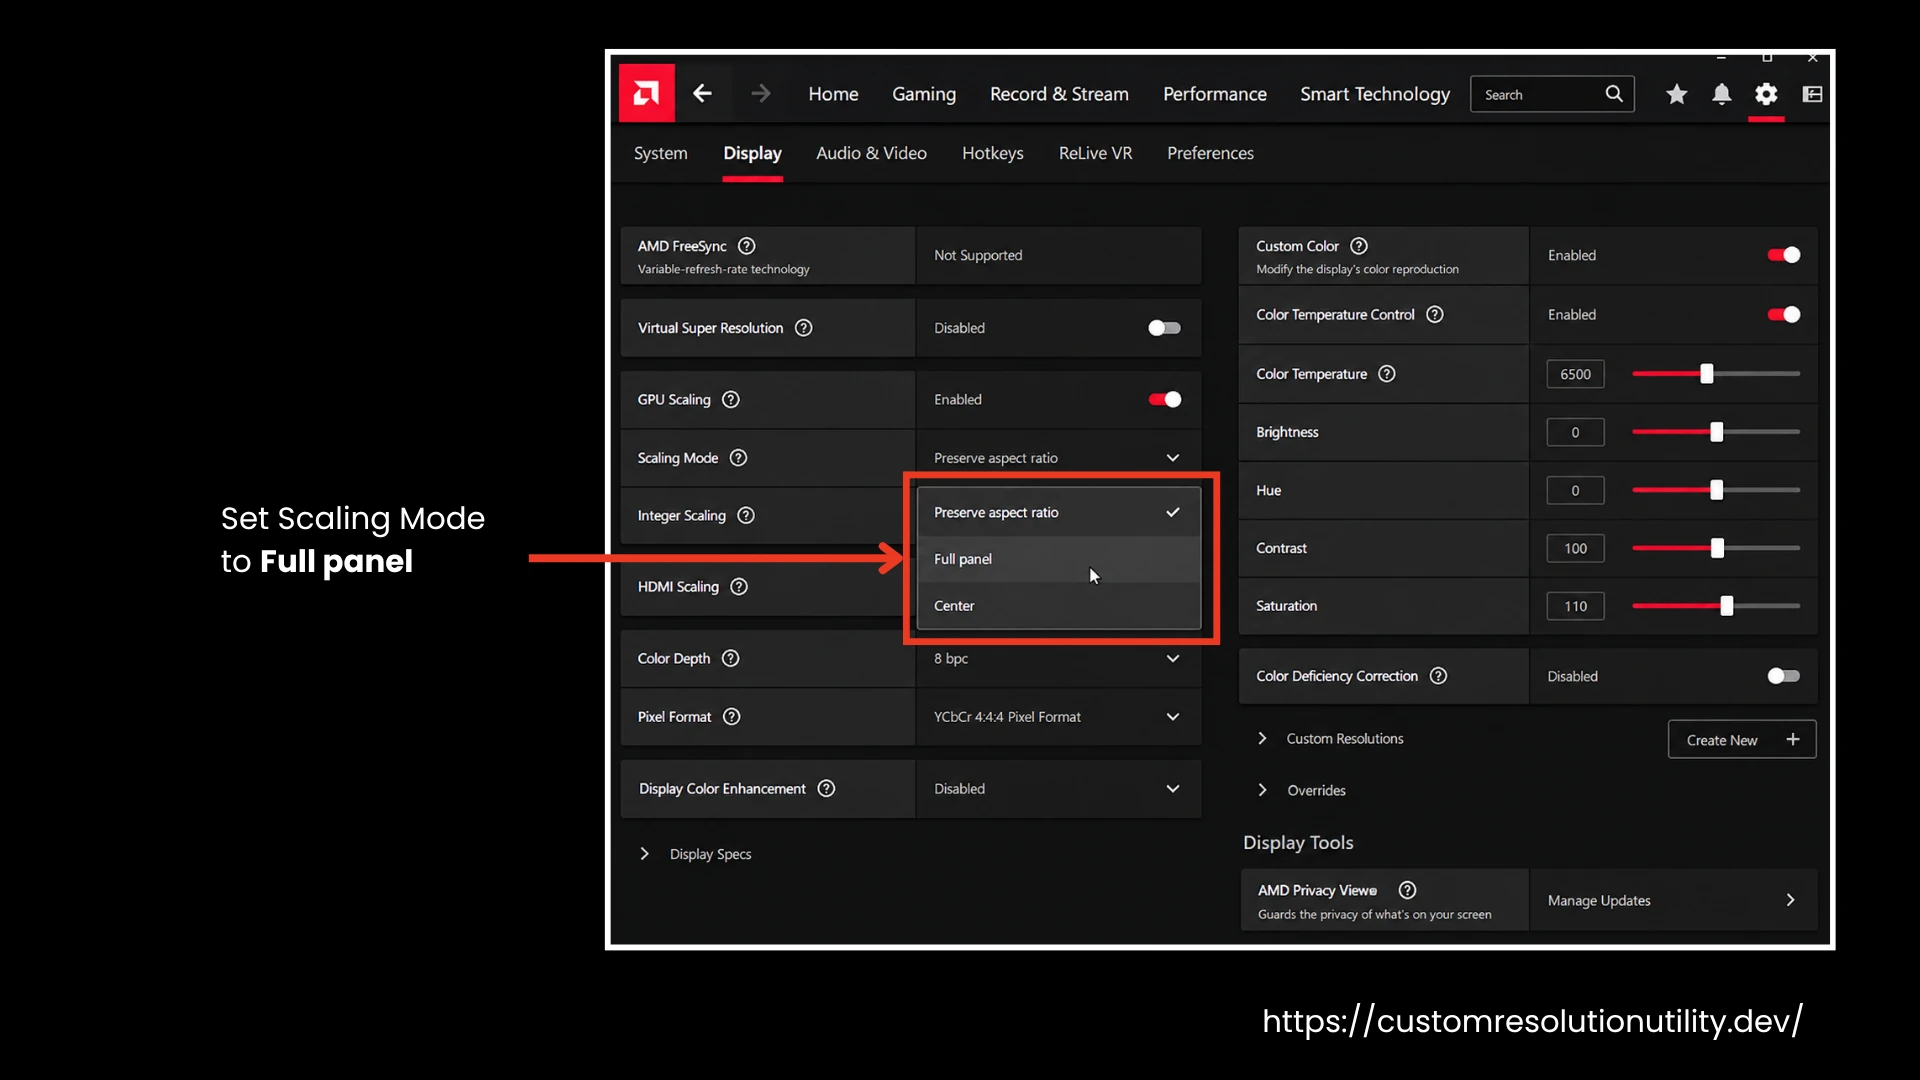
- Set Scaling Mode to Full panel. This option forces the resolution to stretch 4:3 (or your chosen ratios) across a 16:9 display.
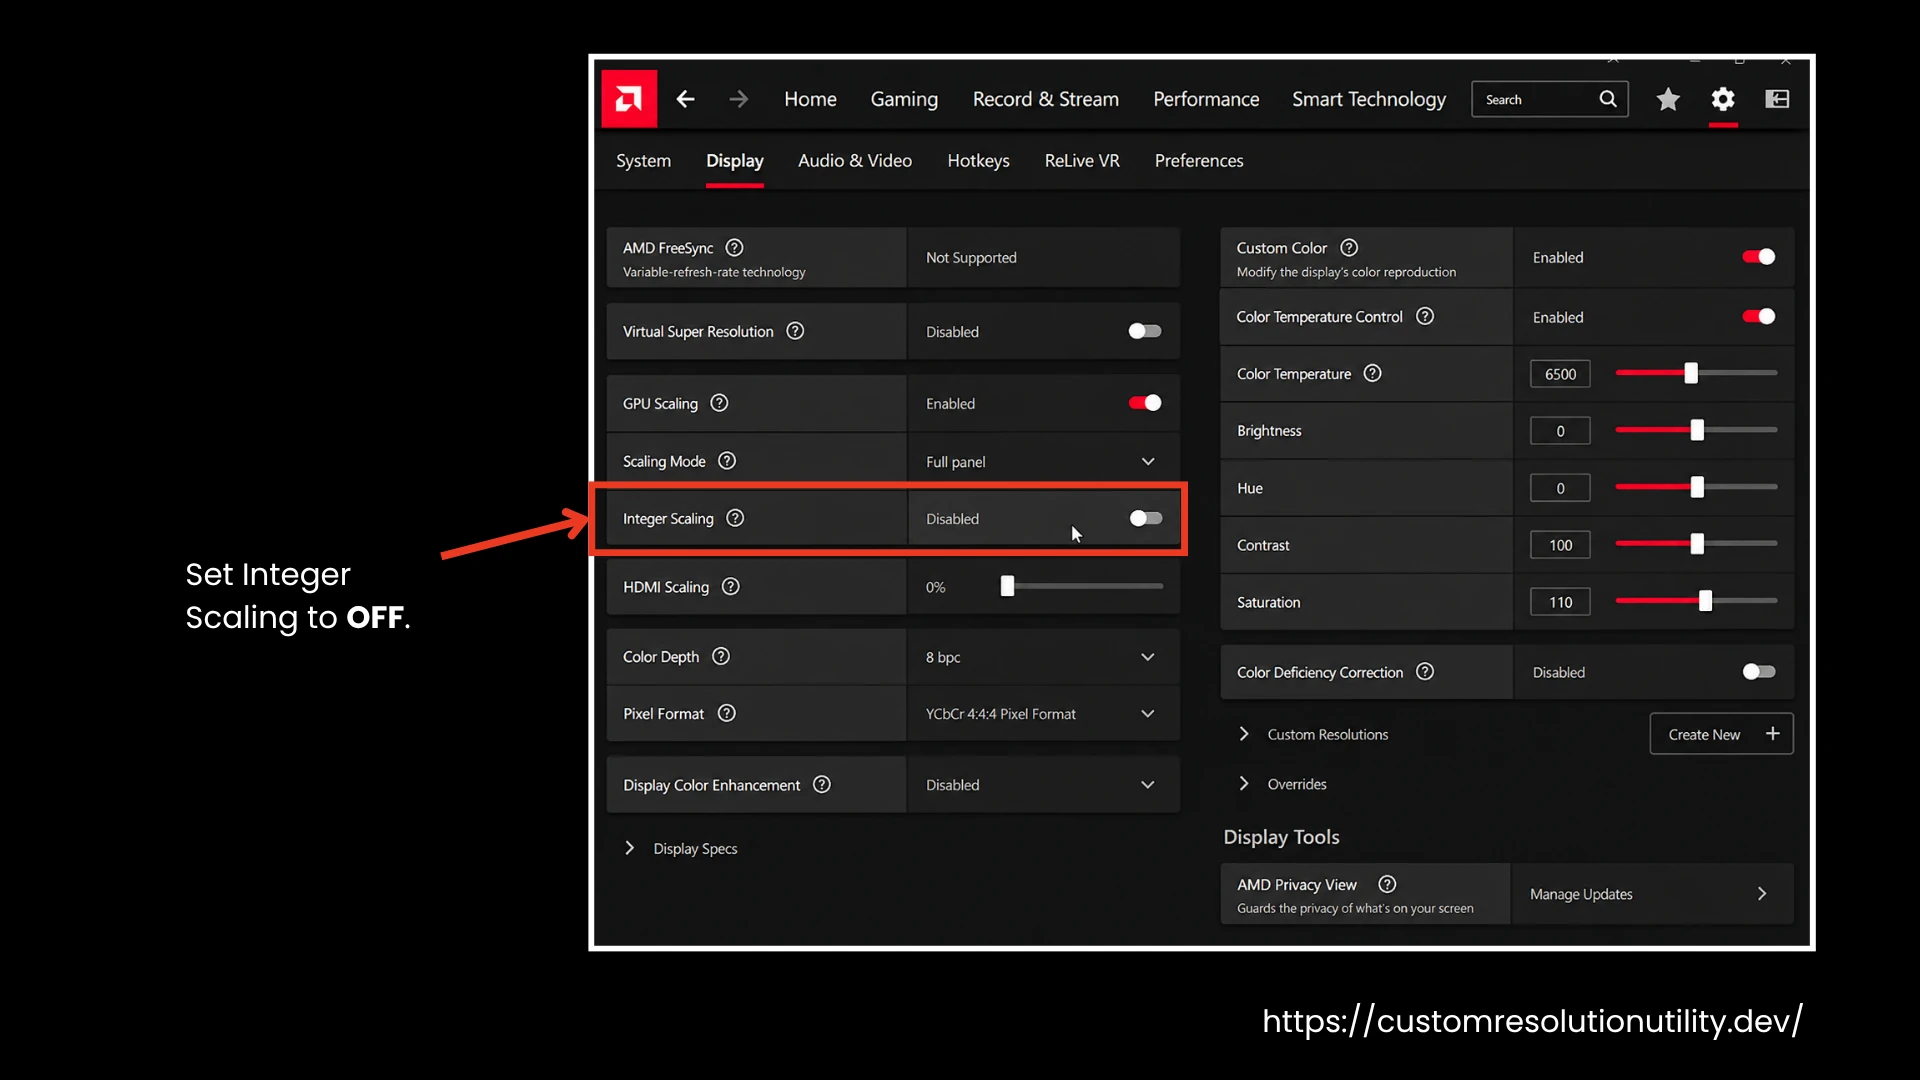
- Set Integer Scaling to OFF. This is important because it keeps the pixels in a perfect square, avoiding pixel-level stretching and maintaining picture quality.
- Now you need to confirm your color and picture quality settings. It keeps the screen clear and responsive without lag. Ensure Pixel Format is set to RGB 4:4:4 Full for sharp text and clear visuals.
If anything goes wrong with the settings, such as the screen going black, flickering, or showing black bars, don't worry, you can still undo the changes/settings.
How to Reset Custom Resolution Utility?
Resetting CRU is even easier than you think. If you run into black screens or misconfigurations, you can reset CRU to its default settings, helping you restore your native resolutions.
To do this, simply open the CRU folder and run reset-all.exe, followed by restart64.exe to restore the default settings.
If you want to delete CRU completely from your PC, simply delete the CRU folder and reboot your PC normally.
Wrapping Up!
That’s all about how to set up and use Custom Resolution Utility on your Windows-based laptop or PC. Custom Resolution Utility allows you to add custom resolutions and refresh rates that are supported by your monitor and graphics card.
Always select the correct display, stay within your hardware’s limits, and test one change at a time. After saving a new resolution, run restart64.exe and select the added display mode through Windows settings.
For a full-screen stretched resolution, enable GPU scaling and choose the Full Panel scaling mode in your graphics settings. Once all set, select that resolution in your game and enjoy your custom resolutions with a wider viewing experience. If you come across flickering, a black screen, or signal problems, use reset-all.exe followed by restart64.exe to restore the default settings.